Navigate through cameras. Search for a camera (Android, iOS)
In the Cameras section, the mobile app user can access all the video surveillance cameras available to them. The cameras are grouped according to various criteria on the following tabs: All cameras, Favorites, Camera groups, Layouts. If there are intercom cameras available to the user, they can find them in the Devices > Intercoms tab for a quicker access. For details, refer to Intercom documentation section.
The Cameras section
The Cameras section lists all the cameras available to the current user. For navigation through cameras on the All cameras, Cameras groups, and Layouts tabs, the user can select the tile or list view. For details, see the Tile or list view of cameras on tabs article.
For a quicker navigation:
Bridge cameras are identified with a special icon
 .
. Cameras that are added to favorites are identified with a star icon.
Intercom cameras are identified with a special icon
.png?inst-v=b63742cc-00c9-4c22-96cb-e64d375db7d7) .
. Agent-integrated cameras are identified with this icon
 .
.
To update the list of cameras, the user can swipe down from the top of the screen.
To find a relevant camera, the user will use on the options listed below.
The search field
The search field is available at the top of all tabs of the Cameras sections. The search is performed across all cameras all the cameras, regardless of which tab is open in the Cameras sections during the search. Find a camera by entering its name or address. Cameras are auto-searched as you type.
To cancel the search, select Cancel. The search history keeps the last five search requests.
.png?inst-v=b63742cc-00c9-4c22-96cb-e64d375db7d7)
The search field
The All cameras tab
The All cameras tab displays the cameras that are grouped according to the address structure set in the video surveillance.
To find a camera on the All cameras tab, follow the steps:
Select a relevant address and tap the Expand icon to get the list of cameras nested at this address. Tapping the location name opens the player and automatically displays the stream from the first available (unblocked) camera at this address.
To view a camera in the player, tap the camera.
From within the player on All cameras, the user can swipe horizontally to view other cameras within the same address. For this, use one of the options:
In the player of the selected camera, select a camera by swiping horizontally on its view. The current view (either Live or Archive) will stay the same. In Live mode: the user won't see video feeds for inactive or locked cameras as they swipe. The system will keep the Live setting and show video from the next available camera. In Archive mode: when viewing the recorded footage of one camera and the next camera in the sequence doesn't have any archive available, the user will automatically see its live video feed instead. Importantly, cameras that are inactive or blocked will remain in the archive view without playing any video. However, the system will still remember the archive time the user was at, so when they move to the next available camera with an archive, it will maintain the place in time.
Return to the list of cameras of the selected address and choose a camera.
.png?inst-v=b63742cc-00c9-4c22-96cb-e64d375db7d7)
The All cameras tab
The Favorites tab
The Favorite tab lists the cameras that the current user marked as favorite. To view a camera in the player, tap the camera.
.png?inst-v=b63742cc-00c9-4c22-96cb-e64d375db7d7)
The Favorites tab
The Camera groups tab
The Camera groups tab displays the cameras grouped by the current user according to various criteria, such as location, for example.
To find a camera on the tab, follow the steps:
Select a camera group and tap the Expand icon to get the list of cameras nested in this group. Tapping the group name opens the player and automatically displays the stream from the first available (unblocked) camera in this group.
To view a camera in the player, tap the camera.
From within the player on Camera groups, the user can swipe horizontally to view other cameras within the same group. For this, use one of the options:
In the player of the selected camera, select a camera by swiping horizontally on its view. The current view (either Live or Archive) will stay the same. In Live mode: the user won't see video feeds for inactive or locked cameras as they swipe. The system will keep the Live setting and show video from the next available camera. In Archive mode: when viewing the recorded footage of one camera and the next camera in the sequence doesn't have any archive available, the user will automatically see its live video feed instead. Importantly, cameras that are inactive or blocked will remain in the archive view without playing any video. However, the system will still remember the archive time the user was at, so when they move to the next available camera with an archive, it will maintain the place in time.
Return to the list of cameras of the selected group and choose a camera.
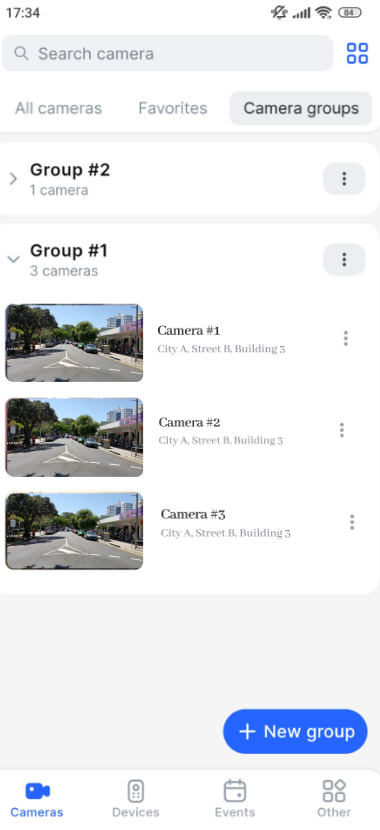
The Camera groups tab
The Layouts tab
The user can easily arrange your video cameras into a custom layout within the mobile app. This option is on the Layouts tab, which is located in the Cameras section. What's even more convenient is that users can also adjust the layout directly while watching the live video feed in the player. For a complete guide on setting up layouts and viewing cameras within them, refer to the Layouts section of our documentation.