View cameras in a layout
In a layout, you can watch camera video in the following modes:
Live stream mode – select the Live button.
Archive mode – select the Archive button.
The management tools set depends on the selected mode.
In both modes, the top-right section of the layout provides the controls that apply to all cameras within the layout.
The Save button – is active only while editing the layout.
The button
.png?inst-v=b63742cc-00c9-4c22-96cb-e64d375db7d7) to simultaneously adjust all camera images to fit their cells.
to simultaneously adjust all camera images to fit their cells.The button
to simultaneously display or hide the names and addresses of all cameras in the current layout.
The button to view the layout full screen.
The mode selection buttons: Archive and Live.
.png?inst-v=b63742cc-00c9-4c22-96cb-e64d375db7d7)
The controls that apply to all cameras within the layout
Live mode
If it is an intercom camera that has the set limitations for viewing video in Live and Archive modes (for more details, see the View and edit an intercom section > the General data tab), the following will be available to view:
When a call is missed: 15 seconds before the call and 30 seconds after.
When a call is answered: 15 seconds before the call was answered and during the call.
.png?inst-v=b63742cc-00c9-4c22-96cb-e64d375db7d7)
Live
The default quality of video in a layout. By default, the video quality you see depends on how you arrange your cameras in the layout. If you place a camera in a large layout cell, the video will play in HD quality (if available). If it's in a small cell, it will play in SD quality. This viewing mode is designed for the following layouts:

In Live mode, the following options are available:
View the name and address of the camera. Select the camera name to show or hide it.
To delete a camera from the layout, select the Crossed icon X in the upper left corner of the image. However, you can’t delete a camera from a layout when playing video full screen.
Digital zoom of a camera video in its designated sell. To zoom, select the relevant zoom icon in the camera cell and adjust the image scale. Hover over the zoom slider and use your mouse wheel for fine-tuned adjustments. If the slider isn't in focus, simply hold CTRL and use your mouse wheel for rapid zoom changes.
Take a screenshot of a camera image and save it in PNG.
Change a stream quality for an individual camera.
For PTZ cameras, manage the pan, tilt, and zoom of a selected camera.
For cameras supporting audio, turn on and off audio of a selected camera.
View full-screen video feeds of individual or all cameras in the layout.
Simultaneously adjust all camera images to fit their cells or only for a selected camera.
Download an archive of a selected camera. For details, see the View video in the player article.
The mode selection buttons: Archive and Live.
Archive viewing is limited to simultaneous playback of recordings from no more than six cameras in a layout. If you attempt to open the archive from a Live layout with more than six cameras, you’ll be redirected to a page where you need to select up to six cameras for further viewing in the archive.
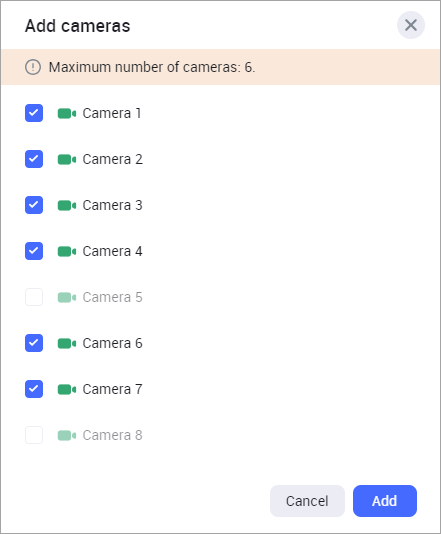
Selecting cameras to view in Archive
Archive mode
In Archive mode, the following options are available:
View the name and address of the camera. Select the camera name to show or hide it.
To delete a camera from the layout, select the Crossed icon X in the upper left corner of the image. However, you can’t delete a camera from a layout when playing video full screen.
Digital zoom of a camera video in its designated sell. To zoom, select the relevant zoom icon in the camera cell and adjust the image scale. Hover over the zoom slider and use your mouse wheel for fine-tuned adjustments. If the slider isn't in focus, simply hold CTRL and use your mouse wheel for rapid zoom changes.
Take a screenshot of a camera image and save it in PNG.
View full-screen video feeds of individual or all cameras in the layout.
For cameras supporting audio, turn on and off audio of a selected camera.
Control the viewing time for each camera individually and for all cameras simultaneously.
Manage the display of the analytics events and the events received from cameras via ONVIF and SMTP protocols, directly on the timeline.
Add and manage custom events and their marks on the timeline.
Download archive segments for an individual camera. To proceed, select the
 icon of the relevant camera and Download. For details, refer to the View video in the player documentation section.
Download archive segments for all cameras in a layout simultaneously. The file creation process is similar to what's described the View video in the player documentation section. However, MP4 and ZIP files are generated separately for each camera.
Simultaneously adjust all camera images to fit their cells or only for a selected camera. For this, use the
 icon either at the top of the layout or for an individual camera.
Adjust the playback speed for a selected camera.
If it is an intercom camera that has the set limitations for viewing video in live and archive modes (for more details, see the View and edit an intercom section > the General data tab), the following will be available to view:
When a call is missed: 15 seconds before the call and 30 seconds after.
When a call is answered: 15 seconds before the call was answered and during the call.
.png?inst-v=b63742cc-00c9-4c22-96cb-e64d375db7d7)
The Archive tab
Control the viewing time
The timeline of each camera is located at the bottom of the workspace. Adjustment of time on them depends on the Asynchronous control toggle.
When the Asynchronous control toggle is enabled, you can set the time to view for each camera independently of other cameras by dragging the toggle for a relevant timeline.
Each timeline features:
Time scale divisions: This refers to the markings or segments on a timeline that represent specific units of time, such as seconds, minutes, hours, or days. Scale detail is adjusted using the slider on the right
 or the mouse wheel. This is applicable both to individual timelines and to the general timeline
Date and time.
.png?inst-v=b63742cc-00c9-4c22-96cb-e64d375db7d7)
The Asynchronous control toggle is enabled
When the Asynchronous control toggle is disabled, all timelines are adjusted simultaneously. Consequently, the same date and time for archive viewing is set for all cameras. This displays only the overall timeline and the overall date and time of the viewing.
.png?inst-v=b63742cc-00c9-4c22-96cb-e64d375db7d7)
The Asynchronous control is disabled
Each camera cell features an individual camera timeline. Hover over the cell to activate the timeline.
The Asynchronous control toggle will be enabled if you change the viewing time on an individual timeline for a camera.
Archived video sections on the timeline (both on individual and general) are indicated with light bars. Conversely, a dark section means there's no archive for that particular moment.
.png?inst-v=b63742cc-00c9-4c22-96cb-e64d375db7d7)
Archived video
The display of archive segments on the timeline player depends on whether the archive recording is made from a low-quality or high-quality stream, and on the stream quality setting selected in the player: SD, HD, or HD/SD.
When an archive is recorded solely from a low-quality camera stream, only SD quality will be available for playback. Consequently, the timeline will exclusively display those archive segments that were recorded in low quality. Similarly, if the archive is recorded only from a high-quality stream, then HD quality will be the sole option in the player. The timeline will then display only those archive segments captured in high quality.
When there are recordings available both from the HD and SD camera streams – the HD/SD selector is available. The HD/SD viewing mode visually indicates the presence of archived recordings for both HD and SD camera streams directly on the timeline. For optimal viewing, the player is configured to automatically select and display the HD stream by default when the recording exists in both formats and overlap in time, eliminating the need for manual user switching.
If you switch the quality from HD/SD to either SD or HD at a point in time where the corresponding quality archive isn't available, the video player will display a message like “Archive not available at this point”. You'll also see the buttons to navigate to the previous and next available archive segments.
Download archives from the cameras in the layout
You can download up to 2 hours of archive footage in a single file.
If it is an intercom camera that has the set by the admin limitations for viewing video in live and archive modes (for more details, see View and edit an intercom section > the General data tab), the following will be available to view:
When a call is missed: 15 seconds before the call and 30 seconds after.
When a call is answered: 15 seconds before the call was answered and during the call.
Downloading of archive segments for all cameras in a layout simultaneously. This depends on the selected quality – SD, HD or HS/SD. The downloaded file creation process is similar to what's described the View video in the player documentation section. However, MP4 and ZIP files are generated separately for each camera.
To start downloading an archive, at the right-bottom of the layout select the icon.
.png?inst-v=b63742cc-00c9-4c22-96cb-e64d375db7d7)
In the Select cameras drop-down, select cameras to download archive from. Set up the date and time for the video period. Next, select Download archive. The following message will inform you on the start of archive generation.
.png?inst-v=b63742cc-00c9-4c22-96cb-e64d375db7d7)
Once archive is ready, you’ll see the following message that includes the link to the archived file. Select the link to download to your device
.png?inst-v=b63742cc-00c9-4c22-96cb-e64d375db7d7)
The generated files are available for download in the Video recordings section. The files are stored for 240 minutes from the time of creation, after which they are deleted. Additionally, when storage is filled to more than 80%, automatic deletion of the five oldest archives is performed.
File name generation
The title for the .mp4 file is generated according to the following rule: <address>_<camera name>_<start date>_<end date>
For example: Westave,17а_entrance2_20240716-100055_20240716-100255.mp4
Definitions for each component:
Address: A concise camera location, potentially including up to three levels from the location tree, starting with the most specific.
Camera name: The specific name of the camera.
Start date: The date and time when the recording began, formatted as YYYYMMDD_HHMMSS in the user's timezone.
End date: The date and time when the recording ended, formatted as YYYYMMDD_HHMMSS in the user's timezone.
File name length limitation
When downloading, the file name is generated automatically, taking into account the technical limitations of web browsers.
Most modern browsers support file names up to 255 bytes in length. This limit applies to bytes, not the number of characters. In character encodings, Cyrillic characters typically require 3 bytes per character, while Latin characters require only 1 byte. Due to the larger byte size of Cyrillic characters, the resulting file name may exceed the allowed limit. In such cases, the browser will automatically truncate the name from the end, potentially omitting information such as the camera name, recording date, or time.
View Analytics events and ONVIF events
You can enable the display of Analytics events and events that are received from cameras via ONVIF and SMTP protocols.
By default, this view is enabled.
You can enable event display for all selected cameras simultaneously or for each camera individually.
Select the Settings button to enable display of the marks for analytics events on the timeline.
To enable simultaneous event display for all cameras, follow these steps:
Select Settings.
In the subsections, choose the checkboxes of relevant events to display on the timeline:
ONVIF events – includes events that are received from cameras via ONVIF and SMTP protocols.
Analytics events – includes the Analytics events.
.png?inst-v=b63742cc-00c9-4c22-96cb-e64d375db7d7)
Selected events for display
The event marks will be displayed on the timeline immediately after their selection.
To enable event display for a specific camera, follow these steps:
On the general timeline, hover over the camera name and select the horizontal ellipses icon (…)
In the subsections, choose the checkboxes of relevant events to display on the timeline:
ONVIF events – includes events that are received from cameras via ONVIF and SMTP protocols.
Analytics events – includes the Analytics events.
.png?inst-v=b63742cc-00c9-4c22-96cb-e64d375db7d7)
Events selection for an individual camera
The event marks will be displayed on the timeline immediately after they are selected. At the same time, events differ in color depending on the analytic types.

Event marks on the timeline
For a detailed view of individual event types, expand the camera's timeline.

Detailed display of events
View and add custom events
While watching your camera feed, you can manually create a custom event. This will place a marker directly on your video timeline and the event will also be saved in the Events section, under User events.
For details on how to add, edit, and delete custom events, refer to the View video in the player.
.png?inst-v=b63742cc-00c9-4c22-96cb-e64d375db7d7)
The event preview
Custom events are added solely to individual cameras. As a result, their markers display on each camera's dedicated timeline, but not on the general timeline.
To add a custom event for an individual camera, use one of the options:
In the camera cell, select the horizontal ellipses icon (…) and from the context menu, select Add event.
Hover your mouse over the relevant time on the timeline and right-click. This will bring up the event creation form. Complete the form and Add event.
To quickly create a custom event, place a slider to a relevant time on the timeline and select the + icon at tthe right bottom on the timeline.
При этом метки пользовательских событий отображаются только на индивидуальных таймлайнах камер. На общем таймлайне пользовательские события не отображаются.
In the camera player, select the horizontal ellipses icon (…) to call out the context menu.
Select Add mark.
Complete the opened form.
When you hove over the event mark, you can preview the event, edit, and delete this event.
To view an event in the player, select the mark on the timeline.