View video in the player
Please take into consideration that the intercom can be set up in a different time zone. This affects the date and time when you view live streams or archived footage, as well as when you export the archive. For details, see the Coordinated Universal Time (UTC) section.
If it is an intercom camera that has the set limitations for viewing video in live and archive modes (for more details, see the View and edit an intercom section > the General data tab), the following will be available to view:
When a call is missed: 15 seconds before the call and 30 seconds after.
When a call is answered: 15 seconds before the call was answered and during the call.
A camera with an archive feature allows for viewing video in archive irrespective of the camera’s streaming status. The available archive range is limited by the storage time allocated to that particular camera.
The player features the following functions:
View live stream from the camera.
View and export archives (if archive is enabled).
Capture screenshots.
Enable/disable audio (if supported).
PTZ camera control (if supported).
Turn on/off full-screen mode.
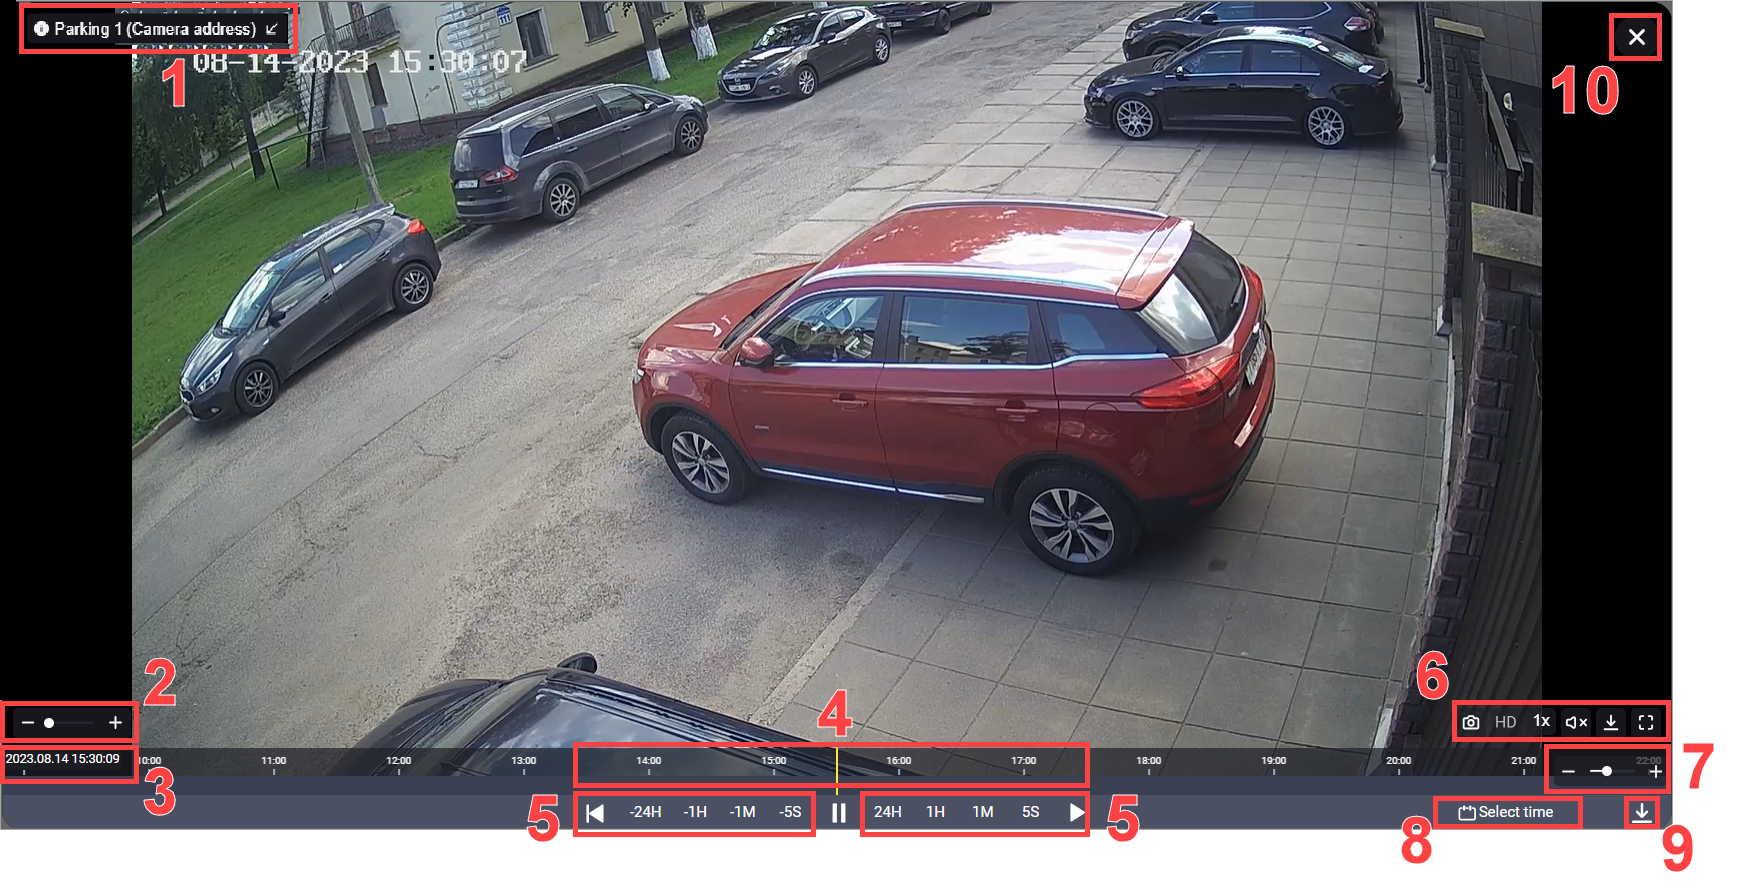
Select a camera from the list to view its feed. You can manage the view with the player controls.

Viewing the camera feed. The video player controls
Additional parameters such as date and time, ambient temperature, and so on, may be displayed on the screen, depending on the camera model and settings..
You can perform the following actions with the player controls:
1. A camera name. Select the camera name to hide/show it.
2. Zoom in/out. Use the slider to zoom in/out the feed.
3. The date and time of the displayed feed. When in archive, it shows the date and time at the moment of viewing.
4. The timeline. Use the timeline to navigate in the archive. On the timeline, you can also track time markers and events. Hover over the timeline, press and hold the left mouse button, then slide to the right or left to explore the archive.
5. Rewind backward or fast-forward by a selected time interval. Selecting a time interval, the player will move backward or forward by that amount of time.

Rewind backward or fast-forward
6. The set of functions. The functions may vary depending on the camera model.
 | Save a screenshot as a PNG file. |
 | Indicates the selected video stream quality. Selecting the stream quality button will change the stream quality. Changing a stream quality is possible only when two video streams are available: HD (high definition) and SD (standard definition). When in archive, the HD setting is applied automatically. The SD stream selection isn’t available. When you navigate back to a live stream from an archive, the stream quality will automatically revert to the original setting that was in place before you accessed the archive. |
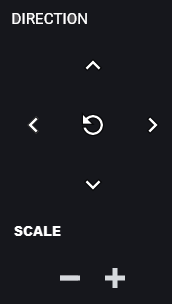
 | Control the camera's lens direction and optical zoom. This function is only available for PTZ cameras. Clicking it displays an additional panel for camera control. |
 | Playback speed. Displayed when viewing the archive. Available values: 1x, 5x, 10x. |
 | Enable/disable audio. This function is only available for cameras with audio recording support. |
 | Download the archive. Description is provided below. |
 | View feed in full-screen mode. |
When the PTZ control function is enabled, an additional control panel is displayed.

The PTZ camera control panel
Select a direction button to change the lens position. To zoom in/out, select “+” and “-” accordingly.
To return to the default lens position and zoom, press the Default button in the center.
In some cases, there might be a delay in the camera control.
We recommend selecting the direction or zoom buttons once and wait for the camera's response.
7. Adjust the level of detail on a timeline’s timescale. Use the slider to increase/decrease the timeline's detail of the timescale. Alternatively, you can hover over the timeline and scroll the mouse wheel up to increase detail, and down to decrease detail.
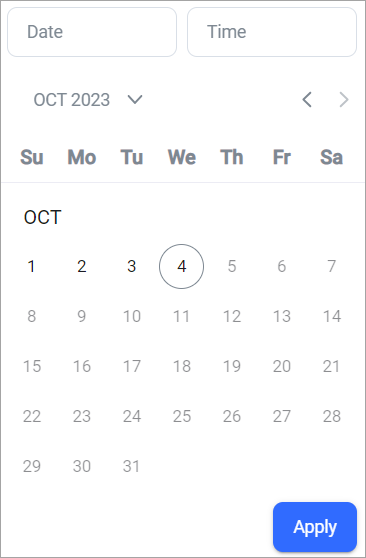
8. Choose the date and time to view the archive feed. In the calendar, select the date and time to view the archive.
Pick a year, month, and day, specify the time, and select Apply. You can select only the dates with the recorded archive.

Select date and time for viewing
9. Download the archive. This option enables you to download the archive of the current camera for a specified date and time.
You can only download a file that contains up to two hours of archived data.
If it is an intercom camera that has the set limitations for viewing video in live and archive modes (for more details, see the View and edit an intercom section > the General data tab), the following will be available to view:
When a call is missed: 15 seconds before the call and 30 seconds after.
When a call is answered: 15 seconds before the call was answered and during the call.
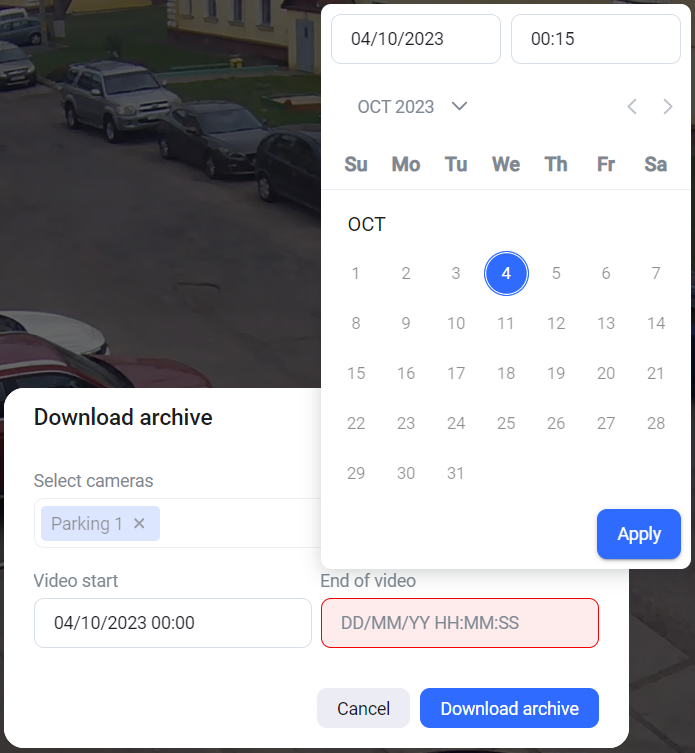
Selecting the button displays a date and time selection form:

Select the period to download the archive
Select Download archive.
When the archive generation is completed, a pop-up notification appears on the screen. Select the link to download the generated archive.

A notification
The generated files are available for download in the Video recordings section. The files are stored for 240 minutes from the time of creation, after which they are deleted. Additionally, when storage is filled to more than 80%, automatic deletion of the five oldest archives is performed.
