The Cameras subsection
In the Cameras subsection, the user can find the list of available to them cameras. They can quickly open a camera on the map or plans for monitoring or management.
The list of the following tools is available in the Cameras section:
.png?inst-v=b63742cc-00c9-4c22-96cb-e64d375db7d7)
The Cameras subsection
View and refresh the list of cameras
To view the latest camera list in the Cameras section, select the Refresh icon. This enables the system to receive the latest data about the available cameras.
.png?inst-v=b63742cc-00c9-4c22-96cb-e64d375db7d7)
The Refresh icon
For a faster navigation:
Cameras, associated with a bridge device, are identified with this
 icon.
icon.Cameras that have an integrated Agent software are identified with this
.png?inst-v=b63742cc-00c9-4c22-96cb-e64d375db7d7) icon.
icon.
Add a camera to the map
Cameras can be added to the map both by the administrators from their interface and users. You can add the cameras to the map only if they aren’t on the map yet.
The user can add and delete cameras from the map if they have relevant permissions Cameras > Adding a camera to the map. The administrator grants this permission.
You can add a camera to the map in one of the following ways:
Drag a camera from the list to the map.
Select a relevant action from the camera context menu.
Drag a camera to the map
To add a camera to the map, follow the steps:
Open the map in the Map subsection and select a location on the map, where you’ll place the camera.
From the Cameras list, left-click a relevant camera and drag to the map. The icon of this camera will be displayed on the map. In the camera preview window, you can find the camera management options. For details about how to manage the camera on the map, see the Map documentation section.
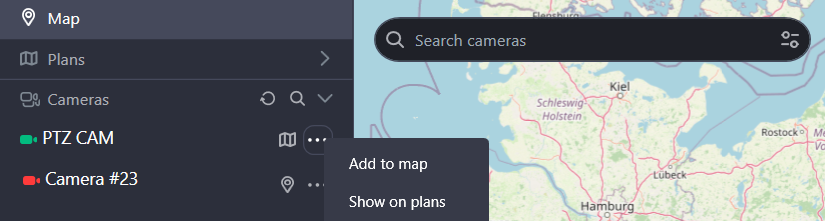
Select a relevant action from the camera context menu
To add a camera to the map, follow these steps:
Expand the Cameras section and select the context menu icon (…) of a camera.
Select Add to map.
Adding a camera to the map
In the opened window, specify the camera geographic coordinates or point its location on the map.
To complete the action, select Add camera.
The camera icon will be added to the map. In the camera preview window, you can find the camera management options. For details about how to manage the camera on the map, see the Map documentation section.
Reposition a camera on the map
To reposition a camera on the map, follow the steps:
Expand the Cameras section and select the context menu icon (…) of a camera.
From the opened menu, select Change position on map. This action is available for cameras that are added to the map.
Optionally, you can also reposition a camera from within a map. For this, on the map, select the camera icon of a relevant camera. From the preview window of this camera, select the horizontal ellipses icon (…) to call out the menu. From the menu, select Change position on map.
.png?inst-v=b63742cc-00c9-4c22-96cb-e64d375db7d7)
Repositioning a camera on the map
In the opened window, specify new geographic coordinates or drag the map to a relevant location.
Select Save to complete the action.
Delete a camera from the map
The user can add and delete cameras from the map if they have relevant permissions Cameras > Adding a camera to the map. The administrator grants this permission.
Users can only delete cameras they've added.
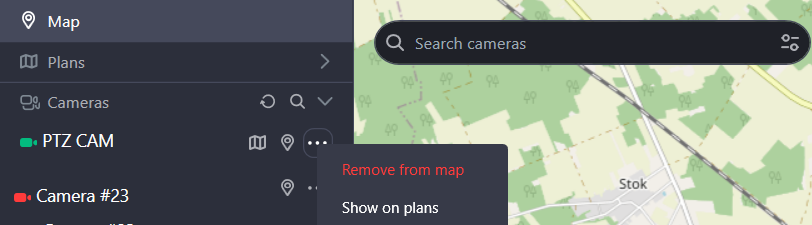
To delete a camera from the map, follow the steps:
Expand the Cameras section and select the context menu icon (…) of a camera.
Select Remove from map.
Removing a camera from the map
Confirm the action by selecting Remove. To cancel the action, select cancel.
Show a camera on the map
You can select to view a camera on the map only if this camera is added to the map. To show a camera on the map, select the geolocation icon (Shown on the map) of the relevant camera. As a result, you’ll see a camera icon in the exact location on the map.
In the camera preview window, you can find the camera management options. For details about how to manage the camera on the map, see the Map documentation section.
Show a camera on the plan
A Plan icon is displayed for the cameras that are added to a plan. To show a camera on a plan, select the Plan icon of a relevant camera. When you select the icon, you’ll navigate to the Plans section with the list of the plans where this camera is added. The plan list name is identical to the selected camera name. To open a plan and view the camera, select the plan. On the opened plan, you can view and manage cameras that are added to this plan. For details about how to manage plans, see the Plans documentation section. To return to the selected camera on the map, select the Return icon (←).
.png?inst-v=b63742cc-00c9-4c22-96cb-e64d375db7d7)
The list of plans