View cameras in a layout
In a layout, you can watch camera video in the following modes:
Live stream mode – select the Live button.
Archive mode – select the Archive button.
The management tools set depends on the selected mode.
In both modes, the top-right section of the layout provides the controls that apply to all cameras within the layout.
The button
.png?inst-v=b63742cc-00c9-4c22-96cb-e64d375db7d7) to simultaneously adjust all camera images to fit their cells.
to simultaneously adjust all camera images to fit their cells.The button to view the layout full screen.
The mode selection buttons: Archive and Live.
.png?inst-v=b63742cc-00c9-4c22-96cb-e64d375db7d7)
The controls that apply to all cameras within the layout
Live mode
If it is an intercom camera that has the set limitations for viewing video in Live and Archive modes (for more details, see the View and edit an intercom section > the General data tab), the following will be available to view:
When a call is missed: 15 seconds before the call and 30 seconds after.
When a call is answered: 15 seconds before the call was answered and during the call.
In Live mode, the following options are available:
.png?inst-v=b63742cc-00c9-4c22-96cb-e64d375db7d7)
Live mode
View the name and address of the camera. Select the camera name to show or hide it.
Digital zoom of a camera stream in its sell. To zoom, select the relevant zoom icon in the camera cell and adjust the image scale.
Take a screenshot of a camera image and save it in PNG.
Change a stream quality.
For PTZ cameras, manage the pan, tilt, and zoom of a selected camera.
For cameras supporting audio, turn on and off audio of a selected camera.
View full-screen video feeds of individual or all cameras in the layout.
Simultaneously adjust all camera images to fit their cells or only for a selected camera.
Download an archive of a selected camera. For details, see the View video in the player article.
The mode selection buttons: Archive and Live.
Archive viewing is limited to simultaneous playback of recordings from no more than six cameras in a layout. If you attempt to open the archive from a layout with more than six cameras, you’ll be redirected to a page where you need to select no more than six cameras for further viewing in the archive.
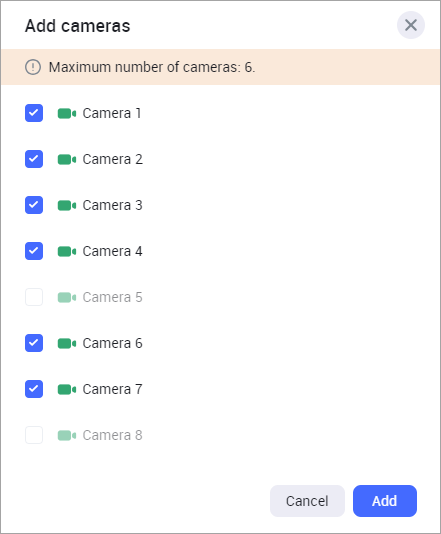
Selecting cameras to view in Archive
Archive mode
In Archive mode, the following options are available:
Control the viewing time for each camera individually and for all cameras simultaneously.
View analytics events.
View user events and create time marks for user events.
Download archives for several cameras simultaneously or for individual cameras.
Simultaneously adjust all camera images to fit their cells or only for a selected camera.
Adjust the playback speed for a selected camera.
If it is an intercom camera that has the set limitations for viewing video in live and archive modes (for more details, see the View and edit an intercom section > the General data tab), the following will be available to view:
When a call is missed: 15 seconds before the call and 30 seconds after.
When a call is answered: 15 seconds before the call was answered and during the call.
.png?inst-v=b63742cc-00c9-4c22-96cb-e64d375db7d7)
The layout in Archive mode
Control the viewing time
The timeline of each camera is located at the bottom of the workspace. Adjustment of time on them depends on the Asynchronous control toggle.
When the Asynchronous control toggle is enabled, you can set the time to view for each camera independently of other cameras.
Each timeline features:
Time scale divisions: This refers to the markings or segments on a timeline that represent specific units of time, such as seconds, minutes, hours, or days. Scale detail is adjusted using the slider on the right or the mouse wheel.
Date and time.

The Asynchronous control toggle is enabled
When the Asynchronous control toggle is disabled, all timelines are adjusted simultaneously. Consequently, the same date and time for archive viewing is set for all cameras. This displays only the overall timeline and the overall date and time of the viewing.

Asynchronous control disabled
Each camera cell features an individual camera timeline. Hover over the cell to activate the timeline.
The Asynchronous control toggle will be enabled if you change the viewing time on an individual timeline for a camera.
View an Analytics event
Select the Settings button to enable display of the marks for analytics events on the timeline.
The Settings button becomes available when at least one camera in the current layout has Analytics enabled.
You can enable event display for all selected cameras simultaneously or for each camera individually.
To enable simultaneous event display for all cameras, follow these steps:
Select Settings > Select events.
Select the checkboxes of events you want to display.
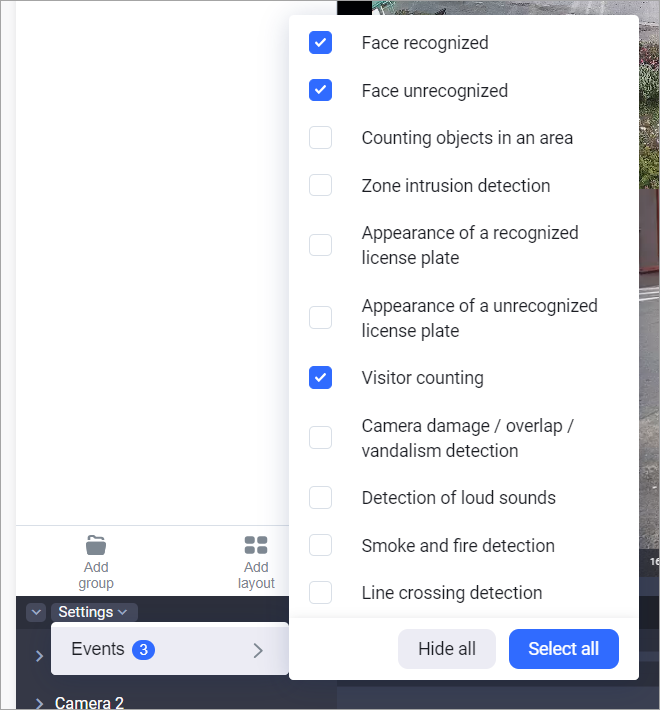
Selecting analytics events for all cameras
The event marks will be displayed on the timeline immediately after their selection.
To enable event display for a specific camera, follow these steps:
Hover over the camera name and select the horizontal ellipses icon (…)
Select Events.
Select the checkboxes of events you want to display.
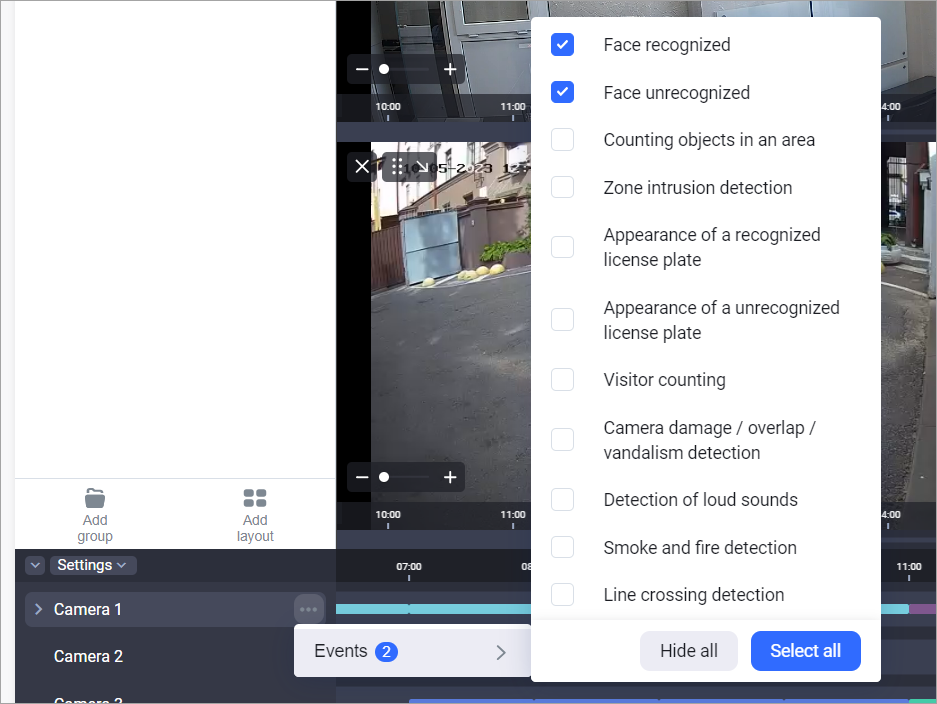
Selecting analytics events for a specific camera
The event marks will be displayed on the timeline immediately after they are selected. At the same time, events differ in colour depending on the analytic types.

Event marks on the timeline
For a detailed view of individual event types, expand the camera's timeline.

Detailed display of events
View and add custom events
You can add user events and create custom marks on the timeline for an individual camera.
User events can only be set in Archive mode.
Marks for user events are set for each camera separately.
To add a custom mark for a user event, follow these steps:
In the camera player, select the horizontal ellipses icon (…) to call out the context menu.
Select Add mark.
.png?inst-v=b63742cc-00c9-4c22-96cb-e64d375db7d7)
Add a user event mark
Complete the opened form.
.png?inst-v=b63742cc-00c9-4c22-96cb-e64d375db7d7)
The event marker is displayed on the timeline of the camera where it was associated.
When you hove over the event mark, you can preview the event, edit, and delete this event.
To view an event in the player, select the mark on the timeline.
.png?inst-v=b63742cc-00c9-4c22-96cb-e64d375db7d7)
Edit a user event
To edit a user event, hover over the event mark on the camera timeline. In the preview window, select the horizontal ellipses icon (…) to call out the context menu. In the opened menu, select Edit mark.
In the opened form, you can edit the following:
The label name
The start and end date and time of the event label
Select Save mark to save introduced changes.
Delete a user event
To delete a user event, hover over the event mark on the camera timeline. In the preview window, select the horizontal ellipses icon (…) to call out the context menu. In the opened menu, select Delete mark.
Confirm the action.