Downloads in the Desktop client
The Downloads section consists of two tabs:
Generated files. Contains the video files that were generated from within a camera player when saving an archive segment.
Downloaded files. Contains the video files are currently being downloaded and the files that are already downloaded to a local device.
The Generated files tab
On the Generated files tab, you can find the generated files that are saved in the system cloud storage.
.png?inst-v=b63742cc-00c9-4c22-96cb-e64d375db7d7)
The Generated files tab
The following details are displayed for each file:
A file checkbox.
Creation date: the date and time when a file was generated.
Name: a file name that contains a camera address and its name.
Cameras: a camera name is displayed.
Time: the starting date and time of the video recording.
Duration: the duration of the recording.
Under the Link to archive, you can track the following statuses of the file:
In process means that the file is being generated. This status is also displayed when the Reload option was selected.
Download means the file is generated, and can be downloaded to the local device.
Reload means that the link to download a file is expired. Another generating session is required.
Failed to load means the link to a generated file is unavailable.
The Delete button.
Generated files are temporarily stored in cloud storage and are accessible for download for a period of three hours. Upon the expiration of this three-hour window, the file will be automatically and permanently deleted. To download the file again after deletion, it must be regenerated.
Filters
To quickly search for files, the following filters are available:
By a set date range (the Range filter)
Today
For 24 hours
For 7 days
For 30 days
For 365 days
Select a period
By a file status (the All files filter)
All files
In process
Download/reload
Failed to load
Filtering is automatically applied.
Download a file
Files with the Download status can be downloaded. Multiple files can be downloaded simultaneously. The downloaded files can be found both on the local device and on the Downloaded files tab. The downloaded files in the Downloaded files tab can be forwarded to the Archive manager section for further editing in the video editor.
There are various ways to download files.
Option #1
Hover over the relevant line and right-click to call out the context menu and select one of the options:
Download in MP4 to download a recording to a file in MP4 format.
Download in ZIP archive to download the selected file archived in a ZIP folder.
Download in ZIP archive with password – you can download your selected file as a password-protected ZIP archive. Set a password for the file. This option encrypts the file within a ZIP folder, requiring a password to access its contents.
To save downloaded files to a specific location, you can define a directory within program settings. If you don't specify a directory, you'll be prompted to select one manually before the download starts.
Option #2
For the selected file, choose the Download expand button under Link to archive. From the listed options, select the relevant one.
Option #3
This option allows you to download multiple files simultaneously. To do so, check the boxes of relevant files. The download drop-down will then appear in the top-left bar.
.png?inst-v=b63742cc-00c9-4c22-96cb-e64d375db7d7)
Download multiple files simultaneously
From the drop-down, select the relevant option to download files:
Download in MP4 to download a recording to a file in MP4 format.
Download in ZIP archive to download the selected file archived in a ZIP folder.
Download in ZIP archive with password – you can download your selected file as a password-protected ZIP archive. This option encrypts the file within a ZIP folder, requiring a password to access its contents. Set a password for the file in the opened form.
When you select multiple files for download to password-protected ZIP archives, the same password will be applied to all of them.
Once the password is ready, select Download file. To cancel the action, select Cancel.
.png?inst-v=b63742cc-00c9-4c22-96cb-e64d375db7d7)
Creating a password
As a result, the selected files will be downloaded to the specified location.
When the download process is in progress, you’ll see a notification. Select Show to navigate to the Downloaded files section.
.png?inst-v=b63742cc-00c9-4c22-96cb-e64d375db7d7)
The Show button
Upon download completion, you’ll see the following message. Select Show in Folder to navigate to the file location.

Show in folder
The Downloaded files tab
In the Downloaded files tab, you find the list of the files that were downloaded to the local device. These files can be directly send to the Archive manager tab for further video editing.
The following details and actions are available for each file:
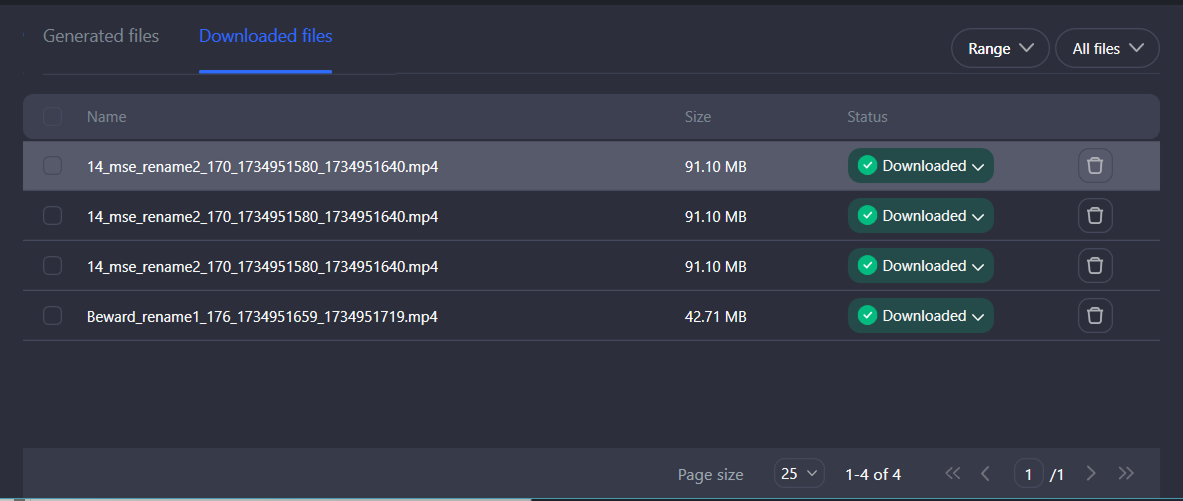
The Downloaded files tab
A file checkbox.
Under Name, you find a file name that contains a camera address, its name, the archive date and start time.
Under Size, the size of a file is specified. During downloading, the progress bar is displayed.
Under Status, you can track the following file statuses:
In process means that the file is being downloaded. The download progress is displayed through a progress bar, indicating the percentage completed. A cancel option, represented by a crossed icon, is also available during the download.
Downloaded means the file is downloaded to the local device. For the file with this status, the following action options are available. Show in folder opens a folder with the downloaded file. Send to manager forwards the file to the Archive manager section for further editing in the video editor. This option can be temporarily unavailable while files are being exported from within the Archive manager. Wait for the current export process to complete.
Cancelled means the download process was cancelled. No more additional actions are available from here. To repeat the download of the file, return to the Generated files tab and repeat the download process.
Download error means there was an issue while downloading a file. No more additional actions are available from here. To repeat the download of the file, return to the Generated files tab and repeat the download process.
File is not available means the file was deleted from the local device.
The Delete button.
Send to manager
The Send to manager option is available for files with the Downloaded status. Selecting this action forwards the file to the Archive manager section for further editing in the video editor.
Each time you send files to the Archive manager section, a new project is created. To add files to an existing project, navigate to the Archive manager section, where add files to the relevant project. For detailed steps on how to upload files to the existing project, see the Add files to the project article.
When sending files to the Archive manager, pay attention to the following details:
The maximum total video duration allowed for a single project is 60 hours.
Each individual cell in the editor can hold a maximum of 10 hours of video.
A maximum of 6 cells is available in a layout.
Only MP4 files are accepted.
Each individual video file can’t exceed 1 hour in length.
This option can be temporarily unavailable while files are being exported from within the Archive manager. Wait for the current export process to complete.
To send files to the Archive manager, follow the steps:
Select files to send in one of the following ways:
Select the checkboxes for relevant files and choose Send to manager at the top left.
To send an individual file, expand a context menu of the file status and Send to manager.
.png?inst-v=b63742cc-00c9-4c22-96cb-e64d375db7d7)
Send to manager
In the opened Create project window, enter a name for a new project. Allowed characters: Cyrillic, Latin, numbers, hyphen, special characters !@#$%^&*()[]{}<>_- and their combinations. Maximum name length - 50 characters. If required, edit the list of files.
Select Add project to complete the action. To cancel the action, select Cancel.
Once the project is created, you’ll automatically navigate to the Archive manager section directly into the newly created project.
When sending 6 or fewer files, the editor will open a layout optimized for the number of files. For more than 6 files, the system fills the editor layout cells as follows: the first cell is filled up to its maximum capacity of 10 hours. Subsequent cells are filled in order until all files are placed. If all 6 cells are occupied, adding more files becomes impossible. For details on how to work with video, see the Archive manager documentation section.
Delete a file
On each tab, you can delete a file in one of the following ways.
Via the context menu
To delete a file, right-click the relevant file. From the opened context menu, select the Remove option. Confirm the action.
Via the Remove icon
Select the Remove (bin) icon for the relevant file and confirm the action. The button isn’t available on the Downloaded files tab for the files being downloaded.
Multiple files deletion
You can simultaneously delete multiple files. For this, select the checkboxes of relevant files. As a result, the Delete option will be displayed at the top left. Confirm the action.