View video in the plаyer
When you open the View in player tab, the playback of the camera's main video stream starts automatically.
The selection of the main video stream is configured in the camera settings.
When viewing video in live or archive mode, or when exporting an archive, it’s important to take into account that the camera may have been added in a different time zone.
For more details, refer to the Coordinated Universal Time (UTC) documentation section.
A camera with an archive feature allows for viewing video in archive irrespective of the camera’s streaming status. The available archive range is limited by the storage time allocated to that particular camera.
The player enables you to perform the following actions:
View live stream from a camera.
View and export archive sections.
Make screenshots.
Enable and disable audio (if a camera features audio).
PTZ camera control (if a camera features this option).
Enable full-screen mode.
When the Camera with limited access option is enabled on the General data tab of the camera, a notification will be displayed on the View in player tab indicating that that access to this camera is restricted. Additionally, it will be noted that all actions performed by the user concerning this camera will be logged.
.png?inst-v=b63742cc-00c9-4c22-96cb-e64d375db7d7)
The notification
Select Continue to proceed to view video. If the mentioned option isn’t enabled, then camera live stream becomes automatically available.
.png?inst-v=b63742cc-00c9-4c22-96cb-e64d375db7d7)
The View in player tab
Depending on the camera model and settings, the display may show additional parameters such as date and time, outside temperature, and more.
At the top of the player, the camera name and address are indicated. This line can be hidden if necessary by selecting the arrow icon.
To adjust the zoom level in a video, use the slider at the left bottom.
The set of controls is located at the right bottom. Depending on the camera model, the controls may vary.
 | Control of pan, tilt, and optical zoom of the camera. This function is only available for PTZ cameras. Selecting it opens an additional control panel for the camera. |
 | Indicates the selected video stream quality. Selecting the button changes the video stream quality. Changing the quality is only possible when there are two video streams available. The possible values are HD (high definition) and SD (standard definition). In Archive mode, another HD/SD view is available. It visually indicates the presence of archived recordings for both HD and SD camera streams directly on the timeline. Details on how to view archive is below in this article. |
 | Select this icon to save a screenshot to a PNG file. The file is saved in the directory specified in the browser settings. |
 | Enable or disable audio. This function is only available for cameras that support audio recording. |
 | View video full screen. |
 | Select a playback speed. Is available only when viewing archive. The available values are 1x, 5x, and 10x. |
When the PTZ Control function is enabled, an additional control panel is displayed.
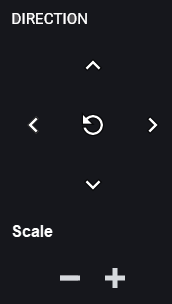
The PTZ camera control panel
Select the direction button to adjust the camera lens position.
To zoom in and out, use the + and - buttons.
Select the Default button in the center to reset the lens and zoom.
When operating a camera, there may be a delay in camera control. To ensure smooth operation, it is advisable to select the direction or zoom buttons just once and allow the camera to respond before selecting it again.
Below, you can find the timeline. The timeline shows the date and time at the current moment. Use the slider to adjust the timeline step. The available step values are 1 minute, 1 hour, and 1 day. To change the step, use the slider or the – and + buttons.
.png?inst-v=b63742cc-00c9-4c22-96cb-e64d375db7d7)
The slider to adjust the timeline step
View and download archive
In the camera player, archive management functions directly depend on the archive recording settings for all camera streams:
If archive recording isn't currently enabled (see Archive settings) and there are no saved archive recordings available for any camera stream, then the archive management tools (viewing, pausing, rewinding the archive, or downloading an archive segment) won't be displayed.
If at least one archive recording from any camera stream is available, all archive management tools become fully accessible to the administrator.
On the timeline, light sections represent periods where an archive is available. Conversely, a dark section means there's no archive for that particular moment.
.png?inst-v=b63742cc-00c9-4c22-96cb-e64d375db7d7)
Select the quality to playback archive
The display of archive segments in the player depends on whether the archive recording is made from a low-quality or high-quality stream (see Archive settings), and on the stream quality setting selected in the player: SD, HD, or HD/SD.
When an archive is recorded solely from a low-quality camera stream, only SD quality will be available for playback. Consequently, the timeline will exclusively display those archive segments that were recorded in low quality. Similarly, if the archive is recorded only from a high-quality stream, then HD quality will be the sole option in the player. The timeline will then display only those archive segments captured in high quality.
When there are recordings available both from the HD and SD camera streams – the HD/SD selector is available. The HD/SD viewing mode visually indicates the presence of archived recordings for both HD and SD camera streams directly on the timeline. For optimal viewing, the player is configured to automatically select and display the HD stream by default when the recording exists in both formats and overlap in time, eliminating the need for manual user switching.
If you switch the quality from HD/SD to either SD or HD at a point in time where the corresponding quality archive isn't available, the video player will display a message like “Archive not available at this point”. You'll also see the buttons to navigate to the previous and next available archive segments.
Archive playback
For archive playback, you can use the following controls:
The timeline slider to navigate through the recording.
Specific buttons designed to move to particular times within the recording.
The buttons that instantly take you to the beginning or the end of the recording.
.png?inst-v=b63742cc-00c9-4c22-96cb-e64d375db7d7)
The playback controls
Use the calendar. You can also select a specific date and time to view the recording. Select the Calendar icon, set the date and time, and Select. Only the dates where archive is available are active. The other dates are grayed out.
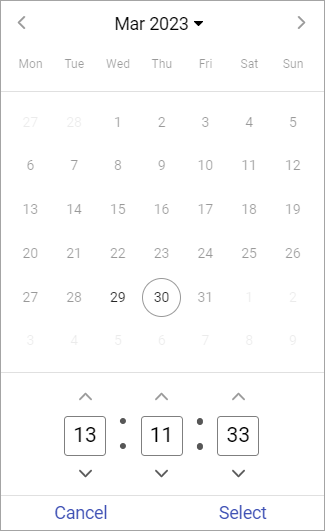
Date and time selection
Download an archive segment
Downloading of an archive segment depends on the selected mode – SD, HD, or HD/SD. When downloading archive recordings, choose to save either a single video stream or both HD and SD streams at once.
If either SD or HD quality is selected, the available archive segments for the chosen period will be downloaded in the selected quality as an MP4 file. Should there be any breaks within the archive segments for the selected time frame, neighboring segments will be merged to create a single MP4 file. See the image below.
.png?inst-v=b63742cc-00c9-4c22-96cb-e64d375db7d7)
When in Archive only with the HD/SD view enabled – simultaneous download of the archives for both streams (HD and SD). In this case, downloaded files are generated according to the following principle:
If the selected interval contains an archive for only one stream (either HD or SD), a single .mp4 media file is downloaded. If there are any gaps in the archive for either the HD or SD stream (like missing data for a certain period), nearby available archive segments are automatically merged.
If both HD and SD segments are present within the selected time interval, a single .zip archive is created. Inside the archive, each segment (HD or SD) is saved as a separate .mp4 file in chronological order. See the image below.
.png?inst-v=b63742cc-00c9-4c22-96cb-e64d375db7d7)
When the selected archive contains segments of varying quality or gaps between segments of the same quality, a .zip archive is generated. This archive will include all alternating segments (both HD and SD) as separate .mp4. Neighboring segments of the same quality will be merged into a single .mp4 file. See the image below.
.png?inst-v=b63742cc-00c9-4c22-96cb-e64d375db7d7)
To download an archive recording for a specific period, select the Download icon. From the opened panel, select the dates of start and end for the video archive segment.
When ready, select Download.
Two hours is the maximum duration of a video archive that can be downloaded in a single file.
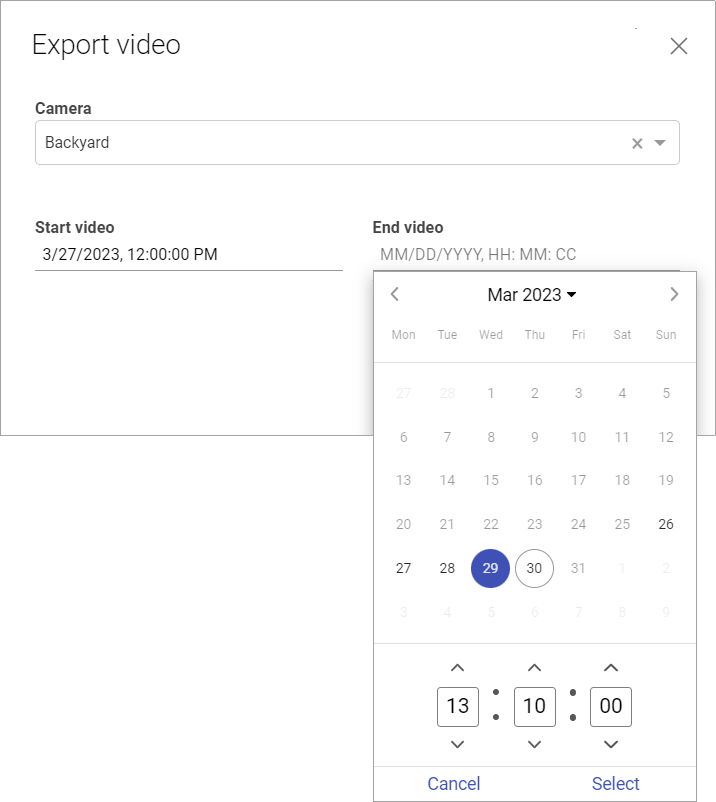
Selecting an archive range
When the file is generated successfully, a pop-up notification will inform you.

A notification
Select the link to download the file.
The generated files are available for download in the Archive video section. Files are stored for 240 minutes from the moment of generation. Subsequent to this period, they are subject to automatic deletion. Additionally, to manage storage capacity effectively, the system is designed to automatically remove the five oldest archives once storage utilization exceeds 80%.
File name generation
The title for the .mp4 file is generated according to the following rule: <address>_<camera name>_<start date>_<end date>
For example: Westave,17а_entrance2_20240716-100055_20240716-100255.mp4
Definitions for each component:
Address: A concise camera location, potentially including up to three levels from the location tree, starting with the most specific.
Camera name: The specific name of the camera.
Start date: The date and time when the recording began, formatted as YYYYMMDD_HHMMSS in the user's timezone.
End date: The date and time when the recording ended, formatted as YYYYMMDD_HHMMSS in the user's timezone.
File name length limitation
When downloading, the file name is generated automatically, taking into account the technical limitations of web browsers.
Most modern browsers support file names up to 255 bytes in length. This limit applies to bytes, not the number of characters. In character encodings, Cyrillic characters typically require 3 bytes per character, while Latin characters require only 1 byte. Due to the larger byte size of Cyrillic characters, the resulting file name may exceed the allowed limit. In such cases, the browser will automatically truncate the name from the end, potentially omitting information such as the camera name, recording date, or time.