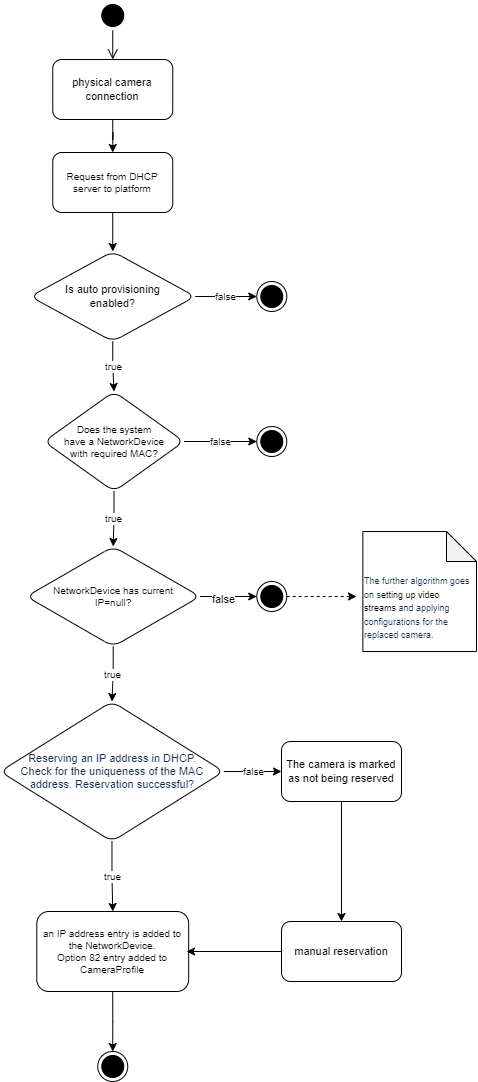
Obtaining an IP Address by the camera
To obtain an IP address for the camera, the following steps are necessary:
The camera must be connected to the data transmission network designated for the service
DHCP server IP address pools must be configured (see «DHCP subnet groups»)
The VMS has the camera data available, including:
Camera MAC address
serial_number
The IP address acquisition process is carried out using the reservation method.
Algorithm for obtaining an IP address by the camera:
The VMS receives a request from the DHCP server containing the following information about the connected camera:
Camera MAC address
Camera IP address
DHCP option 82 parameters (see «Glossary»)
The VMS checks if the auto-provisioning procedure is enabled for adding cameras
If the auto-provisioning procedure is disabled, the process is terminated.
An event log entry is made for «DHCP. IP Address Allocation» (for more details on provisioning events, see the «Provisioning events» page)
The DHCP server allocates an IP address
The VMS searches for the device in its database based on the MAC address and IP address
If the device is not found, the process is terminated.
The VMS checks the current IP address value of the device
If the device has an IP address, the further algorithm proceeds with setting up streams and applying configurations for the replaced camera (see «Setting up video streams» and «Applying configurations»).
The IP address is reserved in the DHCP server
If it fails to reserve the IP address, an event log entry is made for «DHCP. Failed to Create DHCP Reservation» (for more details on provisioning events, see the «Provisioning events»), and the process is terminated.
An entry for the IP address is added to the NetworkDevice
An entry for DHCP option 82 parameters is added to the camera profile
After completing this auto-provisioning stage, manual addition of video streams is not possible for the next 5 minutes.

IP address acquisition by the camera
