View and edit intercom
Intercom Settings are divided into several tabs:
Each tab displays a panel with intercom data and a set of functions:

Intercom view
For Intersvyaz vendor intercoms, the login and password are additionally specified:

Intersvyaz intercom view
The panel contains:
Intercom Address. If the address is not specified, the intercom name is displayed.
Entrance (if specified)
Intercom UUID with a copy function to the clipboard
Vendor
Intercom operational status. The possible values are: Installed, Initializing
Intercom availability status. The possible values are: Online, Offline
The status of Intersvyaz intercoms is checked for network presence every 10 minutes. When the status changes in the web admin interface and mobile applications, a push notification is displayed.
Return to the list of intercoms button
Restart camera video streams button
Restart panel button
General data
The «General data» tab contains a set of settings:
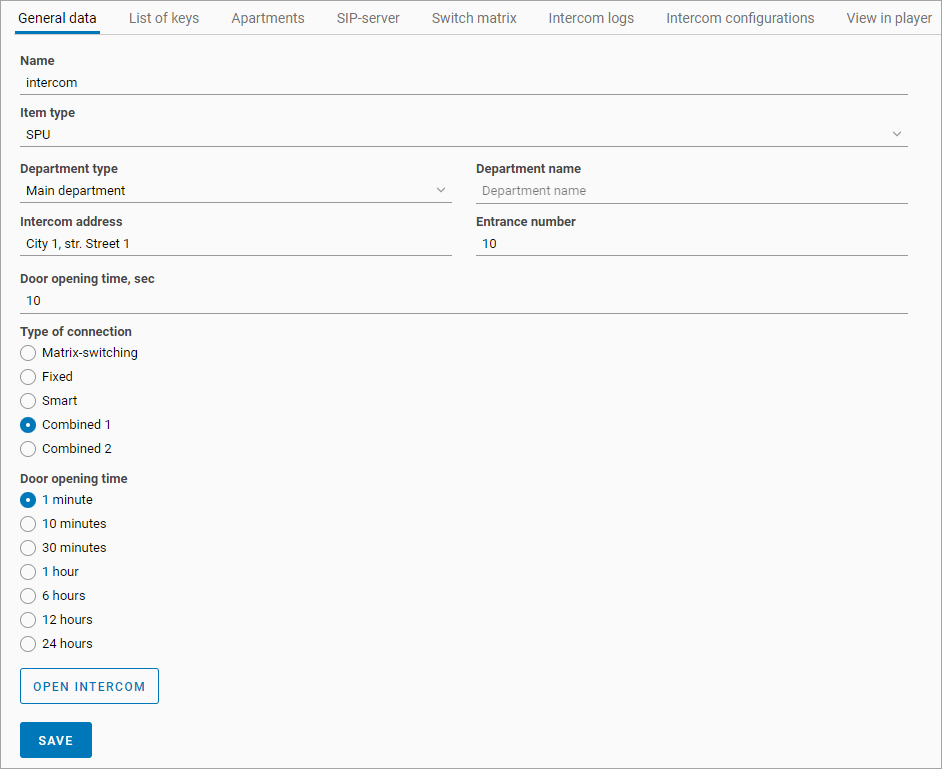
«General data» tab
Name, intercom name
Item type – vendor type
Department type
Department name
Intercom Address
Entrance number
Door opening time, sec, the time during which the door remains open when the intercom is opened from an analog handset, a landline phone, or a mobile application
Door opening time, the time during which the door remains open when the «Open intercom» button is pressed
Type of connection, the intercom connection scheme. It is automatically applied to all apartments. The following options are available:
Matrix-switching, calls are received only on the analog intercom handset. When this scheme is selected, the «Switch matrix» tab is additionally displayed for matrix configuration (description of the tab is provided below)
Fixed, calls are received only on the landline phone. The phone number is specified on the «Apartments» tab when selecting an apartment
Smart, calls are received only on the mobile device. The SIP account is specified on the «Apartments» tab when selecting an apartment
Combined 1, calls are received on the analog intercom handset and the mobile device. Additionally, the «Switch matrix» tab is displayed
Combined 2, calls are received on the landline phone and the mobile device
Open intercom, pressing the button opens the door. The duration of door opening is adjusted with the «Door opening time» setting
After making changes, click the «Save» button to save them.
Changing the connection scheme sets the status to Initializing. During this time, the intercom settings cannot be modified until all apartments are reconfigured.
List of keys
When switching to the tab, the key list is displayed.

List of keys
Search is available for:
Key
User name
User login
The «Keys start date» and «Keys end date» fields are used to filter the list based on the key action interval.
When the «Key collection» feature is enabled, keys are automatically saved in the list when they are used.
When you click on the "Synchronization" button, the cloud storage of the intercom is accessed to receive all the added keys. Also, every five minutes, automatic synchronization with cloud storage is performed.
The function "Download the list of keys" is provided. Clicking the button generates a link to an XLSX file that contains all the keys. Next, the resulting list of keys is used to quickly fill in the file with information about the apartments.
To delete keys, select one or more keys. Once at least one key is selected, the «Delete selected key» button will appear. Click the button and confirm the action to delete the keys.
When the «Key collection» feature is enabled, key deletion is not available (the delete button is not displayed).
To add a key, click «Add key list». This will display the key addition form.
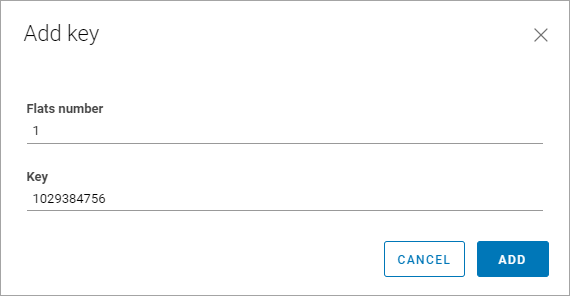
Adding a key
Fill in the fields on the form:
Flats number, the value must fall within the apartment range specified on the «Apartments» tab
Key, key number
After clicking «Add», a new key will be added and linked to the specified apartment.
To change the apartment number to which the key is linked, click the edit button. This will display a form to enter the new apartment value.
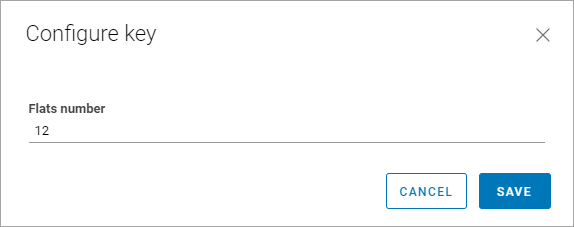
Key editing
The «Delete all keys» function is provided. It deletes keys that are:
Not linked to users
Not linked to apartments
Apartments
The «Apartments» tab is designed for:
Entering the range of apartment numbers associated with the current intercom
Linking users and keys to apartments
Linking a landline phone number and SIP account to apartments
Diagnosing line resistance for an apartment
Enabling/disabling:
Call to a landline phone
Call to an analog intercom handset
Call to a SIP account
Call to an analog intercom handset and SIP account
Configuring apartments. It allows both general settings for all apartments and individual settings for each apartment. Detailed description of the settings is provided in the «Apartment settings» section
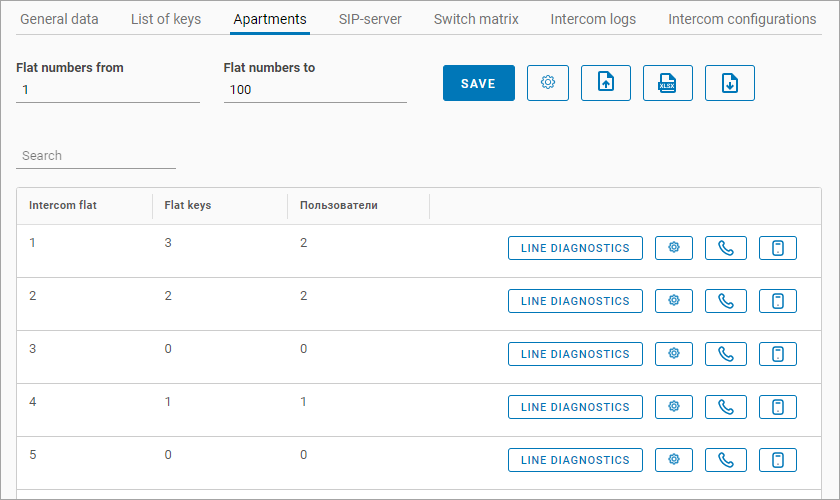
«Apartments» Tab
The apartment range is specified in the «Flat numbers from» and «Flat numbers to» fields. After editing the values, click «Save».
The page provides search options for:
Key
Apartment
User name
User login
An import function is provided, with which you can download a list of apartments with data. For a description of the function, see the «Export/Import apartment data».
For each apartment, a set of functions is available in the table. When hovering over a button, a tooltip is displayed:
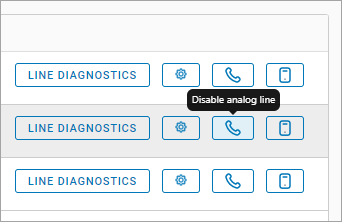
Additional functions
Below are the function buttons for each apartment:
.png?inst-v=09fdd4b9-417a-4c93-8208-bd86285891fb) | Apartment line resistance diagnostics. The button is displayed for Matrix-switching and Combined 1 connection types (if calls to analog intercom handset are enabled). |
 | Individual settings for each apartment. The set of settings depends on the intercom vendor and connection type. Detailed description of the settings is provided in the «Apartment settings» section |
 | Enable/disable call to a landline phone. The button is displayed for the Fixed connection type |
 | Enable/disable call to a mobile device. The button is displayed for the Smart and Combined 1 connection types |
 | Enable/disable call to an analog intercom handset. The button is displayed for Matrix-switching and Combined 1 connection types |
When selecting a connection scheme, the call type is set according to the scheme. Only enabling/disabling the selected call type is available. To choose a different call type, you need to change the connection scheme.
Applying changes and graphical representation of button enable/disable may take some time.
Apartment configuration
Additional settings for the selected apartment are displayed when clicking on the row.
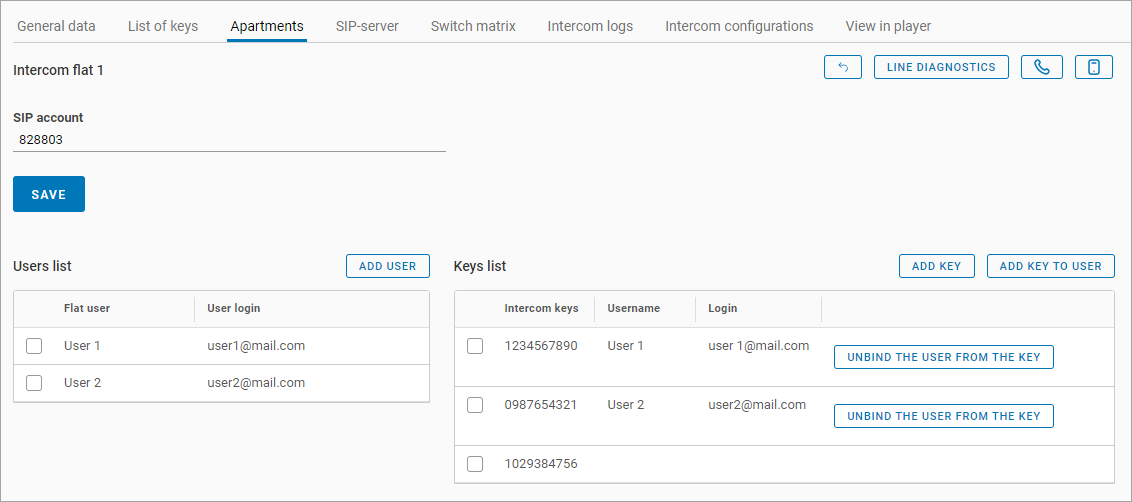
Apartment configuration
Apartment settings include:
Phone Number, the landline phone number. Specify it to receive calls from the intercom on the landline phone. It is displayed only when selecting the Fixed or Combined 2 scheme in the «General data» tab
SIP account, the SIP account for the current apartment. It is configured after setting up the SIP server (see the «SIP-server» section below). Specify it to receive calls from the intercom on the landline phone and mobile application
Configuring the list of users for the current apartment
Configuring the list of keys and linking them to users
After editing the «Phone number» and «SIP account» fields, remember to save the changes.
User list
The «User list» table displays the list of users associated with the selected apartment.
To link a new user, click «Add user». This will display a user selection form.
Available users added in the «Users» and «Temporary users» sections, who are not linked to any apartment, can be selected.
To remove users, select the users to be deleted. Then the «Delete user» button will appear.
If a key is linked to a user, unlinking the user will cancel the association, while the key will remain in the list of added keys for that apartment.
Key list
The «Key list» table displays the list of intercom keys linked to the selected apartment.
To link a new key without linking it to a user, click «Add key». This will display a key selection form.
Available keys added in the «Key list» tab, which are not linked to any apartment, can be selected.
To link a new key with a user, click «Add key to user». This will display a user and key selection form.
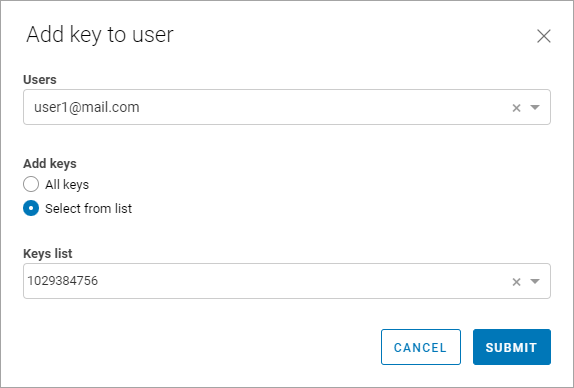
Linking keys to a user
You can link all available keys to a single user or select keys from the available list.
Users added in the «User list» table can be selected. Keys that are not linked to any apartment are available for selection.
SIP-server
The «SIP-server» tab is used to configure the connection to the SIP server. This connection allows receiving calls from the intercom on the landline phone and the mobile application.
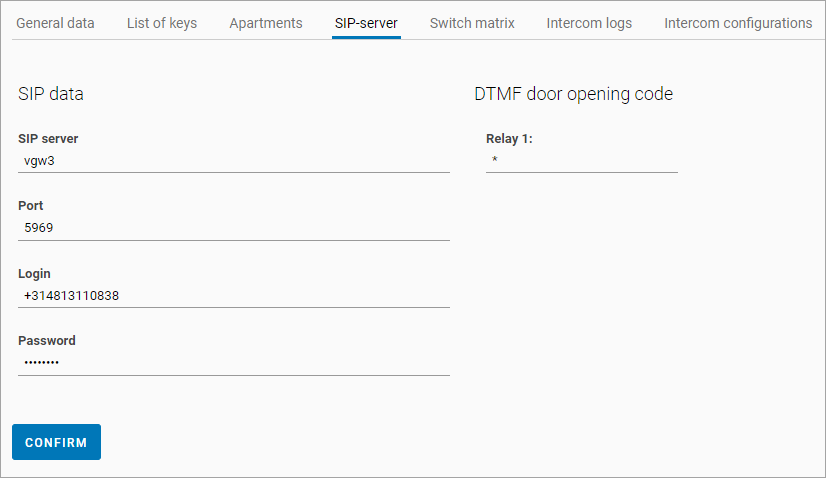
«SIP-server» tab
The tab displays the settings:
SIP server, SIP server address
Port, connection port to the SIP server
Login, login to the SIP server account
Password, password for the SIP server account
DTMF door opening code, specified for each relay (the number of relays corresponds to the number of panels in the entrance). The DTMF code allows opening the door from the landline phone by pressing the specified button
After making changes, click «Confirm» to save them.
To ensure proper interaction between the VMS system and the SIP server, the password should be specified on the «SIP-server» tab, not in the web interface of the intercom control panel. Otherwise, when selecting the corresponding connection scheme, calls to the mobile device will not be received.
Switch matrix
This tab is used to configure the coordinate matrix-switch.
The tab is displayed when selecting the Matrix-switching or Combined 1 connection scheme in the «General Data» tab.
To enter the number of apartments, fill in the «Matrix capacity» field. The apartment matrix will be built automatically.
For «Intersvyaz» intercom vendor, it is possible to edit the apartment matrix after automatic filling.
For «Sputnik» intercom vendor, the matrix is filled automatically without the option to edit it.

Switch matrix
If the number of apartments in the matrix is less than the number of apartments specified in the «Apartments» tab, calls to the apartments that are listed first in the «Apartments» tab will be automatically activated.
In the «Intercoms switch type» field, select the switch. The following switches are available:
Metakom
Vizit
Cyfral
Eltis
The «Flat offset» пfield is used to enter the apartment number in case the first apartment in the entrance does not start with «1».
After making changes, click «Save matrix».
A check is performed to ensure that apartment numbers in different entrances of the same address do not overlap when editing the matrix.
Intercom logs
This tab is used to view logs for the current intercom.
To obtain more detailed information about an action, expand the corresponding row.
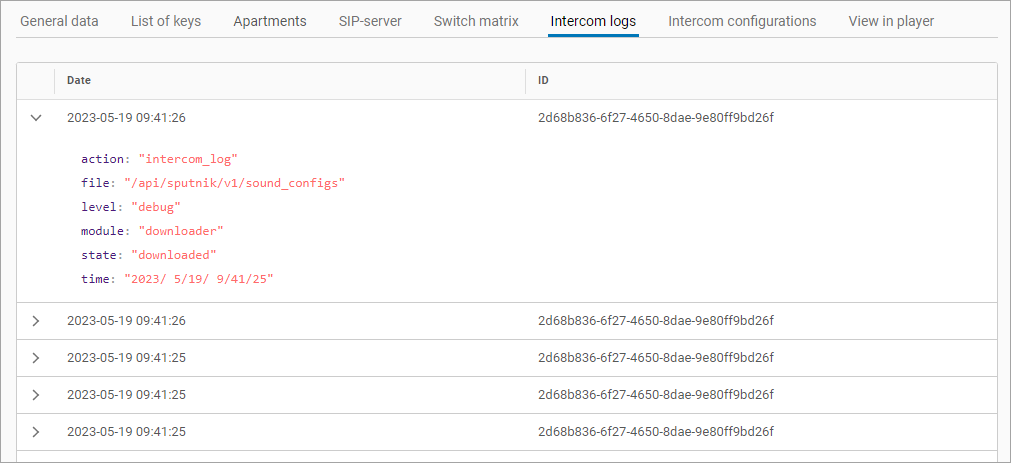
Intercom logs
Intercom configuration
This tab is used to view the configuration of the current intercom.
View in player
The «View in player» tab is used to select the intercom camera and view video footage from the intercom camera, as well as to take snapshots.
When viewing live stream or archive footage, or when exporting the archive, please note that the intercom may have been added in a different time zone. See the «UTC Standard» section for more information.
To select an intercom camera:
Click on the camera editing button
Enter the camera address
Select the appropriate camera from the list
Click «Save»
Available cameras that have the «Intercom camera» setting enabled in their profile are selectable (see the «Adding сameras» section).
To go to the settings of the selected camera, click on the camera name.
During video playback, the player provides the following control buttons:

Player control buttons
Pause
Go to the end of the recording
Go to the beginning of the recording
Go back 24 hours / 1 hour / 1 minute / 10 seconds
Go forward 24 hours / 1 hour / 1 minute / 10 seconds
Zoom in / Zoom out
Change quality (available if supported by the intercom camera)
Take a snapshot
Enable fullscreen mode
Calendar
Download
Camera access
User access to the intercom camera is automatically configured as follows:
When adding an intercom camera, access is automatically granted to all intercom users
When adding a new intercom user, access to the intercom camera (if available) is automatically granted
Manual configuration of access to intercom cameras is also available:
For regular users in the «Administration» → «Users» section
For temporary users in the «Administration» → «Temporary users» section
Sub-user access to intercom cameras is configured by the user in the user's web interface (if the corresponding access rights are available).
Settings
The «Settings» tab is designed to view the intercom connection settings. The settings are not editable.
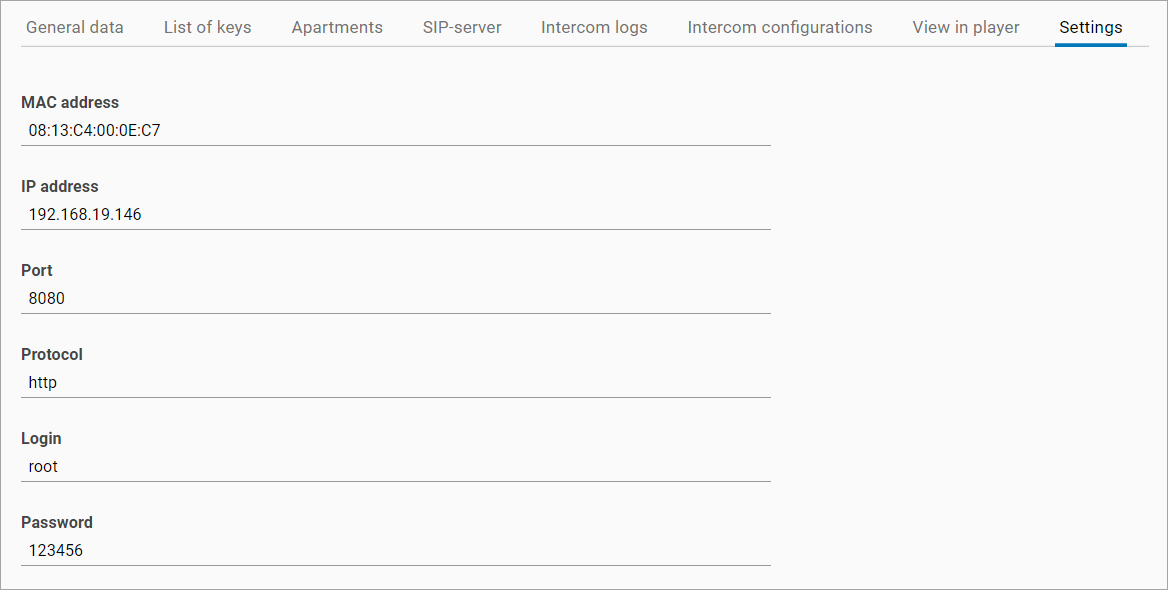
The «Settings» tab
Depending on the vendor, the set of settings differs.
Sputnik | Interconnection |
|---|---|
|
|
