The side panel. The Desktop client
The left-side panel of the Desktop interface lists all available to the user cameras. The panel is available on the Live and Archive/DVR tabs.
The side panel features the following tools to manage cameras and their organizing.
.png?inst-v=1d934989-adc9-47d4-b93e-1c2e7354ae81)
The left-side panel
.png?inst-v=1d934989-adc9-47d4-b93e-1c2e7354ae81) All cameras | Under All cameras, the user can see all the cameras available to them. The list can’t be edited or deleted. The list is automatically generated in the Desktop interface. Here, the user can:
|
.png?inst-v=1d934989-adc9-47d4-b93e-1c2e7354ae81) Camera tree | Under Camera tree, the user can find the cameras that are available to them. The cameras are grouped according to the addresses within the created address system. The Camera tree is automatically generated in the Desktop client, can’t be edited or deleted. Here, the following options are available:
|
.png?inst-v=1d934989-adc9-47d4-b93e-1c2e7354ae81) Camera groups | Under Camera groups, the user can find the groups created by the current user. The user can create, edit, and delete groups. Here, the following options are available:
|
.png?inst-v=1d934989-adc9-47d4-b93e-1c2e7354ae81) Layouts | The Layouts section lists all the layouts created by the current user. This user can create, edit, and delete the layouts. The user can also manage cameras on these layouts. For details about layouts, see this article. |
.png?inst-v=1d934989-adc9-47d4-b93e-1c2e7354ae81) Favorite layouts | The Favorite layouts section lists all the layouts added by the current user to favorites. For details about favorite layouts, see this article. |
.png?inst-v=1d934989-adc9-47d4-b93e-1c2e7354ae81) Layout groups | The Layouts groups section lists all the groups of layouts added by the current user. For details about groups of layouts, see this article. |
.png?inst-v=1d934989-adc9-47d4-b93e-1c2e7354ae81) The shortcut buttons | The shortcut buttons to create a camera group, a new group of layouts, and a new layout. |
Bridge cameras
Cameras that are associated with a bridge and added to the list of cameras available to the users are marked with a special icon.

A bridge camera
The functionality of bridge cameras is identical to the other cameras.
The bridge camera setting is carried out in the user's web interface in the Devices section. For the sub-users to have access to the bridge cameras, they should be granted special access.
Agent-compatible cameras
Agent-compatible cameras are identified with a special icon . Connection and set up of these cameras is carried in the web interface of the user. For details, see the documentation Devices > Cameras.
Adjust the left-side panel size
You can adjust the panel size. To do this, hover over the border between the panel and the work area, hold the left mouse button, and drag the mouse to adjust the width of the panel.
Collapse and expand the panel
You can collapse and expand the side panel. To do this, select the appropriate icon at the top left.
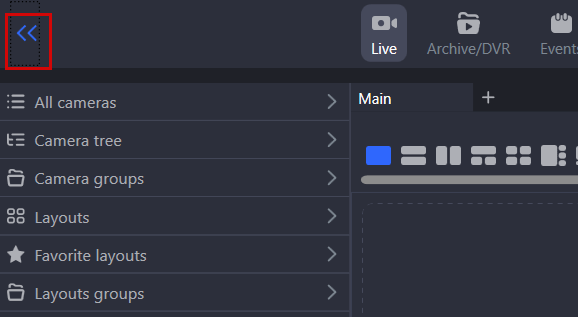
The button to collapse and expand the panel
The context menu
This system offers several additional features, including renaming groups, adding cameras to groups, and viewing layouts in a separate window, and more. These functions can be accessed through a context menu of a selected item.
To open the context menu for a specific item, hover your mouse over it and right-click the context menu icon (...). This will display a context menu with a list of available options that vary depending on the selected item.
.png?inst-v=1d934989-adc9-47d4-b93e-1c2e7354ae81)
The context menu
A comprehensive description is provided below in the relevant sections: