Addresses. The User Portal Manager
In the Addresses section, you can build the address tree. At these addresses, the User Portal users will be able to connect to the video surveillance services.
You can view the complete address from the level of the final address element. In the address card, you can perform the following actions:
Edit the name of the address element.
Edit the list of cameras with public access.
Edit the list of cameras with private access.
View the list of B2B and B2C users.
Create an address tree
The list of addresses is presented in a tree view. By default, the list of addresses is empty.
You can build the address only after the address structure is fully defined in Portal constructor > Address constructor. This address structure is a hierarchical arrangement of fields, organized into a specified number of levels.
.png?inst-v=c246fb15-1530-4ba8-b650-c220381b36ae)
The default Addresses section
To create an address, follow the steps:
Select Add address element. This opens a form to create a root level of the address.
On the opened form, complete the fields:
Address element. Provide a name to the root level element.
External ID. Specify a unique ID of the address element that is provided by the customer.
.png?inst-v=c246fb15-1530-4ba8-b650-c220381b36ae)
Creating a root level element
Select Save to save the changes.
As a result, the root level element is added.
.png?inst-v=c246fb15-1530-4ba8-b650-c220381b36ae)
The added root element
Next, you can perform the following actions:
Add more root level elements.
Add address child level elements.
Edit an address element.
Delete an address element. You can delete an element only if this element doesn’t include a child element.
To add a new root level element, select Add address element and repeat the mentioned above steps.
To add a child level element:
Select the plus + button of the element, where a child element will be added.
.png?inst-v=c246fb15-1530-4ba8-b650-c220381b36ae)
The button to add a child element
As a result, this opens a form to create a child level of the address.
.png?inst-v=c246fb15-1530-4ba8-b650-c220381b36ae)
Complete the form to add a child element
Complete the fields of the opened form:
Address element. Provide a name to the child level element.
External ID. Specify a unique ID of the address element that is provided by the customer.
Select Save to save the changes.
As a result, a next level of the element will be added to the address.
.png?inst-v=c246fb15-1530-4ba8-b650-c220381b36ae)
The next level element
In this way, you will add child levels up until the final level of the tree. It isn’t possible to create child levels for the final element itself.
The number of address levels depends on the settings of the Address constructor.
The final element of the address has the option to view the address card by selecting the Eye button.
.png?inst-v=c246fb15-1530-4ba8-b650-c220381b36ae)
The complete address
The created address tree will be synchronized and reflected in the Administrator client of the video surveillance platform (VMS). This ensures that any updates made to the root or any child elements are automatically reflected in the Administrator client of the video surveillance platform (VMS).
You can search for an element by its name. For this, enter minimum three characters in the Search field and Search.
To edit an element, select the Edit button of a relevant element. You can edit the following:
A name of the element.
An external ID.
Once editing is completed, select Save.
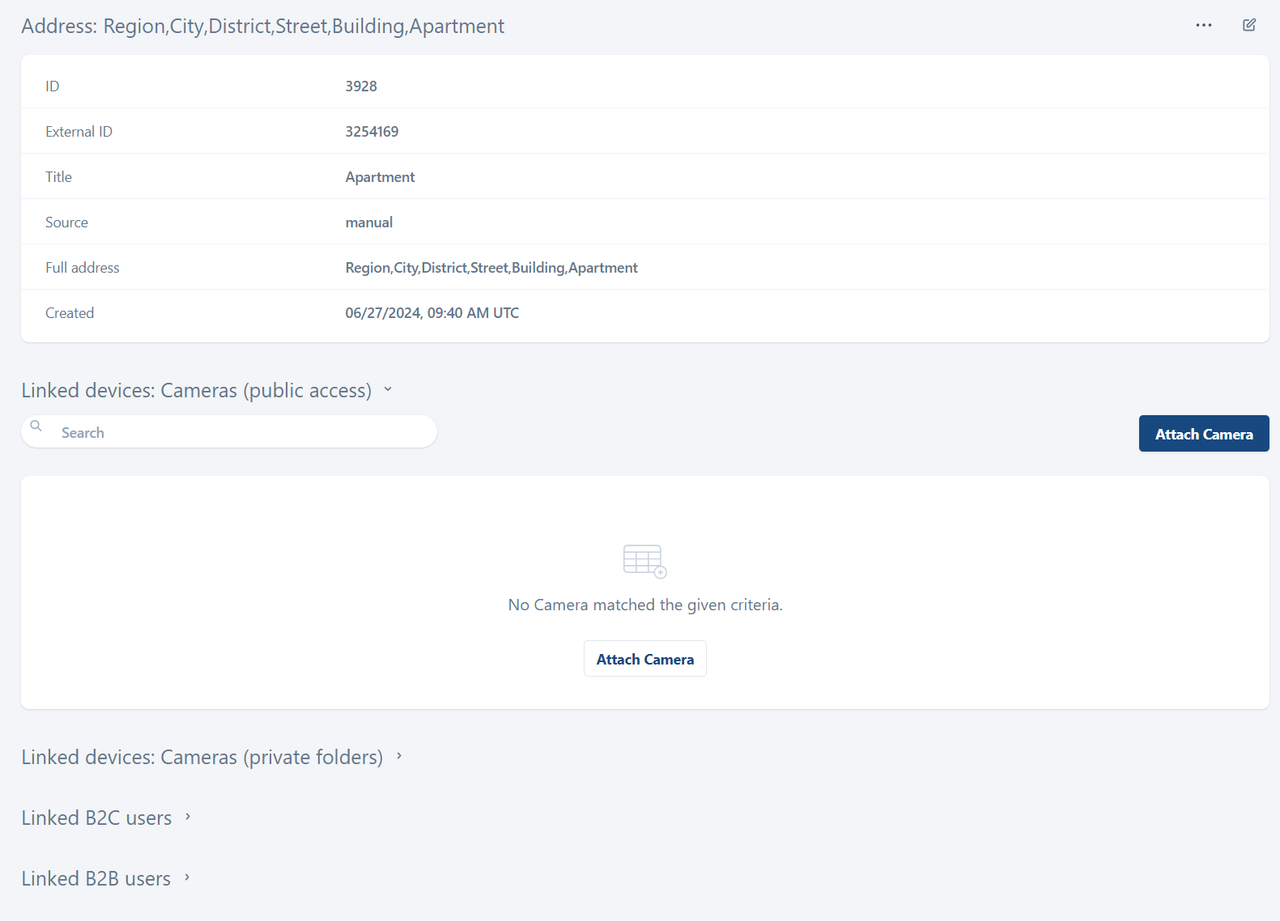
The address card
You can view the complete address from the level of the final address element. In the address card, you can perform the following actions:
Edit the name of the address element.
Manage the list of cameras with public access.
Manage the list of private folders that contain cameras with private access.
View the list of B2B and B2C users that are associated with this address.
The address card
To edit the final element of the address, select the Edit icon in a relevant line.
On the opened panel, you can edit:
The external ID.
The name of the current address element.
To save the changes, select Update.
Linked devices: Cameras (public access)
In the Linked devices: Cameras (public access) section, you can find the list of publicly accessible cameras linked to the current address.
You can attach a camera to a specific address in the Devices > Cameras section, when viewing a camera card.
.png?inst-v=c246fb15-1530-4ba8-b650-c220381b36ae)
The list of linked cameras with public access
The cameras in the list are accessible to the following types of users:
B2C users who have registered on the User Portal and specified this address
B2B users who have this address linked to their account.
To link a camera:
Select Attach Camera.
On the opened panel, from the drop-down list, select a camera to attach to the current address.
The list contains the cameras that aren’t linked to either of the addresses or to any private folders.
When the camera is selected, choose Attach Camera to complete the process.
The information about the camera linked to the address is automatically synchronized with the video surveillance platform and reflected there.
To detach a camera or multiple cameras from the current address, select the checkboxes of relevant cameras and choose Detach cameras from the drop-down Actions menu.
Linked devices: Cameras (private folders)
Private folders are used to manage access to cameras for B2B and B2C users within a single element of an address tree.
By default, the Linked devices: Cameras (private folders) section is empty.
To create a private folder, navigate to the card of the last address element. Under Linked devices: Cameras (private folders), select the Create button.
To create a private folder, select the Create button. For next steps on how to create a private folder and attach cameras to it, navigate to the Private folders documentation section.
.png?inst-v=c246fb15-1530-4ba8-b650-c220381b36ae)
Creating a private folder
Linked users
In the Linked B2C users and Linked B2B users, you can find the list of relevant users linked to this address.
You can only view the lists.
A B2C user is automatically linked to the address after authorization on the User Portal and their address is verified by the administrator. For details, see The user personal account. The User Portal documentation section.
A B2B user is manually linked to the address. For details, see the B2B users documentation section.