General data
You can find general information about the camera and the control buttons at the top-right of each tab when viewing information about the camera.
.png?inst-v=b63742cc-00c9-4c22-96cb-e64d375db7d7)
The camera details and the control buttons
The general details are as follows:
The device type and camera ID in VMS. The ID is automatically assigned to a newly created camera.
The status of the camera can be one of the following values:
Active – both video streams of the camera are active.
Inactive – both video streams of the camera are inactive.
Initialization – the video streams have been initialized on the media server, but the media server has not yet responded regarding the capture of the video streams.
Partially active – one of the two video streams on the camera is inactive.
Empty – there are no video streams on the camera (the default value when the camera is added).
The added tags that can be edited. Automatic tagging is also possible. Camera search by tags is also available on the Tags of cameras page.
The following are camera control buttons:
.png?inst-v=b63742cc-00c9-4c22-96cb-e64d375db7d7)
The camera control buttons
Back. Selecting the icon brings you to the camera list of the location (group).
Transfer streams. See the details below.
Reload index. Select this option to refresh indexes, or reindex, a video stream after moving it from one media server to another.
It is recommended to reload indexes when issues with archive playback arise. Typically, such errors occur after the video streams from cameras have been moved between the platform’s media servers.
Reload. Select this option to reload the camera.
Delete camera.
The General data tab
The General data tab contains general details about the camera.
.png?inst-v=b63742cc-00c9-4c22-96cb-e64d375db7d7)
The General data tab
The top of the tab displays the following information:
The camera IP address.
The reservation status of the IP address on the DHCP server:
Reserved – the IP address is reserved on the DHCP server.
Unreserved – the IP address is not reserved on the DHCP server.
The date and time when the camera was created.
The camera creation method:
auto – the camera was automatically added to the system.
manual – the camera was manually added to the system.
The details of the camera:
The camera name.
The Media server groups.
You can find a detailed description of media server groups on the Media Server Groups documentation page.
You can select media server groups only before camera video streams are added.
Number of days the archive was stored. Enter a number of days for archive storage from 1 to 90.
Camera group. Specifies the group the camera is added to – with Public or Private access within the main address. When in Private, a group of cameras is also specified. You can also change the folder by selecting a relevant option. When changing to Private, additionally specify a group of cameras available within this main address. The list of private camera groups is available for management from within the Camera tree.
Users with access limited to Public folders will lose access to any camera moved to the Private folder.
Services. Here, you can select the Motion detection option for cameras that detect movement and send data via SMTP protocol. With this service selected, motion detection events from this camera are displayed as markers on the camera player timeline when viewing archived footage (if available). These events are also recorded and accessible under the Events > Camera tab.
Add user. Here, you can select a user who will have access to camera schedule settings. The option is available only when the current administrator has the relevant level of permissions to manage users. You can select users from the list who have access to the camera (For details, see the Users documentation section). When a user is selected, the Recording archive settings become unavailable. In this case, the assigned user performs all the settings in their web interface. When the user changes the schedule, the administrator automatically receives a notification about the schedule change. If the user is added and the changes are updated, the Go to owner option becomes available under User. You can select this option to navigate to the page that contains the details of this user.
Camera schedule. You can set the working schedule for the selected camera: either or on a specific schedule. When the camera doesn’t work, the mediaserver stops receiving camera streams and won’t perform any reconnection attempts to the camera.
Full time – the camera works constantly.
Timetable – the camera works on a specified schedule.
The camera's operating schedule may differ from its archive recording schedule (see the Archive settings documentation page). Archive recording will follow the camera's operating schedule.
Address. Here, the main address of the camera is specified. The field can’t be edited. In the camera tree, you can find this camera in the list of the cameras at this address. The address is prefilled automatically as you add a camera to a specific location.
Add address. In this section, you can add more addresses at which this camera will be accessible. In Tree View, this camera will be listed under all associated addresses, including additional. However, in the web interface, users only see cameras accessible under their primary address. In this case, a special icon indicates the camera in the list.
.png?inst-v=b63742cc-00c9-4c22-96cb-e64d375db7d7)
The camera with a special icon
Buffered streams. This setting enables simultaneous server-side buffering of all RTSP streams of the camera, ensuring faster image loading in both mobile and desktop apps. The setting is applied to the mediaserver.
Archive recording stopped/Archive recording in progress are the informational indicators that display the status of the archive recording. When recording starts, the indicator changes to Archive recording in progress.
Sound enabled. The option is for cameras with sound recording capability. With this setting enabled, the audio stream is processed, recorded, and played back together with the camera video stream.
Camera with limited access. Selecting this setting enables a notification on the View in player tab. This notification will indicate that restricted access is now in effect. Consequently, all actions will be recorded in the log.
Intercom’s camera. This setting is displayed when the intercom module is connected and the user has the corresponding permissions. With this setting enabled, the camera can be selected as an intercom camera during its configuration (see the View and edit intercom documentation section). When viewing the camera tree and on the search page of intercoms, intercom cameras are indicated by a special icon. You can see the Open the player on the intercom page button at the top right of the camera details page along with other management buttons, if this camera is selected as an intercom camera on the View in player tab on the intercom details page. Selecting this button will redirect you to the intercom details page, exactly to the View in player tab.
.png?inst-v=b63742cc-00c9-4c22-96cb-e64d375db7d7)
The Open the player on the intercom page button
Increased reconnection time. When this setting is enabled, the number of reconnections required to assign the camera the Problematic and Disconnected statuses is increased. A detailed description of the algorithm is provided in the Incorrect cameras section.
External access. Enable this option to set restrictions to access the camera. To allow access to the camera from a specific subnet, select Add subnet and specify an IP address and subnet mask. If the setting is enabled, but subnet fields aren’t completed, access to the camera won’t be restricted.
Network device. It is displayed when the camera is automatically added. Contains the details about the camera from the customer's billing system.
Camera profile. Displayed when the camera is automatically added. Contains information about the camera from the Customer's billing system. The profile update function is available.
Map
You can specify the camera location on the map.
You can also add a camera from within the Cameras section > the Map subsection.
In the Systems settings section, under Access rights settings, administrators can manage the Setting up automatic adding of cameras to the map setting. This setting is applied to the cameras that are added to the platform via auto provisioning for the first time.
To add a camera to the map:
Under Map, select the Add camera button. This initiates the form to enter camera geographic details.
.png?inst-v=b63742cc-00c9-4c22-96cb-e64d375db7d7)
Mapping a camera
Specify the details in the form, or drag the camera to a relevant location.
Adjust the camera rotation angle.
Select Add.
To edit the camera location on the map, select Edit position and edit the location details, or drag the camera to a relevant location. Editing the coordinates automatically moves the map to the specified point, and the screen centers for a better view. To save the introduced changes, select Add.
To delete a camera from the map, select Delete camera from map and confirm the action.
.png?inst-v=b63742cc-00c9-4c22-96cb-e64d375db7d7)
Edit or delete a mapped camera
Transfer streams
To transfer camera streams, the administrator should have the Camera transfer between servers permission. It is available from the Cameras level permission when managing the admin account.
To transfer camera streams to another mediaserver, select the Transfer streams button.
.png?inst-v=b63742cc-00c9-4c22-96cb-e64d375db7d7)
The transfer of each stream is carried out as outlined below.
Consequently, the system initiates an automatic search for relevant media servers. The search process takes into account the following factors:
If the stream is reserved on an additional media server, and the media server group is specified in the camera settings, the system performs a search for two media servers within the clusters of the group. These servers are the main server and the additional server. If no group is specified in the camera settings, but the camera IP address belongs to a subnet of one of the groups, the system performs a search for media servers within the clusters of the group. If no group is specified in the camera settings, and the camera IP address does not belong to any of the subnets of the groups, the system performs a search for media servers within the clusters outside the group.
If the stream is not reserved, the system performs a search for the main media server among the non-clustered media servers. When the search is completed, you can select a cluster with two media servers to reserve the stream on an additional media server.
During the search process, the media server is subjected to a series of checks to ensure optimal performance and functionality. These checks include:
The distribution must be enabled on the media server.
The number of streams being processed by the media server should not surpass the predefined limit.
The bitrate of the media being streamed should not exceed the set limit to ensure smooth streaming.
The group assigned to the media server should correspond with the group assigned to the camera.
The storage used by the media server should not exceed 80% of its total capacity. This is to prevent potential issues related to storage overflow.
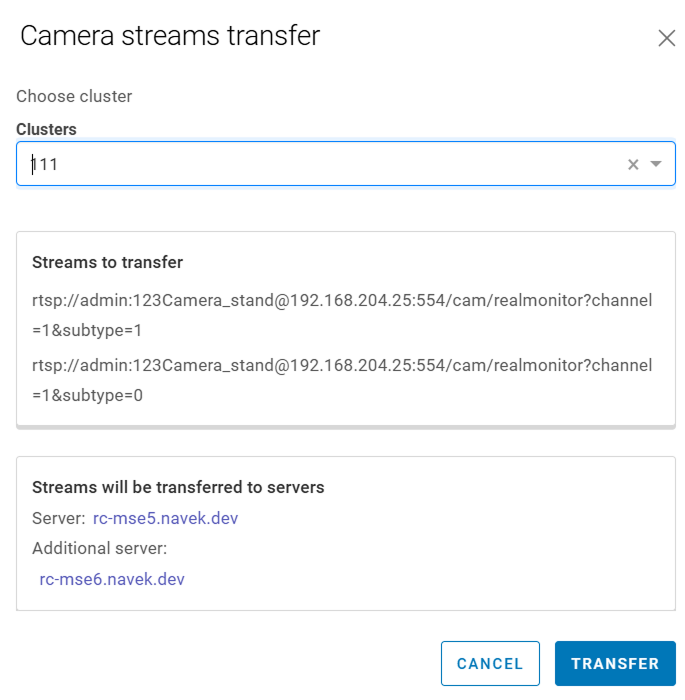
The search result will be displayed to you, as on the image below.
.png?inst-v=b63742cc-00c9-4c22-96cb-e64d375db7d7)
Once the automatic search concludes, you can manually choose a cluster from the list of all clusters. In this scenario, a search operation is carried out within the chosen cluster for two media servers – primary and secondary.
When the cluster of media servers meets all the search requirements, you can track the names of these media servers on the form.
Confirm the stream transfer action by selecting Transfer.
Transfer of camera streams
The Transfer stream button becomes unavailable for the subsequent one hour after the transfer.
When transferring video streams, the archive remains on the original media server. However, the archive indexes are transferred to the new media server.
If archive recording isn’t enabled, the archive indexes won’t be transferred.
To transfer the indexes, enable the archive recording.
To fix this issue, select the Reload indexes button. This will provide the update of the archive indexes.