The Map subsection
In the Map subsection, you find a detailed geographic map that allows you to position the locations of your cameras with precise coordinates and addresses. You can view a selected camera in real-time or from the archive, and add notes for future reference. This feature helps you effectively plan camera placement, quickly navigate in numerous cameras, and manage them efficiently, optimizing your overall video surveillance system.
The user can manage cameras on the map if they have relevant permissions Cameras > Adding a camera to the map. This permission is granted by the administrator.
The user can see the following cameras on the map:
Cameras that were added to the map by the administrator of the video surveillance platform, by the user, and by other users.
Plans (of buildings, premises) that are attached to a certain location on the map. The user can view the plans they personally added to the map.
The user can view cameras that were added by other users only if the user has access to these cameras.
In the Map subsection, the user can access a variety of options for managing both cameras and plans:
Switch between the camera and plan view on the map
The user can choose what to display on the map: cameras or plans. To switch between the camera and plan views, use the toggle at the top right of the map.
.png?inst-v=1d934989-adc9-47d4-b93e-1c2e7354ae81)
The toggle on the map
Zoom in and out the map
You can zoom in and out on the map in one of the following ways:
The zoom buttons (+/–) at the lower right.
Scroll the mouse wheel.
Use the touchpad
To move the map, left-click the mouse and drag the map.
Search and filter cameras
Both in camera and plan view, you can use the search field to find a relevant camera or filter cameras according to their current status. To search for a relevant plan, use the search field in the Plans section.
To quickly find a camera on the map, use one of the following options:
Use a camera name or address. For this, enter minimum three characters.
Use a camera status filter. A color code of a camera icon identifies its status: green – Active, red- Inactive, orange – Partially active, gray – Empty, black – Blocked.
.png?inst-v=1d934989-adc9-47d4-b93e-1c2e7354ae81)
Searching and filtering cameras
To view a camera on the map or on the plan, in the search results list, select the geolocation icon (Show on the map) or the plan icon (Show on plans). The Show on the map option is available for the cameras that are located on the map. The Show on plans option is available for the cameras that are added to the plans.
For details about the plans, see the Plans documentation section. For details about the cameras on the map, see the Cameras documentation section.
.png?inst-v=1d934989-adc9-47d4-b93e-1c2e7354ae81)
The icons to show the camera
You can also navigate to the Cameras section, select a camera from the list of available cameras, and choose Show on the map. For details about the cameras on the map, the Cameras documentation section.
You can also view a camera by opening it from the plan, if this camera is added to the map. For details about the plans, see the Plans documentation section.
View plans on the map
The user can view the only those plans on the map they personally added to the map.
To display plans on the map and view them, use the following options:
The user can choose what to display on the map: cameras or plans. To switch between the camera and plan views, use the toggle at the top right of the map. To view the plan, select the Plan icon on the map. The plan will open in the Plans section.
From plans on the map, select a relevant one. If multiple plans are associated with a single location, an icon will be displayed at that point on the map indicating the number of plans. To select the required plan, select the icon and choose the plan from the list. The plan will open in the Plans section.
.png?inst-v=1d934989-adc9-47d4-b93e-1c2e7354ae81)
The list of plans at the same location
From the Plans section, select a relevant plan to view on the map and choose the geolocation icon of this plan.
Manage cameras on the map
The following camera management options are available on the map:
You can find a set of management tools for each camera on the camera preview window. To access these tools, select the camera icon and choose a relevant action icon.
.png?inst-v=1d934989-adc9-47d4-b93e-1c2e7354ae81)
The camera preview window
The camera preview window
Selecting a camera icon opens a camera preview window that features managing options that are displayed with regard to the user permissions. The user can also track here a camera name and address, and the video preview from the camera.
If camera video isn’t available at the moment, a relevant error notification will be displayed.
Show in player
To view camera feed in the player, select the camera icon in the camera preview window. As a result, the live stream will then open in a new player window. On the player timeline, you can also switch to the archived video of this camera. The window name is identical to the opened camera name. All the controls on the opened player are identical to the controls of a separate camera on a layout.
Find the camera on the plan
A Plan icon is displayed on the camera preview window for the cameras that are added to a plan. When you select the icon, you’ll navigate to the Plans section with the list of the plans where this camera is added. The plan list name is identical to the selected camera name.
Here, you can manage cameras from within the plan. For details about how to manage plans, see the Plans documentation section.
To return to the selected camera on the map, select the Return icon (←).
.png?inst-v=1d934989-adc9-47d4-b93e-1c2e7354ae81)
The list of plans of the selected camera
Add a note to the camera
You can add a note to the selected camera on the camera preview window by selecting the Add notice icon. For this, follow the steps:
Select the Add notice icon.
In the opened field, enter the note text.
The note can be up to 50 characters.
You can use Cyrillic, Latin, numeric characters, hyphens, and the following symbols: !@#$%^&*()[]{}<>,_-.
To save the changes, select the Submit icon. To cancel the action, select Cancel.
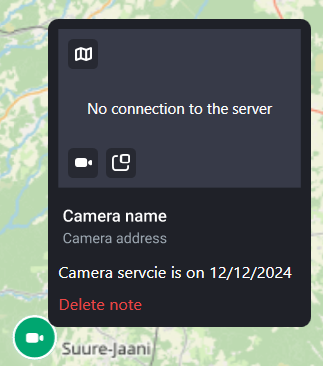
The note
The added note will be displayed on the camera preview window on the map. To edit a note, left-click the note, edit the text, and save it. To delete the note, select Delete note.
Place camera live feed on the map
You can place on the map camera feed in Live mode. For this, select the icon in the camera preview window. You can place multiple feeds from various cameras.
.png?inst-v=1d934989-adc9-47d4-b93e-1c2e7354ae81)
The icon to place Live on the map
A detached window with camera Live mode will open at the bottom left of the visible map area. You can reposition the window by dragging-and-dropping it. You can open multiple cameras in this way.
To close the detached windows, select the Close icon or Close all at the top right.
.png?inst-v=1d934989-adc9-47d4-b93e-1c2e7354ae81)
Delete the camera from the map
Users with appropriate permissions can add and delete cameras from the map. For this, the administrator grants the Cameras > Adding a camera to the map permission.
The user can delete from the map only the cameras that they added to the map. They can't delete the cameras that were added by the administrator or by other users.
To delete a camera from the map, select the Delete icon on the camera preview window of the selected camera.
.png?inst-v=1d934989-adc9-47d4-b93e-1c2e7354ae81)
The Delete icon
This Delete fucntion can also be used to change the location of the camera on the map. For this, delete a camera and add it to the map at the relevant location.