Cameras. Archive/DVR
In Archive/DVR mode, a set of controls is provided for each camera. Depending on the camera model, the tools may differ.
The toolbar provides simultaneous management of all cameras within the layout, offering access to all necessary tools. For details, refer to the Toolbar. Archive article.
You can simultaneously manage the viewing time of all cameras using the general timeline displayed below the layout. For details, refer to the General timeline article.
.png?inst-v=b63742cc-00c9-4c22-96cb-e64d375db7d7)
The Archive/DVR section
Pressing F7 while viewing a camera in a layout toggles the display of controls for all cameras within that layout and any other open layouts.
The set of controls for each camera includes:
 | Current viewing date and time. Camera name. The camera address is indicated in brackets (when distributing cameras by address). Click the arrow image to the right of the camera name to hide/show it. |
Select the camera cell to activate it | To manage an individual camera on the layout, activate the cell for this camera. You can select the camera cell on the layout by left-click. As a result, the cell will be highlighted. Select Esc to remove highlighting of the cell. |

| Use the Fill camera image button to expand an image within a single camera cell, or select this button on the top panel to apply this adjustment to all camera images in the current layout. This scaled view is also applied in full-screen mode. To revert to the original image size, select the button again. |
 | Enable and disable audio. Displayed for cameras that support audio recording. |

| Detach a camera from the general timeline to independently manage its playback. Once detached, adjustments to the general timeline will not affect this camera timeline. Select the button again to re-attach it. |
| Select mark types to display. Enables you to set up the display of the marks for events on the camera timeline. To move between events, use the < and > buttons. The following types of events are available: Custom, External events, SMTP motion detection. For the ONVIF-compatible cameras: Motion detect; Tamper detection. Image too blurry; Tamper detection. Image too dark; Tamper detection. Image too bright; Tamper detection. Global scene change; Event from external system; Event to external system; Configuration changed. |
 | Playback speed. For the cameras with the H.265 codec, the following playback speed options are available: 0.5х, 1x (the default standard speed), and 2x. For the cameras with the H.265 codec, the following playback speed options are available: 0.5х, 1x (the default standard speed), 2x, 4x, and 8х. It is possible to control the playback speed on all cameras simultaneously. For details, refer to the General timeline article. |
 | Select this button to open the camera full screen. |
 | Remove a camera from a cell of the layout. To remove a camera from the cell, select the Crossed icon (X) in the upper right corner of the camera image. However, you can’t delete a camera from a layout when playing video full screen. Save changes once complete. |
 | Zoom control: use the slider to digitally zoom in (right) or out (left). For details, navigate below to Zoom control. |
 | The function is designed to capture and save a screenshot to a PNG file. You can also capture a screenshot of a layout to save simultaneously the images from all the cameras. The relevant icon is located on the general timeline. For details, see the General timeline article. |
 | Controls playback start and stop. Note that stopping playback does not interrupt archive recording. |
 | Use the Save the selected video fragment of the archive button to export a segment of the archived video. For details, see Export an archive below. |
 | In Archive, each camera features its individual timeline. For details, see The camera timeline below. You can also create a user event on the timeline. |
Export an archive
The archive export feature allows downloading a specific video segment of archived video for the selected camera.
The maximum length of an archive segment that can be downloaded in one file is 120 minutes.
Bulk download of archives from several cameras simultaneously is available from within the General timeline article.
Selecting the Save the selected video fragment of the archive button opens the form to choose the date and time for the segment to download. Complete the form and select Export an archive section.
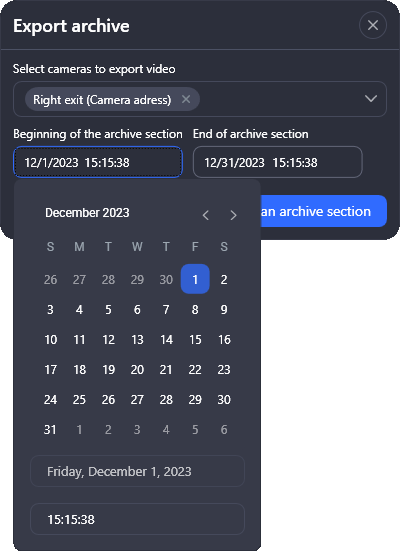
Selecting the date and time when exporting an archive section
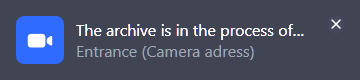
As a result, a notification about the start of the file generation process will appear on the screen:
File generation notification
Once the process is complete, the notification will be displayed.
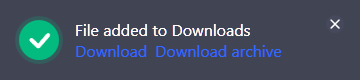
You can download the file by selecting one of the options on the notification:
Download – to download the file to MP4.
Download archive – to download the file in ZIP format.
If you specified a path for saving exported files in the Settings section, the file will be automatically saved to the selected directory. If the path isn’t specified, a directory selection window will be displayed each time the file is uploaded.
The generated files are also available for download in the Downloads section.
If you block the main timeline (the On/off main timeline button), this will disable the buttons
![]() to specify the archive segment range. The exception is the case, when an individual camera cell is active (highlighted green). In such a case, the buttons remain active for this selected cell, and you can download an archive segment of the selected camera.
to specify the archive segment range. The exception is the case, when an individual camera cell is active (highlighted green). In such a case, the buttons remain active for this selected cell, and you can download an archive segment of the selected camera.
However, when the main timeline is active and there is a selected camera on the layout, the set archive range will be applied to all the cameras on the layout.
The camera timeline
In Archive/DVR mode, you have simultaneous control over the viewing time of all cameras, with the option to manage each camera separately.
An individual timeline is displayed for each camera.
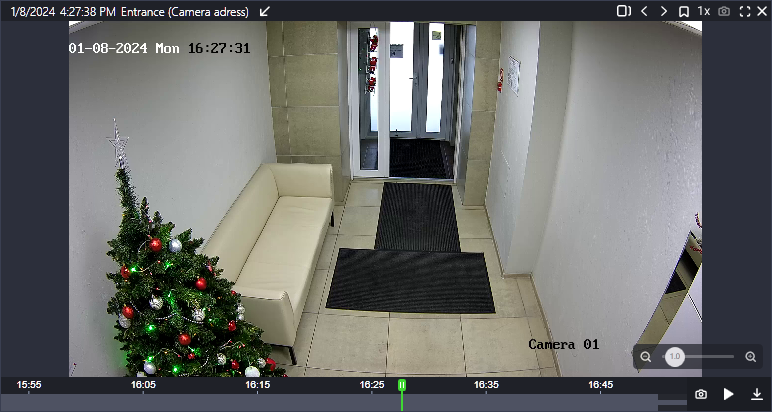
Camera timeline
The camera timeline offers the following functions:
Preview. Hover over the timeline to display a video frame at that point in time.
To adjust the timeline detail, hover over the relevant section and hold CTRL while scrolling the mouse wheel. This allows you to zoom in and out for the necessary level of detail. You can also simultaneously change the detail level for all camera layouts. For details, see the General timeline article.
View events. The timeline displays marks of custom events (if any created). To display them, use the event filter.
Drag the timeline. To move the timeline, select and drag it horizontally using the right mouse button.
Create a user event. Details are below in Create a user event.
Create a custom user event
The Archive/DVR section lets you mark specific time periods as custom user events. Remember that user custom events are created independently for each camera. To create one, find the relevant start time on a camera's timeline and double-right-click. This will display the user event creation form.
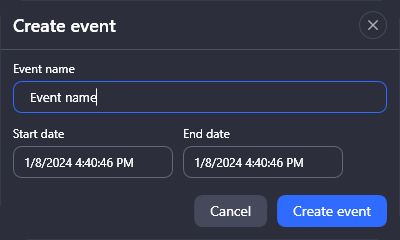
Create a new user event
Enter the name for the event and specify the time period.
Select Create event.
The user event mark is displayed on the camera timeline.
When you hover over an event in the timeline, the following information becomes available: event name, type, and duration.
To navigate between events, use the < and > buttons.
You can view and edit custom user events in the Events section on the User events tab.
Edit a custom user event on the timeline
To edit a user event, hover over the event on the camera timeline and right-double-click. On the opened form, edit the event name or a duration period.
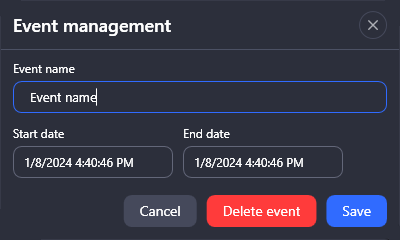
Editing a user event
Select Save to save the changes.
Delete a user event
To delete a user event, hover over the event on the camera timeline and right-double-click. On the opened form, select Delete event.
Confirm the action.