Create and manage a plan
Users can view and manage their own plans both in the desktop and web interfaces.
In this documentation section, you fund a comprehensive guide on how to:
Create a plan
To create a plan, follow the steps:
In the Plans section, select the Plus icon and choose Create plan from the opened menu.
.png?inst-v=b63742cc-00c9-4c22-96cb-e64d375db7d7)
Creating a plan
In the opened window, enter a plan name. You can use Cyrillic, Latin, numeric characters, hyphens, and the following symbols: !@#$%^&*()[]{}<>,_-.
To complete the action, select Add. To cancel, use Cancel.
As a result, this plan will be added to the list of plans. The plan can be edited. You can add a plan image and cameras to the plan while editing a plan.
.png?inst-v=b63742cc-00c9-4c22-96cb-e64d375db7d7)
A new plan in Edit mode
You can create a plan from within a plan group. For details, see the Create and manage a group of plans article.
Manage a plan
Plan editing tools are available while viewing and editing the plan, as well as from the context menu of a selected plan. For details, see the following documentation sections:
Adjust a plan scale
The plan scale can be adjusted both in viewing and editing modes, allowing you to switch between a broad overview and a detailed focus on specific areas.
To manage the plan scale, use one of the following options:
Use the mouse scroll wheel. Hover your mouse cursor over the plan, hold down the Ctrl key, and use the scroll wheel.
Use the dedicated zoom buttons on the plan.
Hover over the plan and use the pinch gesture on a touchpad to zoom in or out.
Drag-and-drop a plan to reposition it on the screen.
To horizontally navigate an enlarged plan, use the mouse wheel. For this, hover your mouse cursor over the plan, hold down the Shift key, and use the scroll wheel.
Open a plan in Edit mode
To open the plan in Edit mode the plan, follow the steps:
To edit the plan, select the Edit icon at the top right of the opened plan. This enables the editing options.
Select the context menu icon (…) to call out the list of available editing options. A separate Add cameras button is also available.
.png?inst-v=b63742cc-00c9-4c22-96cb-e64d375db7d7)
The plan editing options
Introduce all necessary changes.
To save the changes, select the Save icon. If you try to exit Edit mode without saving changes, you’ll be prompted to save the changes.
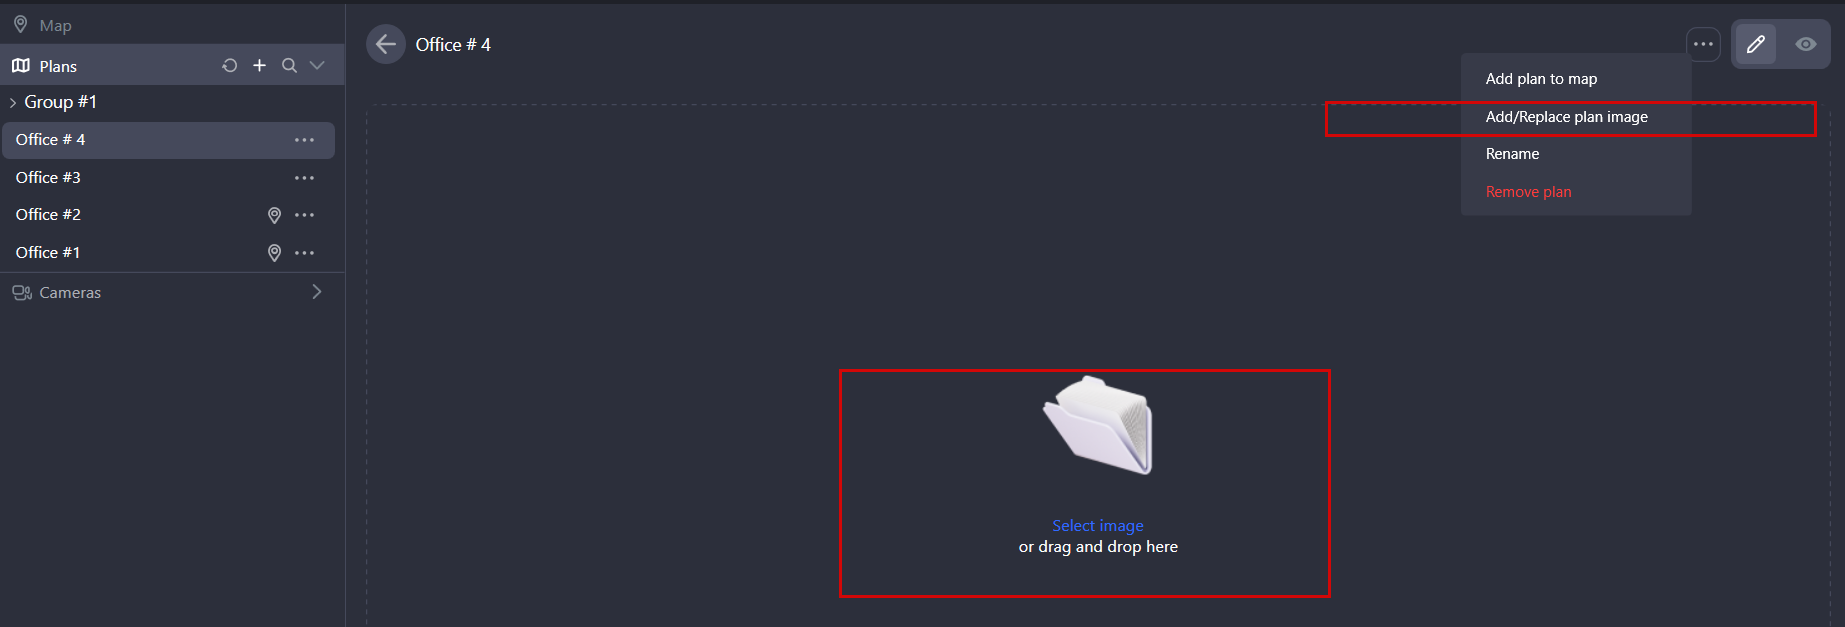
Add or replace a plan image
In Edit mode, you can add or replace an image of the plan in one of the following ways:
If there was no plan added before, you can opt to drag-and-drop an image or use the Select an image option to upload an image.
From the context menu, select Add/Replace plan image.
You can upload images in PNG, JPEG, BMP formats.
To save the changes, select the Save icon.
Managing the plan image
Add a plan to the map
You can add a plan to the map when editing or viewing the plan.
To add a plan to the map, follow the steps:
Open the plan. From the context menu of the opened plan, select Add plan to map.
In the opened window, specify the coordinates or drag the map to the relevant point
To save the plan on the map, select Add plan. To cancel, the action, select Cancel.
.png?inst-v=b63742cc-00c9-4c22-96cb-e64d375db7d7)
Adding a plan to the map
Change a plan address on the map
To change a plan address on the map, follow the steps:
While editing a plan, select Change plan address on map from the context menu.
In the opened window, confirm the action with Change.
In the newly opened window, specify new coordinates or point to a new spot on the map.
To save changes, select Add plan. To cancel, the action, select Cancel.
Show a plan on the map
You can select to view a plan on the map only of this plan is added to the map. This option is available only when viewing a plan. To show a plan on the map, use one of the following options:
In the list of plans, select the geolocation icon (Shown on the map) of the relevant plan.
.png?inst-v=b63742cc-00c9-4c22-96cb-e64d375db7d7)
The geolocation icon
While viewing a plan, select the context menu icon (…) and choose Open plan on map from the opened menu.
Rename a plan
You can rename a plan when editing or viewing the plan.
You can rename a plan in one following ways:
While editing a plan, select Rename. In the opened window, change the plan name and select Rename.
In the list of plans, select the context menu icon (…) of a plan and choose Rename from the menu. In the newly opened window, change the plan name and select Rename.
Delete a plan
You can delete a plan when editing or viewing the plan.
You can delete a plan in one following ways:
While editing a plan, select Remove plan. In the opened window, select Remove.
In the list of plans, select the context menu icon (…) of a plan and choose Remove from the menu. In the newly opened window, select Remove to confirm the action.
Move a plan to a plan group
For a faster navigation and management, created plans can be grouped. You can add a plan to an existing plan group. For this, follow the steps:
In the list of plans, select the context menu icon (…) of a plan.
In the opened menu, select Move plan.
In the newly opened window, from the dropdown list, select a group where to move the plan.
To complete the action, select Move.
For details on how to manage plans within plan groups, see the Create and manage a group of plans section.
Add cameras to a plan
Once the plan image is added, you can add cameras to the plan.
To add cameras to the plan, follow the steps:
Open the plan in Edit mode and select Add cameras.
From the opened drop-down list, select relevant cameras and Add. The added cameras will be placed on the plan.
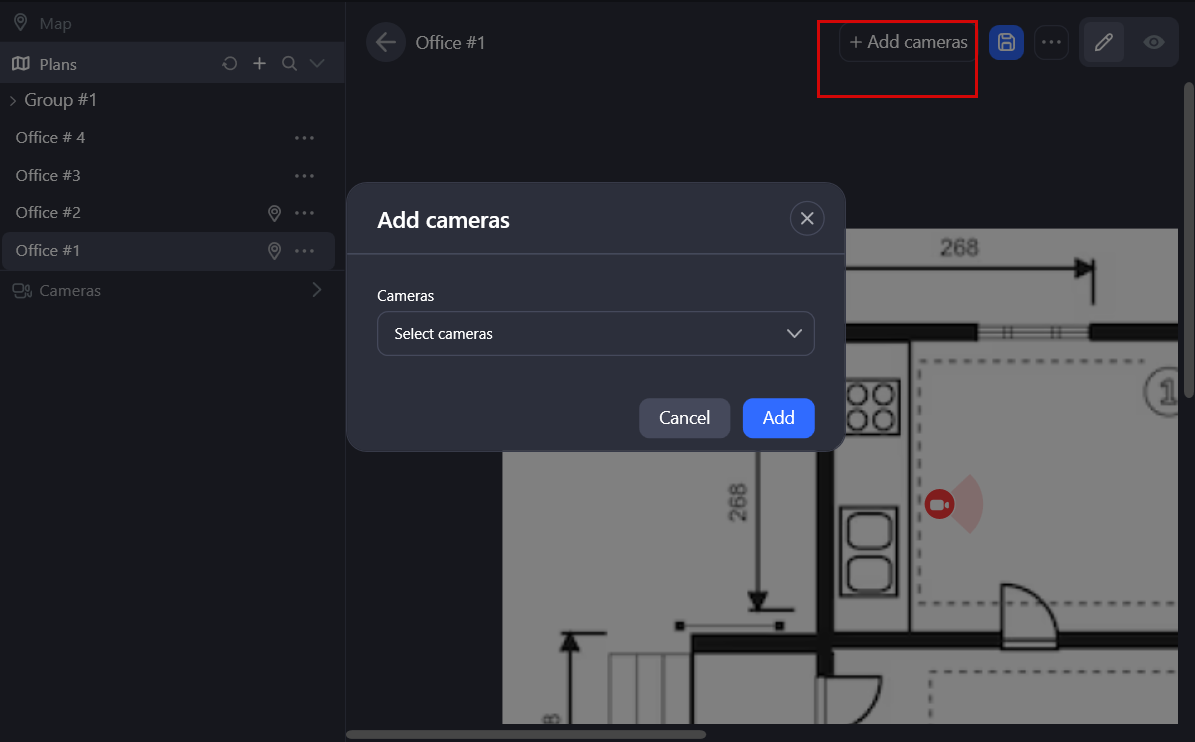
Add cameras to the plan
You can also add cameras to the plan by dragging-and-dropping them from the list under Cameras.
Locate the newly added cameras on the plan by dragging them to their appropriate positions.
Visualize the camera view direction on the plan. For this, left-click the camera. Click and drag the arrow to point the camera in the direction you want.
.png?inst-v=b63742cc-00c9-4c22-96cb-e64d375db7d7)
Ajusting a camera view direction on a plan
Visualize the camera view area on the plan. For this, left-click the camera. Click and drag one of the side spots to adjust the view area.
.png?inst-v=b63742cc-00c9-4c22-96cb-e64d375db7d7)
Ajusting a camera view area on a plan
To save the changes, select the Save icon.
Manage cameras on a plan
You can find a set of management tools for each camera on the camera preview window. To access these tools, select the camera icon and choose a relevant action icon.
.png?inst-v=b63742cc-00c9-4c22-96cb-e64d375db7d7)
The added cameras
The camera preview window
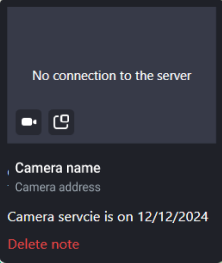
Selecting a camera icon opens a camera preview window that features managing options that are displayed with regard to the user permissions. The user can also track here a camera name and address, and the video preview from the camera. If camera video isn’t available at the moment, a relevant error notification will be displayed.
Show the camera on the map
You can select to show a camera on the map when editing or viewing the plan. For this, select the geolocation icon (Show on the map) in the camera preview window. The icon is displayed for the cameras that are added to the map. Selecting this icon will navigate you to the Map section to the exact point on the map where the camera is added.
Open Live
You can select to Open Live when editing or viewing the plan.
To view camera feed in Live mode, select the camera icon in the camera preview window and Open Live. As a result, the live stream will then open in a new player window. The window name is identical to the opened camera name. All the controls on the opened player are identical to the controls of a separate camera on a layout in Live mode.
.png?inst-v=b63742cc-00c9-4c22-96cb-e64d375db7d7)
The Camera icon
Open Archive
You can select to Open Archive when editing or viewing the plan.
To view camera footage in Archive mode, select the camera icon in the camera preview window and Open Archive. As a result, the archived video will then open in a new player window. The window name is identical to the opened camera name. All the controls on the opened player are identical to the controls of a separate camera on a layout in Archive mode.
Delete a camera from the plan
You can select to delete a camera from the plan when editing or viewing the plan. To delete a camera from the map, select the Delete icon on the camera preview window of the camera. Confirm the action. To save changes on the plan, select the Save button on the plan.
Add a note to the camera
You can add a note to the selected camera on the camera preview window by selecting the Add notice icon. For this, follow the steps:
Select the Add notice icon.
In the opened field, enter the note text.
The note can be up to 50 characters.
You can use Cyrillic, Latin, numeric characters, hyphens, and the following symbols: !@#$%^&*()[]{}<>,_-.
To save the changes, select the Submit icon. To cancel the action, select Cancel.
The added note will be displayed on the camera preview window on the map. To edit a note, left-click the note, edit the text, and save it. To delete the note, select Delete note.
The camera with a note
Place camera live feed on the plan (Live view)
To place camera live feed on the plan, select the Live view icon in the camera preview window. You can place life feed on the plan from multiple cameras.
.png?inst-v=b63742cc-00c9-4c22-96cb-e64d375db7d7)
Live view icon
A detached window with camera Live mode will open at the bottom left of the visible map area. You can reposition the window by dragging-and-dropping it. You can open multiple cameras in this way.
.png?inst-v=b63742cc-00c9-4c22-96cb-e64d375db7d7)
The detached windows with live feed
To close the detached windows, select the Close icon or Close all at the top right.