Layouts
In the Layouts section, you can create custom camera layouts and watch camera feed from within a layout.
Each layout can contain from 1 to 16 cameras and allows simultaneous watching of selected cameras.
By default, layouts are listed in descending order of creation date, with the most recently created layouts appearing at the top of the list.
In the Layouts section, you can perform the following actions:
Search for a layout.
Create a layout.
Rename a layout.
Delete a layout.
View a layout.
Edit a layout.
Create a layout
You can create a new layout in several ways.
Option 1
Expand the Layouts section.
Select the Pus icon.
In the opened form, enter a layout name.
Select the Confirm button.

Creating a new layout
Option 2
If no layouts are open, the Create a layout button is displayed in the working area. Select the button.
In the opened form, enter a layout name.
Select the Confirm button.

Creating a new layout
The created layout will appear in the Layouts section
Open a layout in the workspace
To open a layout in the workspace, follow these steps:
Expand the Layouts section.
Select the layout name.
As a result, the layout opens in the workspace.

Opening a layout in the workspace
Add a camera to a layout
You can flexibly adjust the number of cameras in the layout by selecting the appropriate grid. The available grid options are located at the top panel of the layout.
Grids with 8, 9, 11, and 16 cameras are available only in Live mode.
You can add a camera to a layout in one of the following ways:
Option 1
Open a layout.
Select a camera grid.
Open the camera list. You can expand any layout: All cameras, Camera tree, Camera groups, or Layouts, which contain the cameras you need.
Drag a relevant camera and drop in a proper cell in the grid.
When you add a camera to a grid, it will be automatically synchronized across all other grids in the current layout. This means that if you change the grid layout, the newly added camera will be present in the new configuration as well.
If needed, repeat the process for other grids and layouts
To change the location of the camera on the grid, delete it by selecting the Crossed icon X in the upper left corner of the image and add it again at the desired position.
Select the Save button.
.png?inst-v=b63742cc-00c9-4c22-96cb-e64d375db7d7)
The Save button
Option 2
Open a layout.
Select a camera grid.
Hover over the layout name. Next to the layout name, select the Plus icon.

Button to add cameras to layout
From the opened list, select the required cameras and Save.
Repeat the process if you change the grid.
If you select a layout with fewer cells than the number of cameras currently in the layout, a dialog box will appear, prompting you to choose the appropriate number of cameras to display.

Camera selection
Select the required cameras and Add. The search is conducted by camera name. As a result, you navigate to the selected grid, where only added cameras are displayed.
The functions of the video player window are described in the View video in the player section.
For details on how to view cameras in a layout, see the View cameras in a layout documentation section.
It is also possible to switch to Archive mode. To do this, select the Archive button at the top right. As a result, in Archive mode, you will see the general timeline for all cameras in the layout and each camera cell features an individual timeline.
.png?inst-v=b63742cc-00c9-4c22-96cb-e64d375db7d7)
Archive mode
Please take into consideration that a camera can be set up in a different time zone. This affects the date and time when you view live streams or archived footage, as well as when you export the archive. For details, see the Coordinated Universal Time (UTC) section.
Move the camera in the layout grid
To move a camera within the layout grid, follow the steps:
Hover over the camera name.
Drag the name with the left mouse to a relevant cell. If this cell is occupied by another camera, the cameras will swap cells.
Save changes.

How to move the camera in the layout grid
Complain about the camera (report an issue)
You can report issues with the camera. For this, follow the steps:
Select the camera in a relevant layout.
To open the camera context menu, hover over the camera name and select the horizontal ellipses icon (…).
Select Complain about the camera.
Specify the problem:
Foreign objects in the lens
No sound
No picture
Interruptions in work
Swing mechanism defective
Select the Complain the camera button.
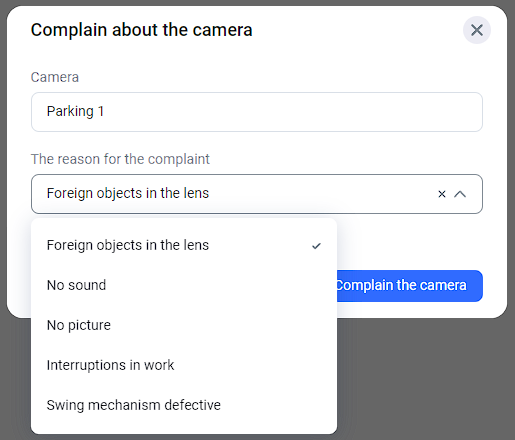
Reporting a camera issue
Rename a layout
To rename a layout, follow these steps:
Expand the Layouts section.
Hover over the layout you want to rename.
Select the Plus icon.
Select Rename layout. Enter a new name.
Select Confirm.

Renaming a layout
Delete a layout
To delete a layout, follow these steps:
Expand the list of layouts.
Hover over the layout you want to delete.
Select the Plus icon.
Select Delete layout.
Confirm.
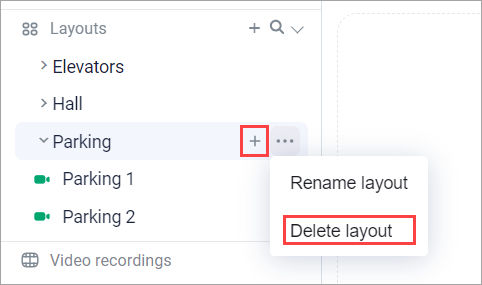
Deleting a layout