All cameras. Camera tree. Camera groups. Search, add, and edit
Manage cameras
You can find a set of tools to manage cameras in the sections: All cameras, Camera tree, Camera groups, and Layouts. You can access the management tools either from the context menu of a selected camera or on the level of the section.
On the section level
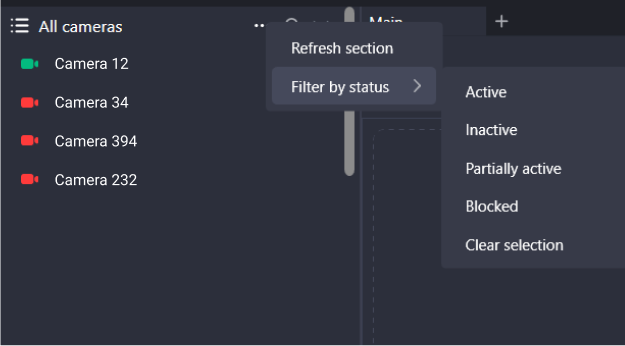
On the section level, you can manage cameras from the context menu of the section. For this, expand the section and select the context menu icon of the section (…). This will open the menu with the following options:
Search of cameras by name.
Filter cameras by its status: Active, Inactive, Partially active, Blocked. To cancel filtering, select Clear selection.
Refresh the section with the Refresh section button.
Managing cameras on the level of the section
Via the context menu of the selected camera
To call out the camera context menu, hove over the camera and right-click the context menu icon (…). This will open the menu with the following options to manage a camera:

Open. Select this option to open a camera in the selected cell of the opened layout.
Add camera to group. Select this action to add a camera to a camera group.
Rename. Select the action to rename a camera.
Complain about the camera. Select the action to report an issuer with a camera.
Open camera on map. Select the action to open a camera on the map. The action is available for the cameras added to the map.
Information. Select the action to view the system name of the camera.
Delete camera from group. Select the action to delete a camera from a camera group. Applicable for cameras in the groups.
Remove camera from layout. Select the action to delete a camera from a layout. Applicable for cameras on a layout.
Complain about a camera
To report a camera’s issue, follow the steps:
Select a camera and right-click its name to call out its context menu.
In the menu, select Complain about the camera.
Specify the issue:
Foreign objects in the lens
No sound
No picture
Interruptions in work
Swing mechanism defective
Only one issue can be reported at a time.
Next, select Apply to complete the action.
.png?inst-v=b63742cc-00c9-4c22-96cb-e64d375db7d7)
An issue selection
Add a camera to a group
You can only add a camera to a custom group.
You can add a camera to a group in one of the following ways:
From the All cameras section.
From the Camera tree section.
From other groups.
Option #1
On the left-side menu, expand the section of a layout to find a relevant camera.
Call out the context menu of the camera by selecting the icon (…).
From the opened menu, select Add camera to group.
From the newly opened drop-down list, select a group to add this camera.
Select Add.
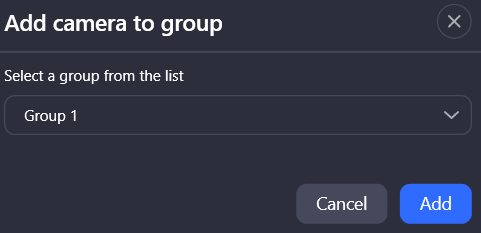
Adding a camera to a group
Option #2
To add a camera to a group, drag-and-drop it.
Open a relevant group or a layout to add a camera.
Drag-and-drop the camera to the title of the group or a layout.
Delete a camera from a group
You can delete a camera from a user group. Once deleted from a group, the camera will remain available under All cameras and Camera tree.
To delete a camera from a group:
Open the group and hover over the relevant camera.
Call out the context menu of the camera by selecting the icon (…).
From the opened menu, select Delete camera from a group.
Open a camera on the map
You can select to view a camera on the map only if this camera is added to the map.
To show a camera on the map:
Call out the context menu of the camera by selecting the icon (…).
From the drop-down menu, select Open camera on map.
As a result, the camera will open on the map. For details about how to manage the camera on the map, see the Map documentation section.
Camera groups
Groups are used to arrange cameras based on certain characteristics: by location, quality, etc. Users arrange groups at their own decision and add camera to them.
Under Camera groups, you can find the set of tools to manage the Camera groups section, an individual camera group, and cameras inside groups.
To call out the context menu, hover over the selected group and left-click the context menu icon (…).
On the level of the Camera groups section, you can perform the following actions:
Refresh the section.
Filter cameras by its status: Active, Inactive, Partially active, Blocked. To cancel filtering, select Clear selection.
On the level of an individual camera group, you can perform the following actions:
With regard to a camera in a group, you can perform the actions that are described in details in the Manage cameras section.
Search for a group and a camera
Type a camera or group name to instantly narrow down your search options.
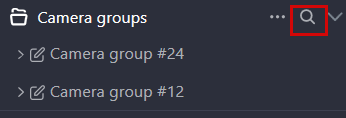
The search icon
Add (create) a camera group
You can create a camera group in one of the following ways:
Option #1
Call out the context menu of the Camera groups section title by selecting the horizontal ellipses icon(…).
From the opened list, select Add camera group.
.png?inst-v=b63742cc-00c9-4c22-96cb-e64d375db7d7)
Select Add camera group
Complete the opened form.
Enter a unique group name.
Optionally, you can select cameras from the next drop-down list. These cameras will be added to this camera group. You can add cameras later.
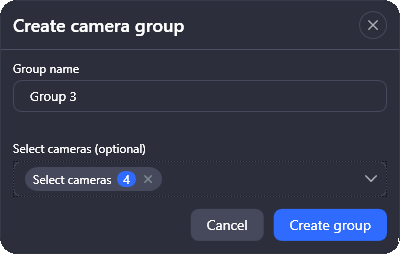
Adding a camera group
To complete the action, select Create group.
Option #2
At the left bottom of the left-side panel, select New camera group.
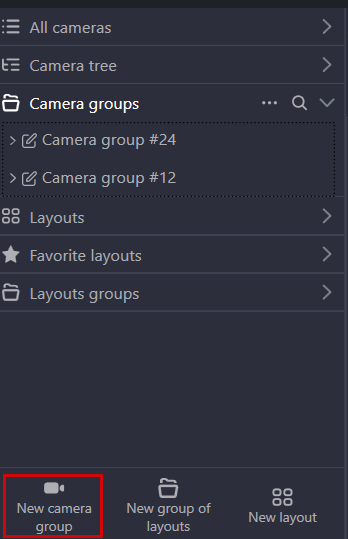
The New camera group button
Complete the opened form.
Enter a unique group name.
Optionally, you can select cameras from the next drop-down list. These cameras will be added to this camera group. You can add cameras later.
To complete the action, select Create group.
Open cameras in the layout
The Open in layout option allows for simultaneous opening the group cameras in a new layout to view them. The option is available for the groups that contain at least one camera.
To open cameras in a layout:
Right-click the camera group name to call out the context menu.
Select the Open in layout option.
In the opened form, select the cameras and confirm the action.
.png?inst-v=b63742cc-00c9-4c22-96cb-e64d375db7d7)
The Open in layout option
The maximum number of cameras that are available to view depend on the mode.
In Live mode, you can select up to 49 cameras.
In Archive, the number depends on the following settings. When the Show all archive layout templates settings is selected, the maximum number of cameras is 16; when the setting isn’t enabled – up to 6.
After confirmation, a new layout is created bearing the same name as the group.
A detailed description of the options available when viewing cameras open in layout is available in the relevant documentation sections:
Clear a group
The Clear group option enables you to delete all the cameras from the selected camera group. The option is available for the groups that contain at least one camera.
Rename a camera group
You can only rename a user’s group.
To rename a group, hover over a relevant group. Right-click to open the context menu.
Select the Rename group menu item.
Enter a new name and select Rename.
Delete a group
You can only delete a user’s group.
To delete a group, hover over a relevant group. Right-click to open the context menu. Select the Delete group menu item and confirm the action.
As a result, the group will be deleted with all included cameras. The cameras from the deleted group will remain available under All cameras and Camera tree.