
In Live mode, each camera features a set of controls that varies depending on the specific camera model.
You can manage all cameras in bulk within the layout. For detailed instructions, refer to Layout and bulk camera controls in Live layout article.
.png?cb=9e328b657c9af5ebdac343a63d60243b)
Selecting F7 while viewing a camera in a layout toggles the display of controls for all cameras within that layout and any other open layouts.
|
Select the camera cell to activate it |
To manage an individual camera on the layout, activate the cell for this camera. You can select the camera cell on the layout by left-click. As a result, the cell will be highlighted. Select Esc to remove highlighting of the cell. |
|
|
A camera name. Select the arrow icon to the right of the camera name to hide or display the camera name. |
|
|
The icon indicates the number of Analytics cases this camera is enrolled in. Selecting this icon opens a panel with the cases to manage them. For details, see the Added Analytics cases documentation section below. |
|
|
Use the Add videoanalytics to camera button to add an Analytics case to an individual camera. For details about how to use this option, refer to the Optional ways to create a case documentation section. |
|
Use the Fill camera image button to expand an image within a single camera cell, or select this button in the top panel to apply this adjustment to all camera images in the current layout. This scaled view is also applied in full-screen mode. To revert to the original image size, click the button again. |
|
Enable and disable audio. Displayed for cameras that support audio recording. |
|
|
Adjust camera pan, tilt, and zoom. This option appears for cameras that support PTZ. For details, navigate below to the PTZ function. |

|
Create a quick event. For details, navigate below to Create a quick event. |
|
Capture and save a screenshot to a PNG file. For details, navigate below to Capture a screenshot. |
|
This button allows you to select the video stream quality. When selected, it switches between HD (high quality) and SD (standard quality) if both options are available. |
|
Select this button to open the camera full screen. For details, navigate below to Watch the camera full screen. |
|
|
Remove a camera from a cell of the layout. To remove a camera from the cell, select the Crossed icon (X) in the upper right corner of the camera image. However, you can’t delete a camera from a layout when playing video full screen. Save changes once complete. |
|
|
Zoom control: use the slider to digitally zoom in (right) or out (left). For details, navigate below to Zoom control. |
The following is a detailed description of the controls and functions.
Enable and disable audio
For cameras with audio, the Sound on/off button appears in the video view.
The PTZ function
A camera control button is displayed when viewing a broadcast from a PTZ-enabled camera. Activating this button reveals a panel with controls for camera rotation (pan/tilt) and image zoom.
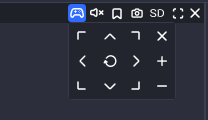
Because camera controls may have a delay, press direction or zoom buttons individually and wait for a response before the next press.
To reset the settings, select the Refresh icon.
To exit, select the PTZ control button or the X button on the camera control panel.
Create a quick event
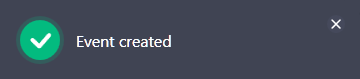
The function is designed to create a quick event at the current moment. Once you select the button, you’ll see a notification on a successful event creation.
When watching a camera in the Archive/DVR section, the camera timeline displays markers for events.
You can view and edit quick events in the Events section of the User events tab.
Capture a screenshot
The function is designed to capture and save a screenshot to a PNG file.
You can also capture a screenshot of a layout to save simultaneously the images from all the cameras. The relevant icon is located on the upper toolbar in the Live section. For details, see the Toolbar. Live mode page.
You can select the default directory where files will be saved. The directory is specified in the Settings section. If a directory is not specified, a directory selection window will be displayed each time you save.
Select the Save screenshot button. This opens the following window to select the relevant option to save the image:
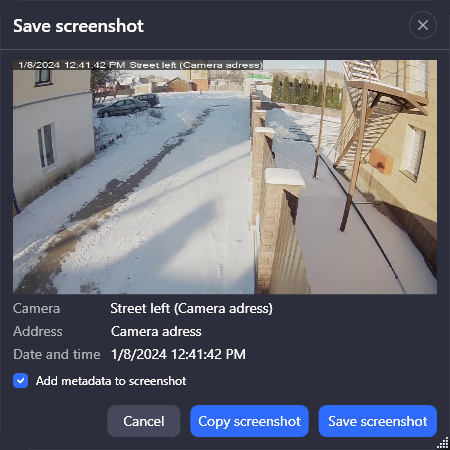
The form displays the following camera data: name, address, and the date and time of saving.
To apply this data to the screenshot, enable the Apply metadata to screenshot setting.
Save the screenshot, select a relevant option:
-
Copy screenshot – this will copy the screenshot to the clipboard.
-
Save screenshot – this will save the screenshot to a PNG file on your device.
If a destination path for exported files is defined in the Settings section, files will be saved automatically to that location. When no path is specified, a directory selection window will be presented upon each upload.
Select a video stream quality
The HD/SD button allows you to select the video stream quality. When selected, it switches between HD (high quality) and SD (standard quality) if both options are available.
You can only change the quality when there are two video streams available.
Opening a layout template with only one camera automatically sets the quality to HD.
Expanding a layout camera's image to full screen sets the quality to HD by default. Upon returning to the layout view, the quality reverts to SD (unless HD was previously selected). The chosen quality is saved for the camera when the layout is saved.
Watch the camera full screen
Select this button opens the camera full screen that features all controls. To return to the layout, select the full-screen mode button again or ESC on the keyboard.
Remove a camera from a layout
To remove a camera from the cell of the layout, select the Crossed icon (X) at the upper right of the camera image. However, you can’t delete a camera from a layout when playing video full screen. Save changes once complete.
If you didn't mean to select that button, just close the layout without saving and then open it again. That will undo any accidental changes.
Zoom control
Zoom control: use the slider to digitally zoom in (right) or out (left).
.png?cb=073c24576cb2949a3daba866828650d8)
You can also zoom using the keyboard and mouse. Simply hover over the image, hold down CTRL, and scroll the mouse wheel up or down.
To move the zoomed image, hover the cursor over it, press and hold the left mouse button, and drag the mouse in the relevant direction.
Maximize the camera view to fill the workspace
You can maximize any camera view to fill the workspace by double-clicking any empty area within its cell. This view keeps all controls.
When the image is expanded, the video quality switches to high if a high-quality stream is available.
To return to the layout view, double-click any empty area within the expanded image.
Added Analytics cases
The icon ![]()
.png?cb=7dd089088aea804fb3a2c245ba26c12d)
On the open panel, under Analytics cases, you can view all cases involving this camera. Selecting a case displays its details.
You can perform the following actions on cases:
-
Delete a case. For this, select the Delete icon next to a relevant case and confirm the action.
-
Navigate to the case page by selecting Go to case page.
-
Edit a case name.
-
Edit case settings.
-
Edit case reactions.
-
Modify detection areas or crossing lines. For details, refer to the Create an Analytics case documentation page.
-
Navigate to the Analytics tab, cameras section.
If you make changes, use the Save button to finalize your updates.
The comprehensive guide on how to use the mentioned above functionality is on the next pages:
You can access Analytics events, view, and edit cases from within the Analytics tab > Analytics cases. For details, refer to the View and edit a case documentation section.