
-
Analytics cases can be added to cameras that provide HD streams.
-
Before adding a new Analytics case, it is recommended to verify that free licenses of the required Analytics level are available on the Licenses tab.
-
Adding a camera to an Analytics case consumes one Analytics license.
When no license is available, the system displays a notification when you attempt to create an Analytics case.
The process of adding an Analytics case involves several steps.
Step #1: Add a name, select an Analytics type and cameras
.png?cb=79ef975997b26e4b910a6255b8f82e1e)
-
Give a name to an Analytics case.
-
Choose an Analytics type for this case. The following types are available in the Desktop app:
-
Counting people (objects) in an area. This tool automatically locates and determines the exact number of people in a designated area of a video stream. Notifications are sent when the number of objects in the area changes.
-
Camera damage/ overlap/ vandalism detection. This feature is designed to automatically detect and identify instances of camera interference, including damage, blockage, or vandalism, within a video stream. By continuously monitoring the video feed, it can promptly alert the system or the user when such incidents occur.
-
Smoke and fire detection. This tool automatically locates and detects smoke and open flames in a designated area of the video stream.
-
Zone intrusion detection. This tool automatically locates motion within a designated area of a video stream.
-
Detection of loud sounds. This tool automatically detects loud sound events using the microphone of the video camera.
-
Line crossing detection. This tool automatically locates and verifies instances of crossing a designated line within a video stream.
Cases for the following Analytics types can only be created and edited in the Web app. Once created in the Web app, they are automatically synchronized with the Desktop app: the cases appear in the lists, and their detected events are displayed in the Events section along with other Analytics events. However, users cannot view case details or edit these cases from within the Desktop app.
-
Visitor counting
-
Face recognition
-
License plate recognition
-
Container number recognition
-
Add cameras to the case.
For this, select Add under Add cameras. This action opens a camera list for selection. To quickly locate a camera, search by its name. The list includes only cameras that meet the following criteria:
-
The camera is in the Active status.
-
The camera has a high‑quality stream available.
Choose cameras and Add. To cancel the action, select Cancel.
The added cameras are displayed with a preview under Add cameras. To remove a camera from this list, select the Delete icon on its preview window.
.png?cb=fbf2979b1d11dd956fcd993ebdc146b3)
-
To proceed to Step #2, select Next.
Step #2: Set up camera
Depending on the selected Analytics type of the case, the camera configuration may differ.
Pick a camera from the list to configure. The system will display its settings panel.
.png?cb=13bda1671245e72c373a01b05e1e9b90)
You can configure individually each camera of the case, or enable the Use as default option. This feature allows you to replicate the parameters and reaction settings of the current camera across all other cameras in the case. For cameras where these settings have been applied, the master camera’s name is displayed, and configuration changes are restricted.
Detection areas and crossing lines aren’t inherited from the master camera.These parameters must be configured independently and remain editable for each camera in the case.
.png?cb=2aa755202bd34b02ec03550df82cfc1f)
To cancel these settings, return to the master camera and toggle off the Use as default option. This action reverts the settings of other cameras to their previous values and makes them editable again.
The Use as default option is automatically reset to Off when you edit an exisitng case where this option was previously enabled. The shared settings remain applied to all cameras but become available for editing.
The process of setting up a camera includes the following stages:
-
Configuration of additional parameters for specific Analytics types.
-
Configuration of a reaction to detected events.
Additional parameters on Step #2
Depending on the selected Analytics type of the case, additional parameters may differ.
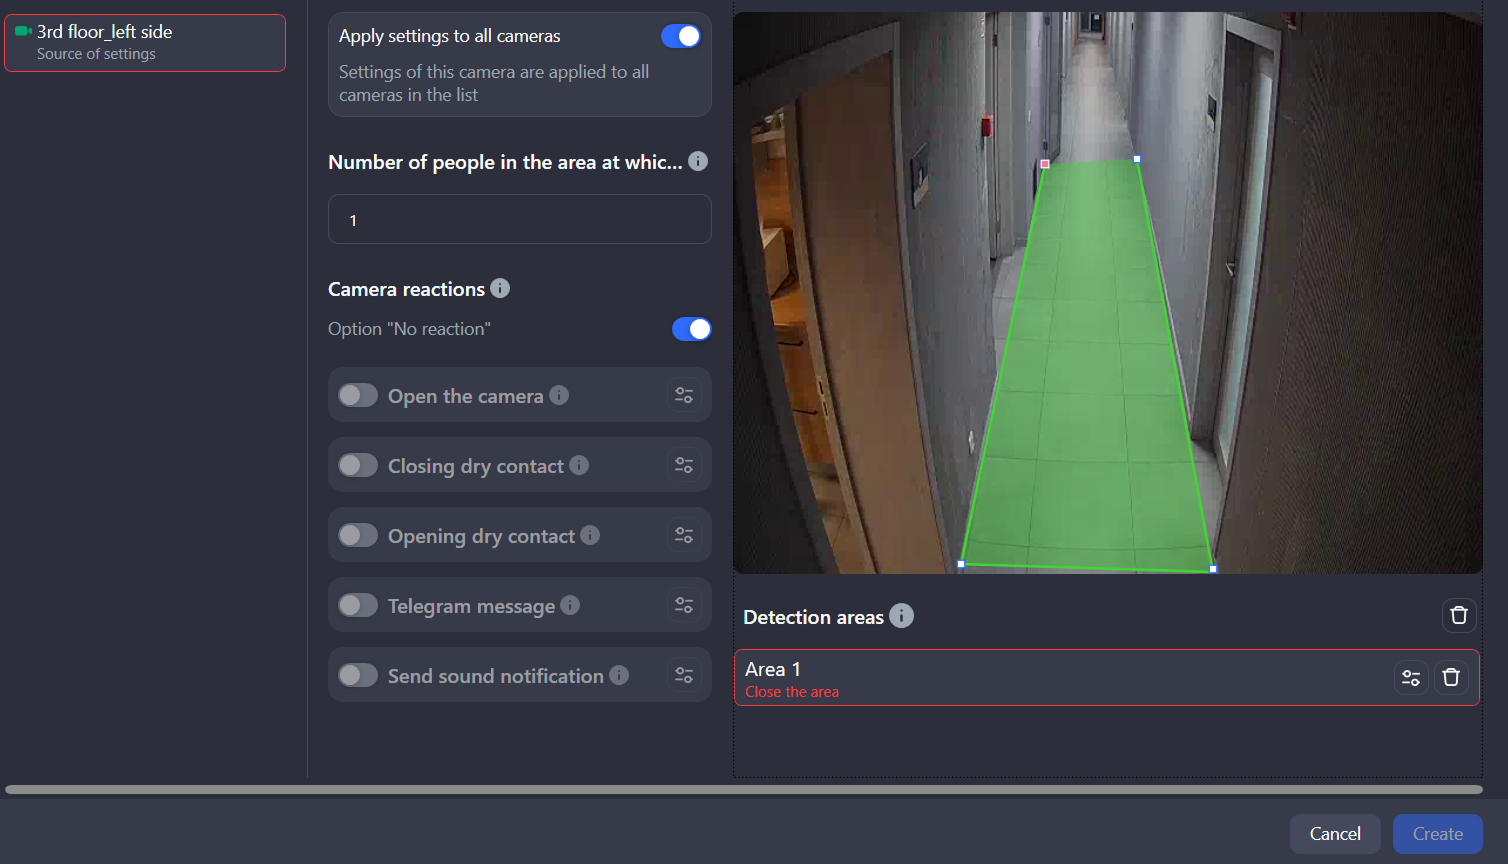
Counting people (objects) in an area
Under Number of people in the area, specify a threshold – number of people in the designated area of a video stream, reaching which the system will detect an event and trigger a reaction. Only integers greater than 0 are valid.
Set detection areas. Specify one or more virtual zones within the camera’s field of view in which people counting will be performed. The system supports up to six independently configurable detection areas.
To set a detection area, follow these instructions:
-
Click to draw lines: while viewing the camera image, use the left mouse button to click and draw the boundary lines of the recognition area. Ensure the lines you draw don’t cross or intersect one another. To complete the area, connect the last point back to the first point. remains highlighted in red until the area is closed. Once the area is successfully closed, it will become filled in green.
-
Use the Fill full area option to automatically define the entire camera image as a single detection zone.
-
Each detection area is identified in the following way: it is represented by a row under the camera image. The row contains the area name, the rename option, and the delete option. Selecting the row highlights the area in the camera image.
-
To delete an area, select the row with its name and use the Delete area button.
Overlapping of detection areas is permitted. Once detection occurs within the intersection of two or more areas, the system generates a distinct event for each area.
Zone intrusion detection
Under Sensitivity (1–100), set the minimum detector sensitivity, reaching which the system will detect an event and trigger a reaction.
Next, set detection areas. Specify one or more virtual zones within the camera’s field of view in which people counting will be performed. The system supports up to six independently configurable detection areas. For details on how to set up a detection area, refer to the section above – Counting people (objects) in an area.
Detection of loud sounds
Under Sensitivity (1–100), define the minimum detector sensitivity, reaching which the system will detect an event and trigger a reaction.
For cases of this Analytics type, setup of detection areas isn’t required.
Smoke and fire detection
Under Sensitivity (1–100), define the minimum detector sensitivity, reaching which the system will detect an event and trigger a reaction.
Next, set detection areas. Specify one or more virtual zones within the camera’s field of view in which people counting will be performed. The system supports up to six independently configurable detection areas. For details on how to set up a detection area, refer to the section above – Counting people (objects) in an area.
Line crossing detection
In this Analytics case, specify one or more lines that trigger detection when crossed. The maximum number of lines is 6. The system registers the moment when an object in the frame moves across the designated line in the specified direction. As a result, the system automatically generates an event and activates the predefined reaction scenario.
To draw a virtual line and set the direction where the object should move to trigger a reaction:
-
Click to draw lines: while viewing the camera image, use the left mouse button to click the starting point and the ending point to draw the detection line.
-
The detection vector is automatically assigned based on the order of point placement. The detection vector is derived from the drawing path (start-to-end point). The system automatically displays a directional arrow corresponding to this vector to signify the flow of movement that will initiate an event. To reverse the vector direction, hover the cursor over the directional arrow and click the left mouse button.
-
To adjust a line, move its points. To do this, hover the cursor over a point, hold down the left mouse button, and drag the point to a new position.
-
Each detection line is identified in the following way: it is represented by a row under the camera image. The row contains the line name, the rename option, and the delete option. Selecting the row highlights the line in the camera image.
-
To delete an area, select the line with its name and use the Delete area button.
.png?cb=13bda1671245e72c373a01b05e1e9b90)
Set a reaction to an event
The configuration of system reactions is entirely independent of the chosen video analytics type. The process for creating an event reaction remains uniform across all Analytics case definitions.
If required, enable the No reaction option. Once this option is enabled, the user won’t receive any notifications when the event occurs. At the same time, the detected event will still be recorded and displayed in the event list for this Analytics case.
To set up a reaction from the list below, the No reaction option should be toggled to Off.
The following types of reactions are available:
-
Open the camera. When an event is detected, a separate window will open displaying the camera in Live mode.
-
Close dry contact. This reaction activates a device. The reaction can be integrated with control and management systems (intercoms, barriers). Supported only for cameras equipped with a dry contact sensor.
-
Open dry contact. This reaction deactivates a device. Supported only for cameras equipped with a dry contact sensor.
-
Telegram message. This reaction triggers sending a message to Telegram. For details, refer to the documentation section below.
To enable a reaction, toggle it On.
Next, set up a schedule for each added reaction. For this, follow the steps:
-
Select the Edit reaction button of the relevant reaction.
-
On the opened Manage reactions panel, specify details:
-
The period, when the reaction operating period (required).
-
Additionally, you can specify an inactive period for the reaction within the defined operating schedule. It refers to a time interval when the reaction is intentionally inactive, even though the overall reaction schedule (operating period) is active.
-
For the Telegram message reaction, specify a bot token and Chat ID. For detailed instructions, see the details below.
-
Select Save to complete the setup. Select Cancel to cancel the action.
Ensure, each camera in the case is properly set up. Cameras with incomplete mandatory settings are highlighted in red. This occurs when:
-
No other reaction is enabled while the No reaction option is disabled.
-
A detection area or line isn’t completed.
.png?cb=3ad8271300c4840c11e26161c6a89c4d)
To complete creation of a case, select the Create button. This will create a case and open its details. For details on how to manage the Analytics case, refer to the View and edit a case documentation page.
If a case includes multiple cameras and some cannot be added due to an error:
-
An error icon is displayed next to each affected camera in the case.
-
The case is still created successfully.
-
The case is marked with an information icon indicating that one or more cameras failed to be added.
.png?cb=f73b523e2c70faf06052e77d557e5f93)
Telegram message reaction
To get the bot token, follow the steps:
-
Open Telegram.
-
In the search bar, enter @BotFather, select the account, and Start.
-
Enter the /newbot command.
-
Enter the name for your bot (no specific requirements for the name).
-
Enter the username following this example: name_bot (once the name is provided, make sure to add _bot at the end).
-
In the next message, you’ll receive a message with a link to your created bot and the bot token.
To get the Chat ID, follow the steps:
-
Follow the link within the received message to access your newly created bot, and then select Start.
-
In your browser, enter the following request:
https://api.telegram.org/botXXXXXXXXX:YYYYYYY-YYYYYYYYYYYYYYYYY_YY/getUpdates
Replace XXXXXXXXX:YYYYYYY-YYYYYYYYYYYYYYYYY_YY with your bot token.
-
Send any message to the bot in Telegram.
-
In the browser, refresh the page with your request.
-
Copy the Chat ID.