
The Bridges section covers activation of the Bridge device, adding and configuring cameras on the VSaaS platform via the Bridge, and managing camera access for other users. Connecting the Bridge and cameras to the local network with Internet access, as well as performing their initial setup, is carried out by users independently.
Add a bridge
In the Devices section, you can add and configure bridge devices, as well as add and set bridge cameras.
Cameras added to a bridge will be available to view in all the user interfaces if all necessary permissions are provided.
A bridge can be added:
-
Via the Administrator interface by the administrator at the user’s request.
-
Via the web interface of a user. See the instructions below.
The Devices tab is empty if there are no previously added bridges.
To add a bridge, follow the steps:
-
Expand the Bridges section and select the Add bridge button.
-
On the opened Add bridge panel:
-
Enter a bridge name.
-
Select a method to add a bridge:
-
Via a MAC address.
-
Via a serial number.
-
A MAC address and a serial number can be found on the bridge device. A MAC address is represented as a 12-digit sequence of numbers and Latin letters from A to F.
-
When the fields are completed, select Add to finalize adding a bridge.
.png?cb=ae499eb115a391c11821538bd4745eb5)
As a result, the bridge is added, and you start receiving information from the device.
The added bridge is listed in the Bridges list. Select a bridge name to open the detailed information.
View bridge details. Manage cameras
Bridge details are grouped on the following tabs:
-
Cameras
-
Archive
-
General information
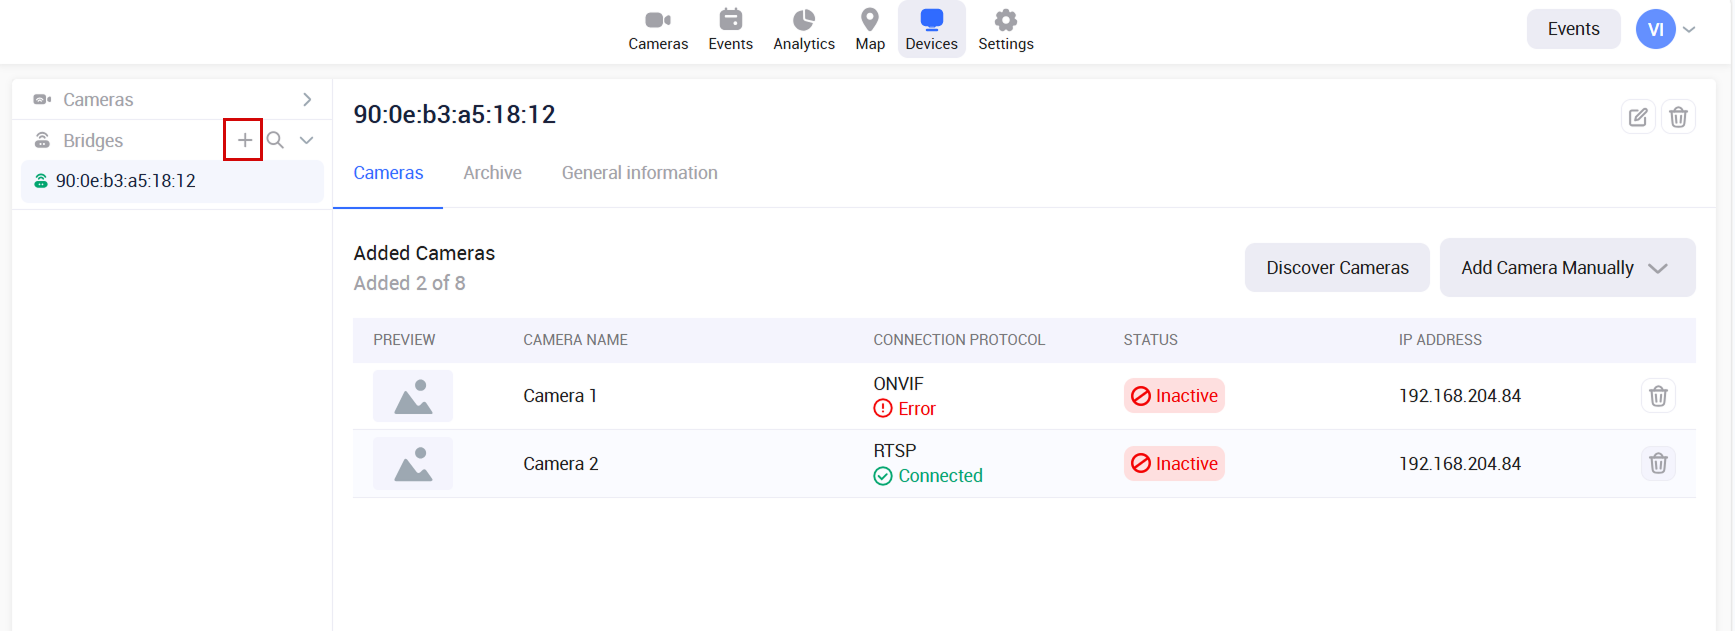
The Cameras tab
Selecting a bridge name navigates you to the Cameras tab.
.png?cb=ff6e15326af33676b6abc84d518fce14)
On the Cameras tab, you can perform the following actions:
-
View the list of the cameras detected by the bridge under Discover cameras.
-
Add a camera from the Discovered Cameras list using the ONVIF or RTSP option.
-
-
Add a camera manually under the Add camera manually drop-down.
-
View and manage camera settings.
The comprehensive guide on the camera management options is available on this page in the Manage cameras documentation section.
The Archive tab
In the Archive tab, you can view and manage the archive recording settings to the cloud for each camera added to the bridge.
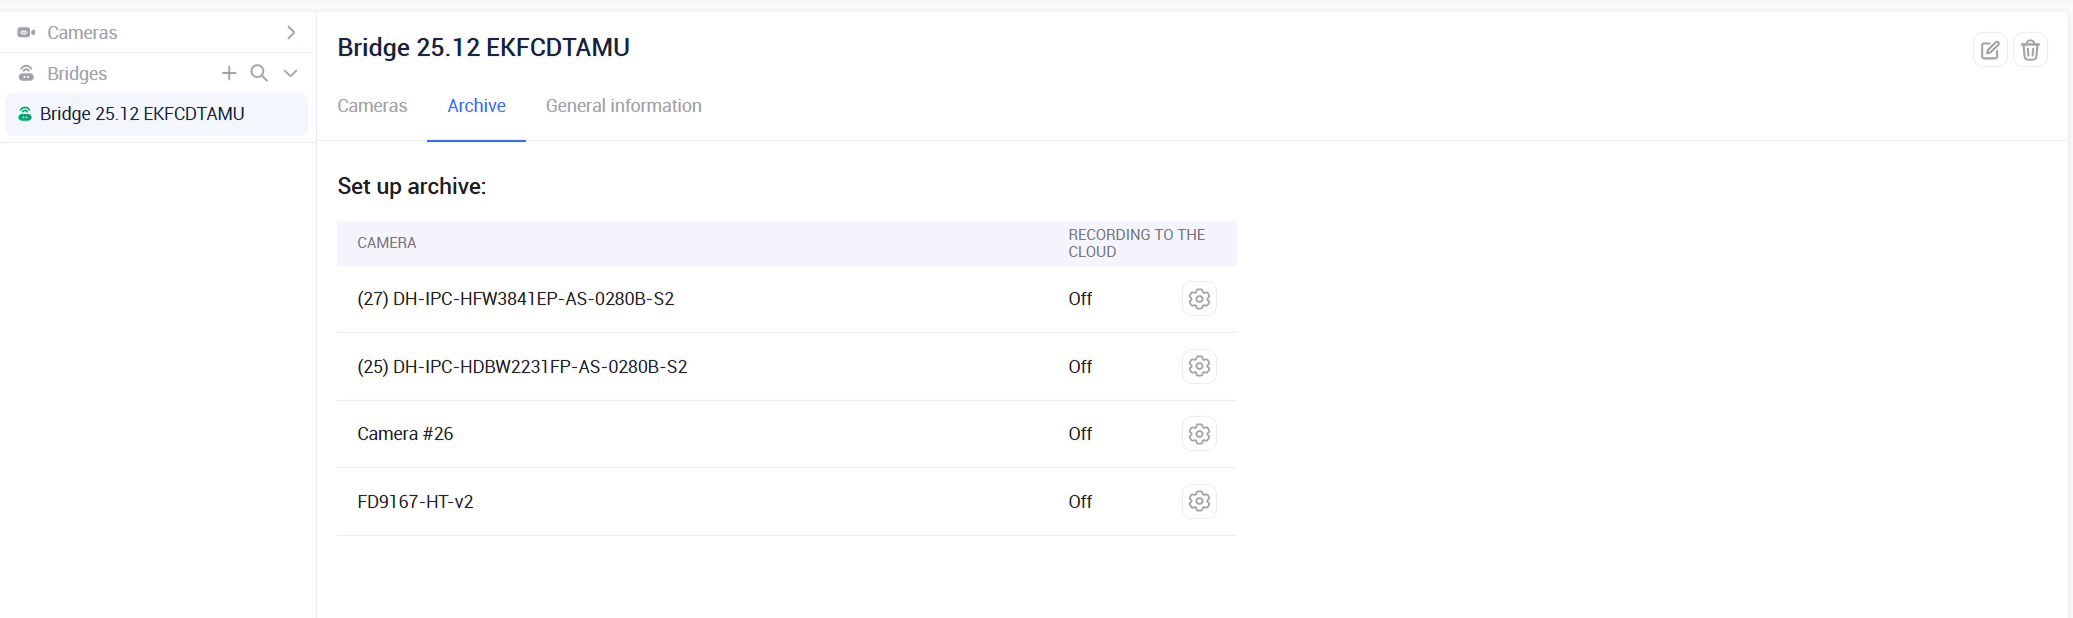
In the Set up archive section, you can enable or disable archive recording and configure the storage duration individually for each camera. By default, the archive storage is off.
When archive recording is activated on a Bridge device camera, the system automatically defaults to using the HD stream for a higher quality archive.
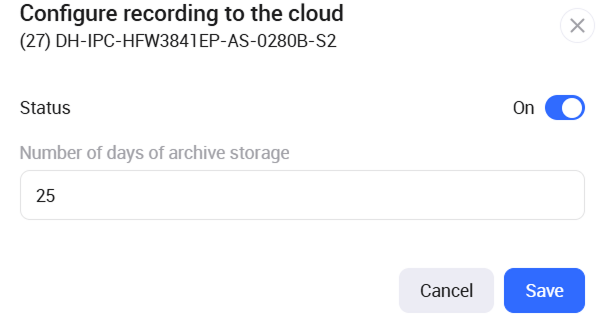
To configure the Recording to the cloud settings, select the Settings icon of the relevant camera. In the opened panel, set the toggle to On and specify the number of days to store the archive. The minimum number of days is 1 (one).
Select Save to save the settings.
The General information tab
In the General information tab, you can track the general details of the current bridge.
.png?cb=bcbba7a73a947cd8b64256fe0752630c)
In the About device section, the following details are presented:
-
Bridge name
-
Bridge IP address
-
Bridge MAC address
-
Bridge serial number
In the Updates section, the following details are presented:
-
Current software version of the bridge
-
Date of the last software update
Manage cameras
The Cameras tab offers the main tools for managing cameras, accessible from the Bridge card.
Discovered cameras
The Discover Cameras action button opens a list with cameras that are discovered by the bridge. From here, you can connect cameras to the bridge.
For the bridge to be able to discover a camera, the following conditions must be met:
-
The camera supports the ONVIF protocol, and ONVIF connectivity is enabled on the camera.
-
The camera is connected to your network via Wi‑Fi or Ethernet.
For each camera, the following information is available:
-
Camera status, indicated by a color code:
-
Green – Active
-
Red – Not active
-
Yellow – Partially active
-
Grey – Empty
-
-
Model
-
IP address
Connect discovered cameras to the bridge
You can add a discovered camera from the list via the ONVIF or RTSP protocol.
Connect via ONVIF
ONVIF connection automatically generates video stream links.
If the camera supports built‑in options such as PTZ and Event detection, these will also be available for management from within the ONVIF services tab.
To connect a camera to the bridge via ONVIF, the following conditions must be met:
-
The bridge and the camera are plugged.
-
The bridge is activated in the system.
-
The bridge and the camera are in the same network or in separate networks that allow broadcast packet transmission.
-
ONVIF is enabled on the camera.
-
Discovery mode is enabled on the camera.
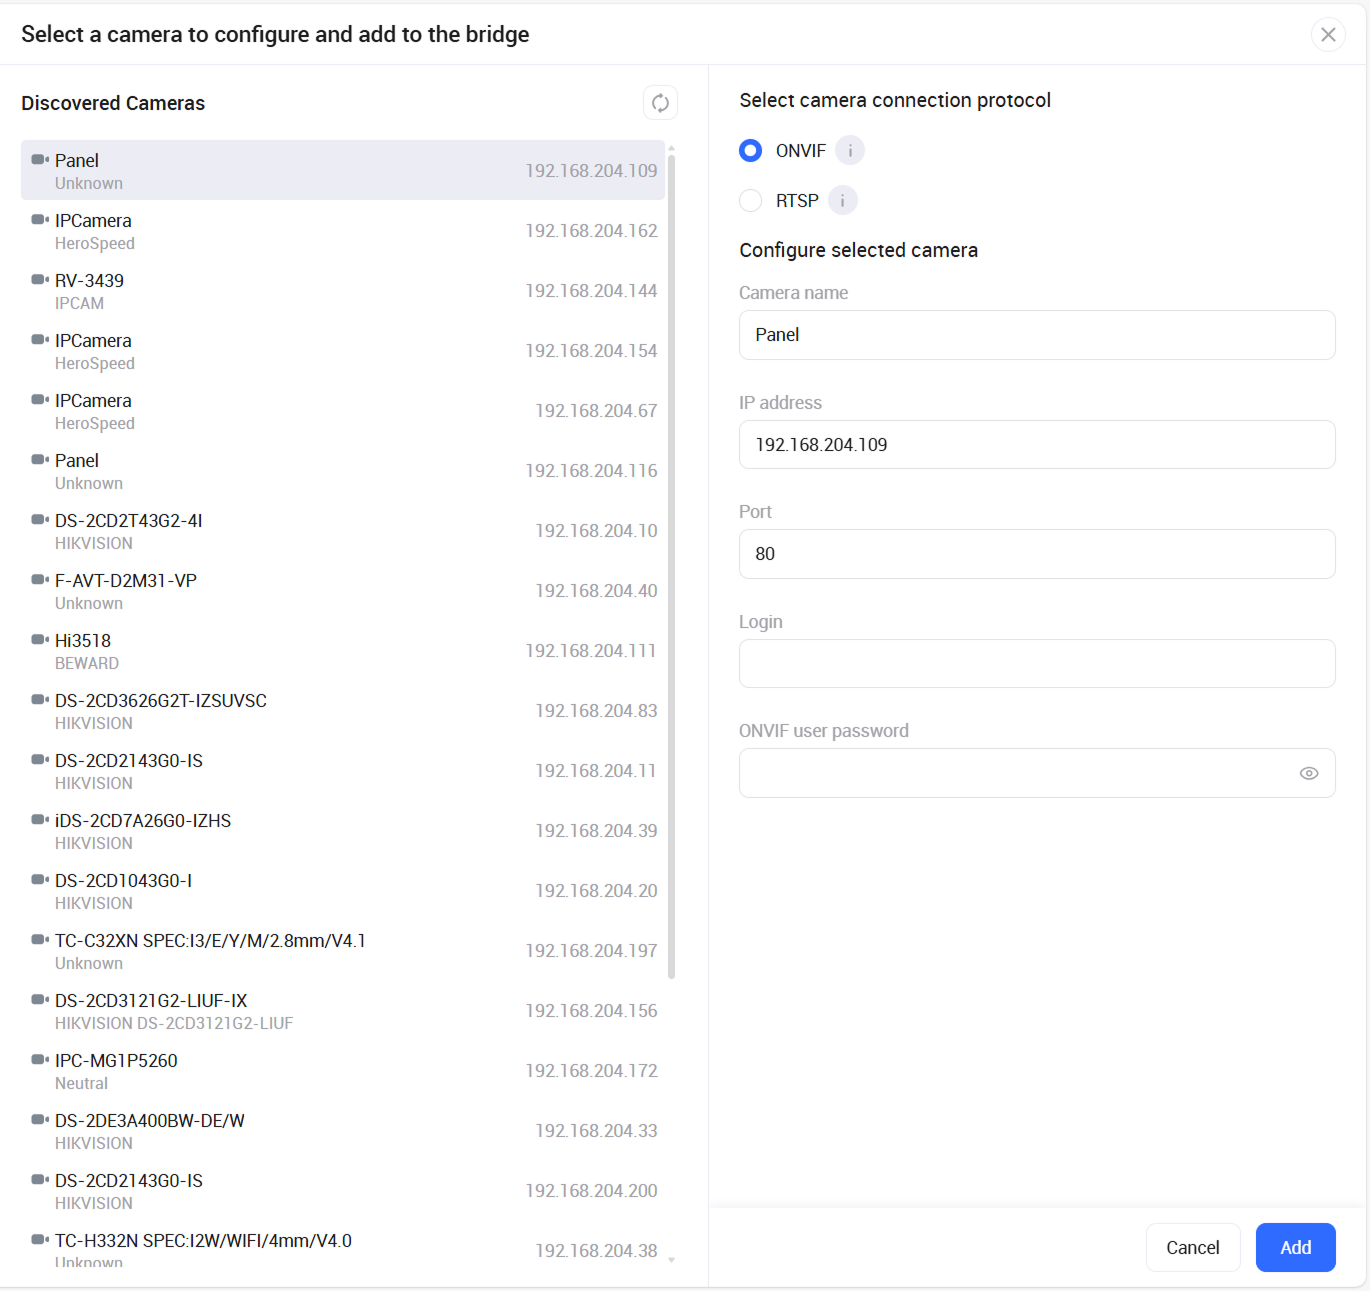
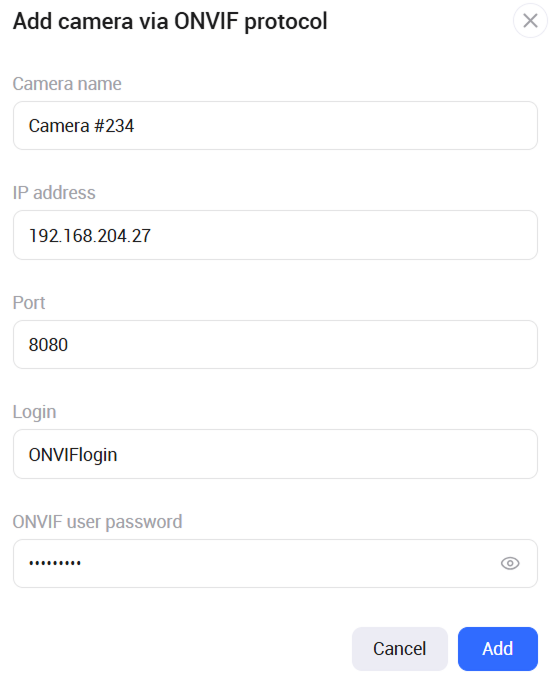
To connect a camera from the list, follow the steps:
-
From the Discovered Cameras list, select a relevant camera.
-
Select the ONVIF protocol to connect. The moment you select a camera from the list of discovered devices, the system instantly populates all critical parameters – including name, IP address, and port.
-
Complete the fields:
-
Login – input the ONVIF login.
-
ONVIF user password.
-
Select Add to complete the process.
.png?cb=48e36b2fd22b74a4ea10241458d4275f)
Next, the system performs the following checks:
-
Activation and availability of the ONVIF service on the camera.
-
Validity of the credentials provided for authorization.
-
Camera connection capacity. The system verifies whether the bridge has available capacity to connect an additional camera. The possibility to connect a camera to a bridge depends on the limits set by the administrator in the Administrator interface. If the number of connected cameras reaches the administrator‑defined maximum, the system displays a notification and prevents the addition of a new camera.
-
Availability of a free license.
Once the camera is successfully connected:
-
The following data is transmitted via the ONVIF protocol:
-
Manufacturer
-
Model
-
Serial number
-
In the camera card, on the Connection protocol tab, you can find the following ONVIF information:
-
Login
-
Password
-
Port
-
ONVIF client IP address
-
The status of the ONVIF connection is updated to Connected.
-
In the camera card, the Streams tab is automatically populated with the addresses for HD and SD streams, along with additional information for each stream. When streams fail to generate, fields stay empty and the Add streams via ONVIF button appears.
-
In the camera card, the ONVIF services tab displays available camera built-in options to manage: PTZ, Events receiving.
-
A license for Video surveillance camera is considered consumed.
-
The added camera is now displayed in the list of cameras added to the bridge, as well as from within the Cameras tab in the All cameras and Camera tree sections of the web interface. The cameras are marked with a special Bridge camera icon.
Connect via RTSP
RTSP connections require manual entry of stream links.
PTZ and event detection features are not supported.
To connect a camera to the bridge via RTSP, the following conditions must be met:
-
The bridge is activated in the system.
-
The bridge is connected to the network.
-
The bridge is connected to Internet.
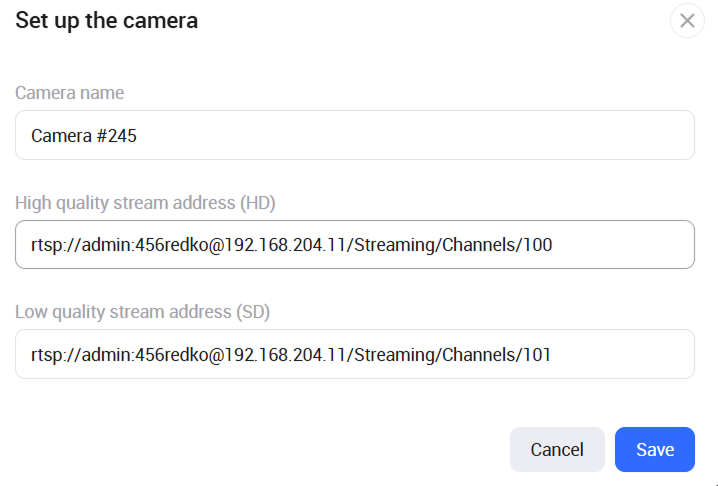
To connect a camera from the list, follow the steps:
-
From the Discovered Cameras list, select a relevant camera.
-
Select the RTSP protocol to connect. The moment you select a camera from the list of discovered devices, the system instantly populates the camera name.
-
Complete the fields:
-
Camera name
-
HD stream address
-
SD stream address
-
Select Add to complete the action.
.png?cb=c03913bda99cf55dd06d05fecefb2467)
Next, the system performs the following checks:
-
Camera connection capacity. The system verifies whether the bridge has available capacity to connect an additional camera. The possibility to connect a camera to a bridge depends on the limits set by the administrator in the Administrator interface. If the number of connected cameras reaches the administrator‑defined maximum, the system displays a notification and prevents the addition of a new camera.
-
Availability of a free license.
Once the camera is successfully connected:
-
The status of the RTSP connection is updated to Connected.
-
A license for Video surveillance camera is considered consumed.
-
The added camera is now displayed in the list of cameras added to the bridge, as well as from within the Cameras tab in the All cameras and Camera tree sections of the web interface. The cameras are marked with a special Bridge camera icon.
When two streams are configured for the camera, the camera's General information tab displays the following data from the HD stream: a camera name, manufacturer, model, serial number, MAC address.
Add a camera manually
For complex network environments, the system soffers full manual configuration from within the Add Camera Manually drop-down menu, providing the perfect synergy between automated speed and professional-grade control. Here, select the protocol to connect a camera: ONVIF or RTSP.
.png?cb=135e68ed8381919078e663b5602c3ee0)
Once the protocol is selected, the system displays the camera addition form. The required fields vary according to the selected protocol.
To connect a camera via ONVIF, complete the fields:
-
Camera name
-
Camera IP address
-
Port
-
ONVIF user login and password.
To connect a camera via RTSP, complete the fields:
-
Camera name
-
HD stream address
-
SD stream address is optional
Camera addition conditions, system checks, and outcomes are identical to those outlined above for discovered cameras connected through ONVIF and RTSP protocols.
The added camera is now displayed in the list of cameras added to the bridge, as well as from within the Cameras tab in the All cameras and Camera tree sections of the web interface.
.png?cb=34fdbd583c15a9733d0056079c84c9f9)
View details of the added camera
To access camera details, select a row with this camera. This opens a page where camera information is grouped on the multiple tabs.
General information
On the General information tab, you can view the following camera details.
.png?cb=096585bdc5abae5a1581e4db37f6a86d)
In the About device section:
-
Camera name
-
Manufacturer
-
Model
-
Serial number
In the Network settings section:
-
IP address
-
Port
-
MAC address
The tab features the camera feed.
Streams
The Streams tab shows video stream addresses. All fields are read‑only.
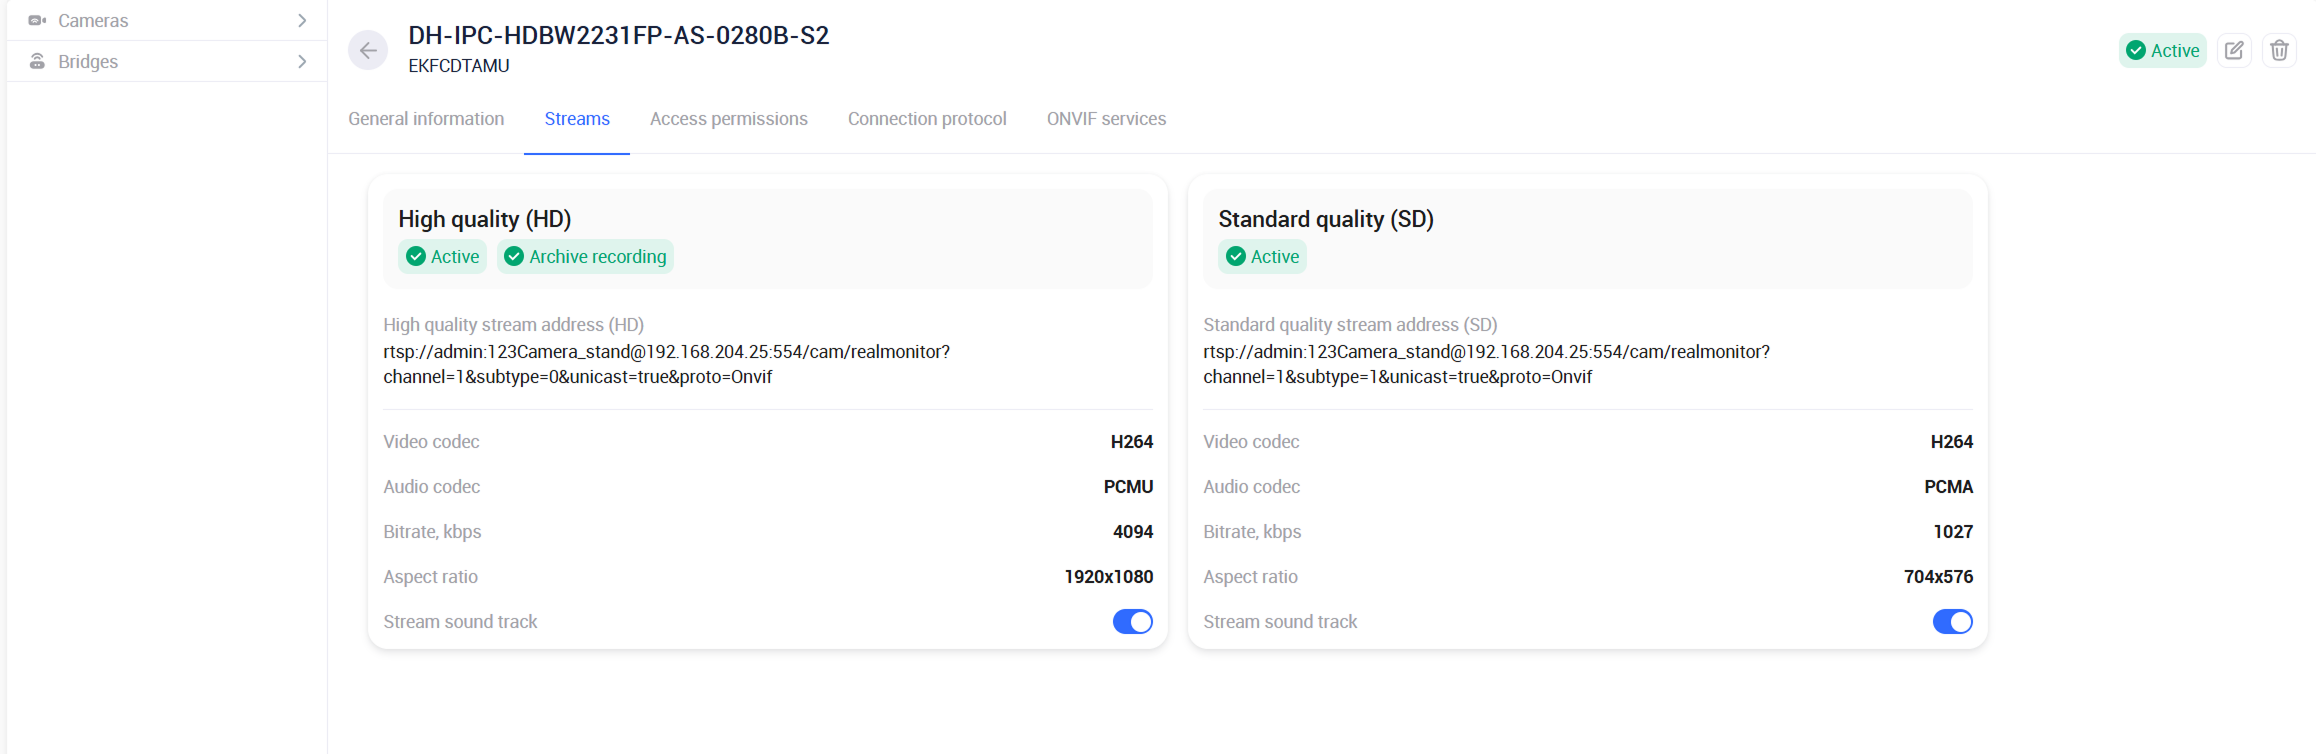
Each stream features the following information:
-
Status – possible values:
-
Initialization – from the moment the video stream is added until the status changes to Waiting.
-
Waiting – from the moment the mediaserver is ready to receive video frames until the status changes to Active.
-
Active – from the moment the mediaserver starts receiving video frames from the Bridge.
-
-
Video codec
-
Audio codec
-
Bitrate
-
Aspect ratio
-
Stream sound track toggle controls audio availability for both live playback and archive recording.
-
Enabled:
-
Live stream playback in the player includes audio.
-
Archive recording is performed with audio.
-
-
Disabled:
-
Live stream playback in the player is muted.
-
Archive recordings are captured without audio.
-
-
Access permissions
The Access permissons tab is available to users who have access to the Users section and the rights to view and administer sub‑users.
The Access permissons tab features the list of subusers created by the current user. These subusers are granted access to bridge cameras.
.png?cb=dc885b9a722808715c03853fe74cedb5)
On the page, you can perform the following actions:
-
Add a user. Selecting the Add user button navigates you to the Settings tab, where you add a subuser by completing a newly opened form. Under the Camera access section, the subuser is automatically authorized to view the associated Bridge camera.
-
Edit the user list. Selecting the Edit list button navigates you to the Settings tab, where you can view and manage the users.
Connection protocol
On the Connection protocol tab, you can view and manage the connection protocol.
Displayed fields vary by connection protocol and status.
-
For ONVIF connections, settings are shown in view‑only mode.
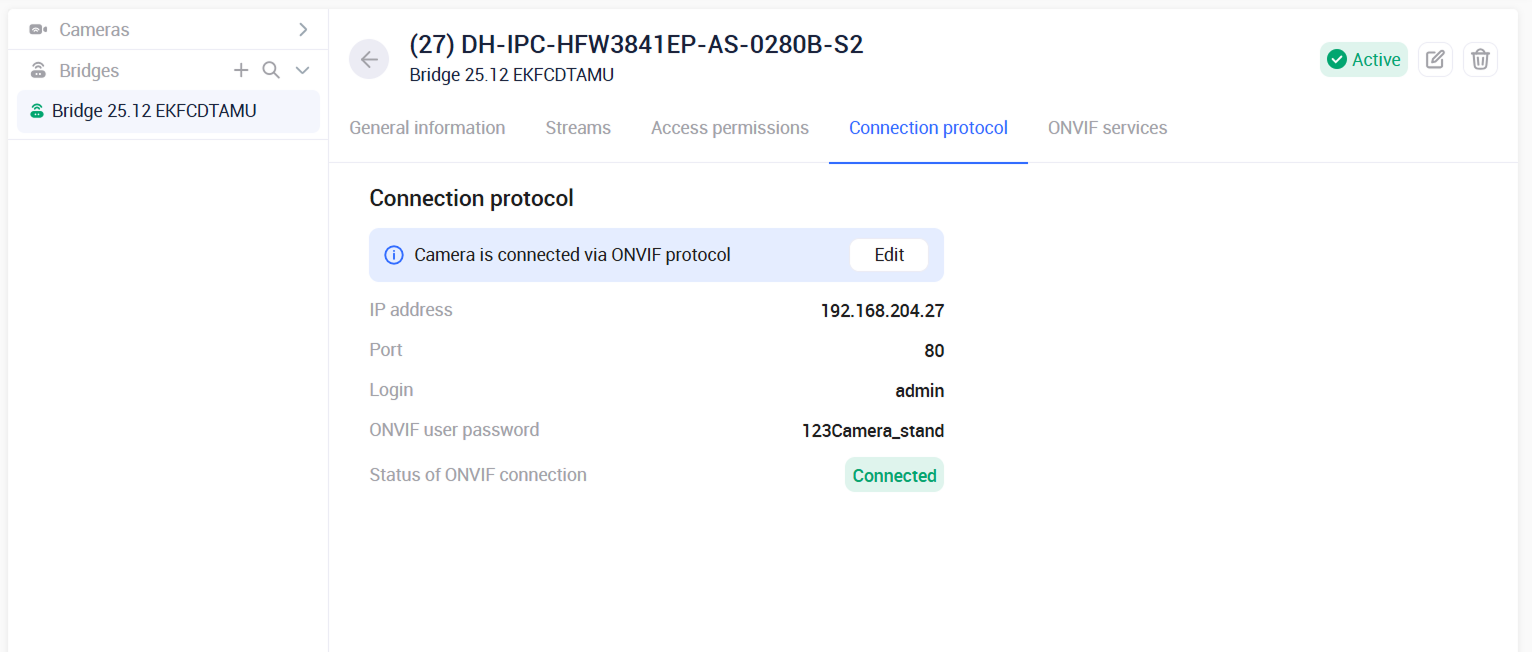
-
For RTSP connections, stream addresses are shown in read‑only format.
.png?cb=a3cb9f0345582d8fd7eb6d64f4b5b7fe)
Editing the connection protocol
Upon successful connection, the Edit button is shown. Selecting it opens the Connection protocol settings form, which adapts to the active protocol.
.png?cb=bd07aa3f0bdf7f8bc7987b84daeb5f0a)
.png?cb=b03f2debef72b27de735960d97e2dcce)
From within the form, you can perform the following actions:
-
Change the connection protocol.
-
For ONVIF: view and edit the connection settings.
-
For RTSP: view the stream addresses.
Switching from ONVIF to RTSP requires manual entry of stream addresses.
Switching from RTSP to ONVIF requires completing connection settings.
Apply the changes by selecting Add.
When ONVIF connection settings are modified or the protocol is changed, the system re‑runs the camera connection procedure. This process covers availability verification, data exchange, stream address refresh, and related operations.
When a stream address is modified, the user retains access to the previously generated archive if cloud archive recording was enabled.
ONVIF services
The ONVIF services tab is available for cameras connected via ONVIF. From the new ONVIF services tab, you can easily activate and manage additional features provided by the camera manufacturer.
The ONVIF services offered by the camera manufacturer are available only if all the following requirements are met.
-
ONVIF services must be enabled directly via the camera’s native settings, independent of the VMS platform.
-
Within the ONVIF services tab, activate a required service:
-
PTZ control
-
Event receiving, and define the event types to be received.
-
-
PTZ control. Bridge supports real‑time remote pan, tilt, and zoom of connected cameras, allowing users to instantly adjust the viewing area without any extra software. The toggle determines whether PTZ camera controls are shown in the camera player. By default, PTZ controls are disabled.
-
Built‑in events receiving. By default, the option is disabled. The Events receiving toggle controls whether the system receives camera events via the ONVIF protocol. Once enabled, select which events to receive, and the system delivers them instantly.
.png?cb=a592883b3829cb7ba395ba70381f8fbe)
Select Save to apply the changes.
In the web interface, you can track the events received via ONVIF from within the Events tab > Camera events.
Change of the camera IP address
Tracking of IP address changes is supported for cameras connected to the Bridge and assigned via DHCP. If a camera’s IP address changes, the Bridge automatically updates the RTSP links for the video streams captured from that camera. This ensures uninterrupted access to live streams without requiring manual reconfiguration.
Functional limitations
-
IP address tracking constraints. Tracking camera IP address changes for cameras connected to the Bridge device is subject to the following network requirements:
-
The bridge can track cameras located within its own broadcast domain, meaning within the same network.
-
Tracking across different networks is possible, provided that broadcast traffic forwarding is configured between them (e.g., Directed Broadcast, VPN tunnel, etc.).
-
Tracking camera IP address changes is only possible for cameras with the ONVIF protocol enabled and Discovery Mode activated.