The Apartments tab. The Administrator client
On the Apartments tab, you can perform the following actions:
Enter the range of apartment numbers associated with the current intercom.
Link users and keys of the apartments.
Link a landline phone number and a SIP account to apartments.
Diagnose the line resistance for an apartment.
Enable and disable:
Calls to a landline phone.
Calls to an analog intercom handset.
Calls to a SIP account.
Calls to an analog intercom handset and SIP account.
Configure apartments. Here, you can manage general settings for all apartments and individual settings for each apartment. A detailed description of the settings is provided in the Apartment settings section.

The Apartments tab
The apartment range is specified in the Flat numbers from and Flat numbers to fields. Once editing is complete, select Save.
On the page, you can search:
By key
By apartment
By username
By user login
An import function is provided, with which you can download a list of apartments with data. For a description of the function, see the Export and import apartment data documentation section.
For each apartment, a set of functions is available in the table. Hover over a button to see a tooltip:
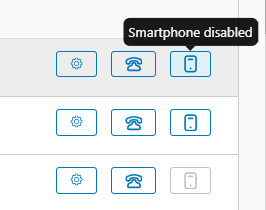
The management options
Below, you find the description of the function buttons:
.png?inst-v=b63742cc-00c9-4c22-96cb-e64d375db7d7) | Apartment line resistance diagnostics. The button is displayed for Matrix-switching and Combined 1 connection types (if calls to analog intercom handset are enabled). |
 | Individual settings for each apartment. The set of settings depends on the intercom vendor and connection type. A detailed description of the settings is provided in the Apartment settings section. |
.png?inst-v=b63742cc-00c9-4c22-96cb-e64d375db7d7) | Enable and disable calls to a landline phone. The button is displayed for the Fixed connection type. |
 | Enable and disable calls to a mobile device. The button is displayed for the Smart and Combined 1 connection types. |
 | Enable and disable calls to an analog intercom handset. The button is displayed for Matrix-switching and Combined 1 connection types. |
The connection scheme you choose determines the type of call allowed. You can only enable or disable the call type associated with the current scheme. To use a different call type, please select a different connection scheme.
Please allow some time for changes to be applied and the button's enabled/disabled status to be updated.
Configure settings for an apartment
Select a line with the relevant apartment to navigate to the detailed settings.
You can modify the settings on the following tabs:
Users – the list of users of the current apartment.
Keys – the list of the keys of the current apartment.
.png?inst-v=b63742cc-00c9-4c22-96cb-e64d375db7d7)
Configurations for an apartment
Apartment settings include:
Phone number. Specify the landline phone number to receive calls from the intercom on the landline phone. It’s available only when the Fixed or Combined 2 scheme in the General data tab is selected.
SIP account. The SIP account for the current apartment is available only if one of the following type of connection is selected on the General data tab: Smart, Combined 1, Combined 2. It is configured after the SIP server is set up (see the SIP-server section below). Specify it to receive calls from the intercom on the landline phone and mobile application.
Configuration of the list of users for the current apartment.
Configuration the list of keys and linking them to users.
Once editing the Phone number and SIP account fields is complete, save the changes.
The List of users
The List of users table displays the list of users associated with the selected apartment.
To link a new user, select the Add user button ( + ).
.png?inst-v=b63742cc-00c9-4c22-96cb-e64d375db7d7)
Add a user
As a result, the form for completion will be displayed.
Available users added in the Users and Temporary users sections, who are not linked to any apartment, can be selected.
To remove users, select the users to be deleted. Then the Delete user button will appear.
If a key is linked to a user, unlinking the user will cancel the association, while the key will remain in the list of added keys for the apartment.
For each user, you can restrict video viewing from the current intercom camera and set restrictions to the door opening options.
Open the door with a chip key. If you disable the option, all the user’s keys become inactive.
Open the door with a time code. If you disable the option, all the temporary (time codes) are deleted. If you disable the option, in the mobile app of the user, the Visitors tab becomes unavailable in the Intercoms section.
Open the door from the mobile app. If you disable the option, it will result in the door opening button becoming unavailable in the mobile app of the user in the Intercoms section.
Open the door using facial recognition. Disabling the option stops opening a door by facial recognition. At the same time, the Photos to open tab won’t be displayed anymore in the intercom settings of the user’s mobile app.
Restrict live video viewing. If you enable the option, you’ll restrict access to viewing the intercom camera video in Live mode from all user’s devices.
Restrict viewing archived videos. If you enable the option, you’ll restrict access to viewing the intercom camera video in archive mode. In the case of the existing events (answered and missed calls), viewing the archive video is available 15 seconds before and 30 seconds after the vent.
Changing the settings on the General data tab will result in update of the individual settings for each user.
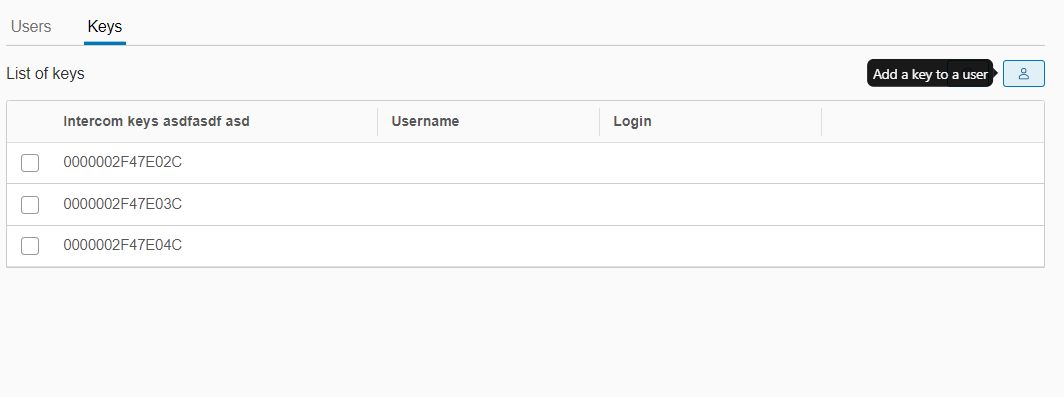
The Key list
The Key list table displays the list of intercom keys linked to the selected apartment.
You can create new keys from the Keys tab.
.png?inst-v=b63742cc-00c9-4c22-96cb-e64d375db7d7)
The Keys tab
To link a new key to an apartment, select Add a key.
.png?inst-v=b63742cc-00c9-4c22-96cb-e64d375db7d7)
The Add a key button
This will display a key selection form.
You can select from the keys added on the Key list tab, which are not linked to any apartment.
To link a new key to a user, select Add a key to a user.
Add a key to a user
This will display a user and a key selection form.

Linking keys to a user
You can link all available keys to a user or select keys from the available list.
You can select users that are added to the Users list.
You can select the keys that are linked to the current apartment.